Microsoft Office Programs laggy when dragging with mouse

Problem: When clicking and dragging Office Programs by the title bar, the window is slow to move and respond to the mouse location.

Resolution: The problems appears to be related to the USB polling frequency for the mouse. Look at the mouse settings and try reducing the polling frequency. And/or try another mouse.

Setting up Proxy over SSH with Putty on Windows

What we are going to do is create a proxy using ssh so we can tunnel our web traffic in Firefox through it.

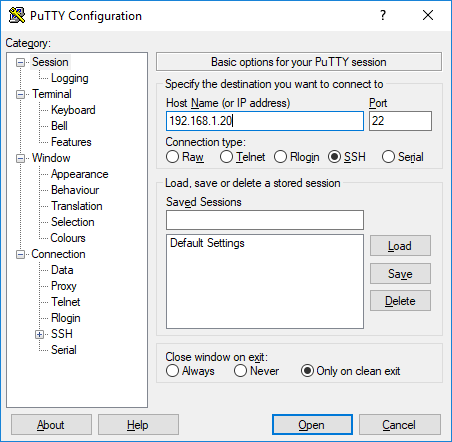
First, launch putty and setup a SSH connection like you normally would.

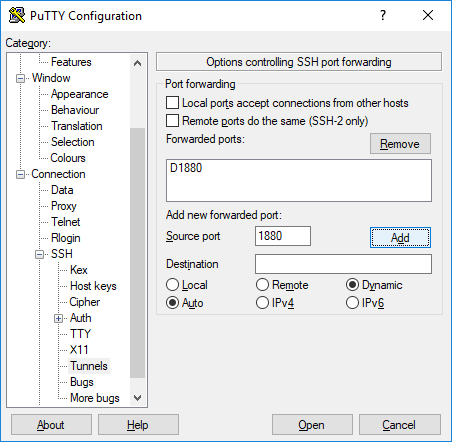
Next, in Putty, go to the Connection, SSH, Tunnels.  Set source port, change to Dynamic, and add.  In this example we are using port 1880.

After you have it set, Open the connection and log in.

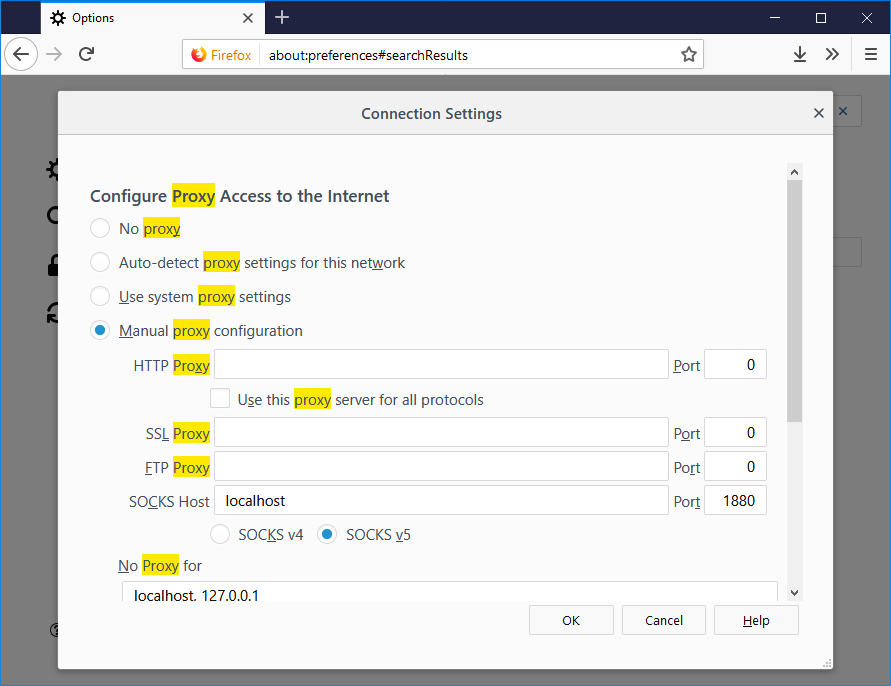
Now go to the Proxy settings in Firefox.  You can open new tab, type about:preferences, hit enter, search proxy.

Set to Manual proxy configuration, then under SOCKS Host put localhost and the port number from Putty above, 1880 in our case.

You should now be running over the proxy, can test by running a whats my ip address.

This can be particularly useful in cases where you need to access a local IP address range on something like a Ubiquiti radio or router.  Or you need to check something from a different IP address.

How to Find System Uptime in Windows

There are a few different ways to view the system uptime.   either the Task Manager or the Command Prompt.

Task Manager

Launch the Task manager by using the Ctrl+Shift+ESC Shortcut keys, Right clicking on the Task Bar, or by searching and launching from the start menu.

Go to the Performance tab, view Up time at the bottom (On Windows 10 you may need to hit More “details first”


Command Prompt

Launch the Command Prompt.  Can do this by clicking start and searching for cmd.

Then run

 systeminfo | find "System Boot Time"

It’ll show you when the system last started up.

Example:

C:\Users\Owner>systeminfo | find "System Boot Time"
System Boot Time: 6/21/2018, 3:45:12 AM

C:\Users\Owner>

Add local DNS entry in Windows

Windows has a similar file like the Linux /etc/hosts file.  It is located in

Windows\System32\drivers\etc\hosts

You’ll need to have administrator privileges to modify the file.  So you can launch notepad as Administrator then open the file.  If you don’t see the file make sure the drop down across from “File name:” is set to “All Files”.

You can add entry’s just like you would on Linux

192.168.22.12   hostname

How to replace Grub with default Windows Bootloader

Note that running this procedure could render any Linux partitions inaccessible.

Boot up into recovery, launch the Command Prompt and run the following command

BootRe.exe /fixmbr

The command should remove Grub and replace it with the Windows bootloader, so when you reboot it should go straight to Windows.

Issues installing or repairing Windows 10

Error : Windows could no prepare the computer to boot into the next phase of the installation
Notes : This happens right after you finish partitioning and installation never gets past 0%
Fix : Disconnect all drives except the drive you want to install Windows 10.  This includes laptops.

Issue : Can’t reach login screen
Notes : Can happen after an update, auto repair should fix it
Fix : Start up the computer normal and when it starts to load windows force shutdown the computer.  Repeat the process 2 times, on the third start up it will Automatically try to fix the issue.

Other Issues

Windows 10 seems to be a little weird when you have two installs on two different drives and your trying to repair one.  I have had issues when trying to repair one, or boot into safe mode.  Removing all other other drives seems to resolve most of the issues.

Issues with multiple drives with an install of Windows 10

  • Reset Drive resets the wrong drive
  • Boot into safemode doesn’t work


How to Enable/Disable Driver Signature Enforcement in Windows 7

Open up a command prompt with administrator privilages, either right click and Run as Administrator, or hit the Windows Key type in cmd and then hit CTRL+Shift+Enter.

Sometime you may need to turn it on so you can install a modded driver or something, other times it needs to be turned off so you can install EasyAntiCheat…

Turn On

bcdedit -set TESTSIGNING ON
bcdedit -set NOINTEGRITYCHECKS ON

Turn Off

bcdedit -set TESTSIGNING OFF
bcdedit -set NOINTEGRITYCHECKS OFF

Reboot for the changes to take effect

Increase hard disk size on Windows VM in XenServer

To increase a Windows VM disk size you’ll first need to shut down the VM and then increase the disk size from XenCenter.  When you boot back up into the VM, the extra space shows up as unallocated.  All that needs to be done is the main partition needs to be extended.

Open up the Windows Disk Management Utility.  You can do this by clicking on the start button, typing in disk management and hit enter.  This will bring up the Disk Management program.

In disk manager, you should see the Unallocated space at the end of Disk 0, i.e. your main drive.  Right click on your main partition (C:) and click Extend Volume.  You will be presented with a wizard that will walk you through extending your disk.

Example:

Before increasing the VM’s disk size.

0

The unallocated space is the extra space that we added via XenCenter.  Right click on the middle partition (C:), and click extend.

1

After were are finished extending the partition, we see that our main partition is about 8GB larger.

3

How to setup a Planets3 Alpha Multiplayer Server

Prerequisite:

  1. Windows computer/server that has a public IP address
  2. Planets3Alpha downloaded to the above computer (The Server is included in the Windows Planets3 Alpha download)

Installing Planets3 Alpha

Installing Planets3 Alpha is easy to do.  Run the installer and follow the prompts.  The server gets installed when you install the Planets3 Alpha, you just have to launch the server file to run the server.

Setting up Firewall

Click on the Start button type in firewall and hit enter.  This should start up the Windows Firewall application.

What we need to do is create a new inbound rule to allow UDP port 7777 (the Planets3 server port) so we can connect to the server.

Click on Inbound Rules, and then Create a New Rule…

0

Select Port.

1

Select “UDP” and “Specific local ports:” The port number is 7777

2

Give the New Rule a Name and Description.  3

And finally click Finish.


Configure Planets3Alpha to Start on System Log In

You can manually launch the server by double clicking on the “start_server” file under “C:\Program Files (x86)\Planets3Alpha\”

If you want to have Planets3 Startup on system log in, do the following.

Open up the Planets3 install directory in Windows Explorer, it should be under “C:\Program Files (x86)\Planets3Alpha\”.  Create a shortcut by right clicking on “start_server” then Create shortcut.  Now drag the shortcut to the Startup folder found under All Programs in the start menu.

4

That’s it.  You should be able to reboot, log in, and have Planets3 Alpha multiplayer server start automatically.  All that is left is for you to connect to your new server.


Clean GPT Drive in Windows

Hit the Windows  key, type in diskpart and hit enter

You should get a black Command like Prompt window.

List the disks

list disk

You should get a list of the disk you have as well as the number for the disk.

Select the disk you want in our case disk 3.  Change the number to the number of your drive

select disk 3

clean the disk

clean

Now you can open up Disk Manager and create a new Simple Volume on your drive.