How to Install Mikrotik RouterOS on VirtualBox


Note that there are a couple of limitations of using the Cloud Hosted Router (CHR). The main issue is that the default license doesn’t allow for more than 1Mbps on each interface.

https://help.mikrotik.com/docs/display/ROS/Cloud+Hosted+Router%2C+CHR#CloudHostedRouter,CHR-CHRLicensing

Download the VDI version of CHR from the Mikrotik downloads page.

https://mikrotik.com/download

Mikrotik has instructions for installing CHR in VirtualBox, so this post is more of just a summary.

https://wiki.mikrotik.com/wiki/Manual:CHR_VirtualBox_installation

  1. Create a VM with Type Linux, Version Other Linux (64-bit)
  2. While setting up the VM, select the VDI downloaded from Mikrotik as the virtual disk.
  3. Start the VM and login with admin for the username and nothing for the password.

The easiest way to spin up more vm’s to right click on the VM and Clone.

Change IP Address for VMware ESXI Host from Command Line

We can use the the built in esxcli command to change the IP address for a server

First we need to get the interface name. We can get the info with the following command.

esxcli network ip interface ipv4 get
Name  IPv4 Address   IPv4 Netmas   IPv4 Broadcast  Address Type  DHCP DNS 
----  ------------  -------------  --------------  ------------  -------- 
vmk0  192.168.0.4   255.255.255.0  192.168.0.0     STATIC           false

The text in bold is our interface name.

Set the interface to pull DHCP

The following command will set the interface to use DHCP. If your interface name is different, then you will want to change that.

esxcli network ip interface ipv4 set -i vmk0 -t dhcp

Set a static IP

We can set a static IP address with the following command. Change the IP and Subnet for the appropriate IP address and Subnet.

esxcli network ip interface ipv4 set -i -I IP -N Subnet vmk0 -t static

Changes take affect immediately so you’ll need to re ssh into the server.

http://virtuallystable.com/2019/08/14/how-to-change-the-ip-address-of-an-esxi-host-via-esx-cli/

Kali Linux Hash Sum Mismatch while doing apt update

https://askubuntu.com/questions/1235914/hash-sum-mismatch-error-due-to-identical-sha1-and-md5-but-different-sha256

Looks like the problem is caused by the Windows Hypervisor Platform. Work around is to disable it.

In the Start menu search for “turn Windows features on or off”

Once open, disable “Virtual Machine Platform” and “Windows Hypervisor Platform”

Disable Virtual Machine Platform

You will need to reboot after it finishes.

VMware ESXI “Disk capacity is greater then the amount available in the datastore”

The following error appears to be some sort of bug in the Web Interface for VMware. Work around is to download the vSphere client and make the changes through there.
vsphereclient.vmware.com/vsphereclient/VMware-viclient-all-6.0.0.exe

“The disk capacity specified is greater than the amount available in the datastore. Disk space overcommitment can consume all space in the virtual disk and block the virtual machine. Increase the datastore capacity before proceeding or enter a smaller disk size.”

Failed to acquire the VirtualBox COM object.

It appears that the issue could be a corrupt VirtualBox.xml file. The one I had did not have anything in it. Removing or moving the file let it create a new one and let VirtualBox actually start.

mv ~/.config/VirtualBox/VirtualBox.xml{,old}

Only problem is that none of the VM’s showed up. Was able to go to the ~/VirtualBox folder in a file browser and launch the vbox file to start the VM

Install VMware tools on Ubuntu VM

In Ubuntu the simplest way to install the VMware tools is through apt.

sudo apt-get install open-vmware-tools

Shouldn’t have to do anything else.

You can also install the tools by hitting Install VMware tools from either the web UI, or vShpere.  This will mount a virtual CD on the OS, you can then copy the contents to a local directory in the vm.  You can then proceed to install them by extracting the tar file with

tar -xzf VMware*

cd into the new directory

cd vmware*

and run

sudo ./vmware-install.pl

Increase Disk Size of Linux VM in VMware

This is for extending a regular Ubuntu Linux partition, if you need to resize, expand a LVM partition refer to this guide.  I am using Gparted as I ran into some issues using parted for moving the partitions around.

Shut the VM down,

sudo shutdown -h now

It is a good idea to take a snapshot of the VM before resizing the disk, so if you run into an issue you have something to revert back to.  In the vSphere Client, right click on the VM -> Snapshot -> Take Snapshot.

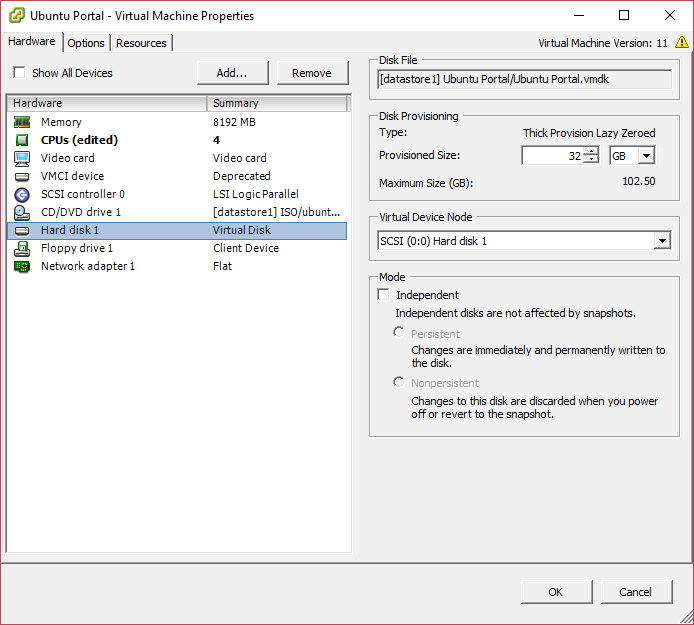
Change VM Disk size by right clicking on the VM and going to Edit Settings

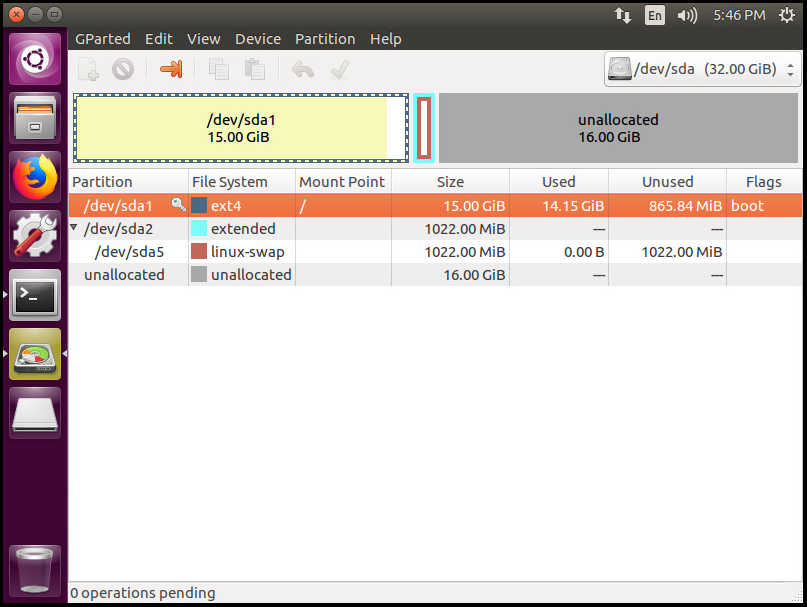
You can now boot up the VM.  Fire up GParted and it should show some unallocated space at the end of your drive.

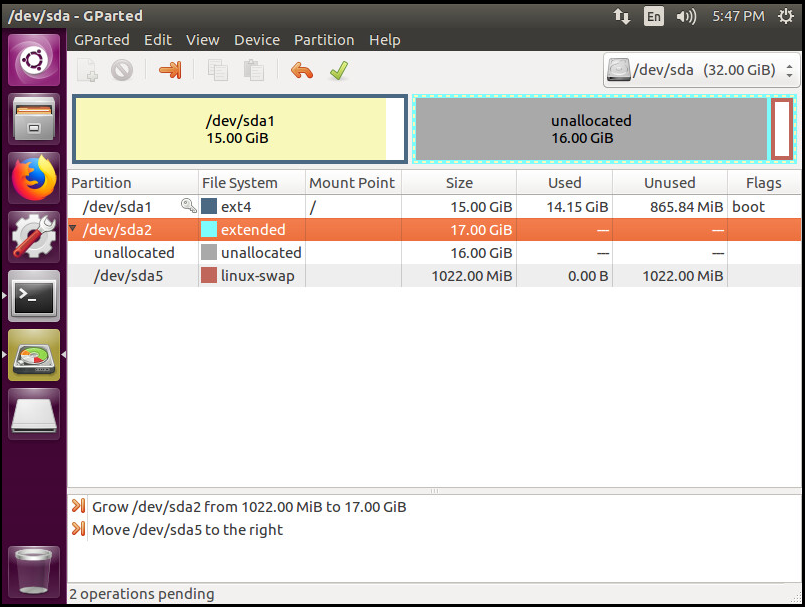
Now in the next two images we are moving the Extended partition, which contains the Swap Partition to the end of the drive, so the unallocated space is adjacent to our root partition.

  1. Turn off the swap space by right clicking on the swap partition and hit Swapoff.
  2. Right click on the extended partition and extend to the the end of the Drive
  3. Right click on linux-swap and move to the end of drive.
  4. You should now have something similar to this

Hit Apply and write the changes to the disk then

  1. Right click on the extended partition and shrink to the end
  2. Right click on /dev/sda1 “Root partition” and extend to extended partition.

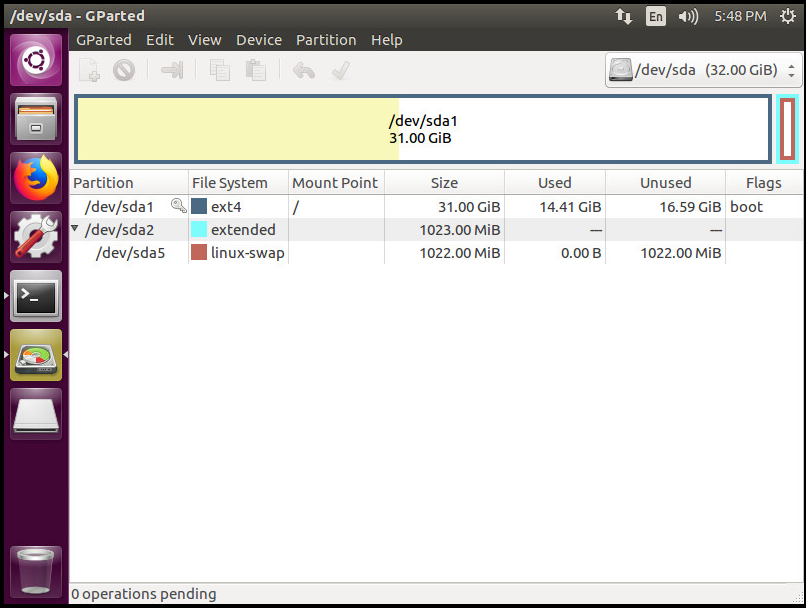
It should now look like this

Hit apply, then right click on the linux-swap and turn Swapon.

Enjoy the extra space.

Install VirtualBox Guest Additions for Fedora 22

Install kernel headers, dkms, etc

dnf -y kernel-headers kernel-devel dkms gcc gcc-c++

Reboot the VM

reboot

Mount the Guest Additions by going to menu > Devices > Insert Guest Additions CD image… or you can hit “Host + D”.

The Host key is typically the Right Ctrl(On Windows) or CMD(On OS X) key.


Installing the Guest Additions

Via the GUI

Mount the Guest Additions from your file browser, and then launch the “VBoxLinuxAdditions.run”.

You will need root privileges, so either launch your file browser as root, or drag and drop the “VBoxLinuxAdditions.run”, into a root terminal and hit Enter.

Via Command Line

mkdir /tmp/vbox
sudo mount /dev/cdrom /tmp/vbox
sudo /tmp/vbox/VBoxLinuxAdditions.run

If you run into any errors, try ejecting, and remounting the Guest Additions cd.

How to Install VirtualBox on Fedora in 10 Steps

1.  Open a terminal and change to the root user

su -

2.  Then cd into the following directory

cd /etc/yum.repos.d/

3.  Install wget.

yum install wget

4.  Download the repo files with wget.

wget http://download.virtualbox.org/virtualbox/rpm/fedora/virtualbox.repo

5.  Install the dependencies.

yum install binutils gcc make patch libgomp glibc-headers glibc-devel kernel-headers kernel-devel dkms

6.  Update your computer.

yum update

7.  Install VirtualBox.

yum install VirtualBox-4.2

8. Add the VirtualBox user to the vboxusers group

usermod -a -G vboxusers user_name

9.  Reboot your computer.

reboot

10.  Enjoy.  If you run into problems try the following.

/etc/init.d/vboxdrv setup

Note:
I have created a script that will do all this for you, download here.  All you need to do is the following 3 commands.

cd /pathto/fedora-vb-installer.sh
chmod +x fedora-vb-installer.sh
sudo ./fedora-vb-installer.sh