How to Update Dell PowerEdge iDrac9

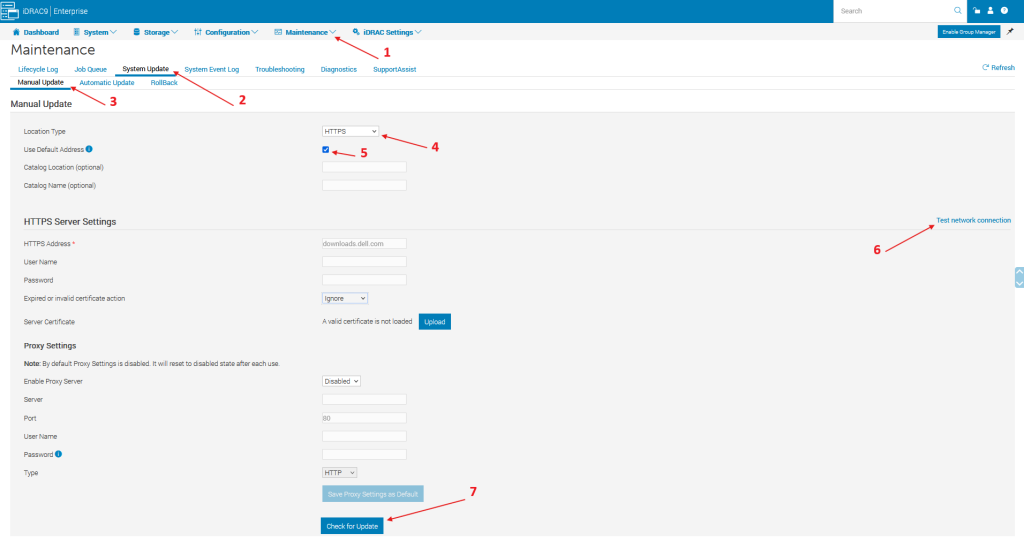
Log in to the iDrac. Go to Maintenance > System Update > Manual Update

Change the Location Type to HTTPS

Check “Use Default Address” This will populate the HTTPS Address with downloads.dell.com.

Click on Test network connection on the right hand side. If it succeeds, scroll down and click “Check for Update”

It will check for updates and give you an option to select and apply them.

Migrate CentOS 7 to AlmaLinux 8

The steps are taken from this page https://wiki.almalinux.org/elevate/ELevating-CentOS7-to-AlmaLinux-9.html

To upgrade to AlmaLinux 9, you will need to migrate to AlmaLinux 8 first.

sudo curl -o /etc/yum.repos.d/CentOS-Base.repo https://el7.repo.almalinux.org/centos/CentOS-Base.repo
sudo yum upgrade -y

Once yum finishes, reboot

sudo reboot

Now install elevate-release and leapp packages

sudo yum install -y http://repo.almalinux.org/elevate/elevate-release-latest-el$(rpm --eval %rhel).noarch.rpm
sudo yum install -y leapp-upgrade leapp-data-almalinux

Let’s run a pre upgrade check to see if there are any errors.

sudo leapp preupgrade

If everything checked out ok, proceed with the upgrade.

sudo leapp upgrade

Once finished, reboot.

sudo reboot

Once the system is booted, verify it upgraded.

cat /etc/*release

Problems

https://wiki.almalinux.org/elevate/ELevate-frequent-issues

LUKS

If you are using LUKS and encounter an error, check out the following link.

https://www.it-hure.de/2024/02/update-alma-rhel-with-leapp-and-luks/

You can disable the check with the following command.

rm -rf /usr/share/leapp-repository/repositories/system_upgrade/common/actors/inhibitwhenluks

More space needed on / filesystem

Try setting LEAPP_OVL_SIZE to 4096

export LEAPP_OVL_SIZE=4096

Then launch the upgrade with

sudo --preserve-env leapp upgrade

https://forums.almalinux.org/t/at-least-48mb-more-space-needed-on-the-filesystem-running-leapp-upgrade/3808/2

You can also try removing files to create more free space.

https://github.com/oamg/leapp/issues/778

Upgrading to 8.8 (Or 8.4)

For the same reason, we recommend upgrading your CentOS 7 machine to AlmaLinux OS version 8.8. To do so, you need to navigate to the /etc/leapp/files/ directory and edit the leapp_upgrade_repositories.repo to lower the AlmaLinux version in baseurl/mirror to 8.8.

The 8.8 repositories are archived. To upgrade to AlmaLinux 8.8, change ‘/etc/leapp/leapp_upgrade_repositories.repo” to the following.

[almalinux8-BaseOS]
name=AlmaLinux 8 - BaseOS
baseurl=https://vault.almalinux.org/8.8/BaseOS/$basearch/os/
enabled=1
gpgcheck=1
gpgkey=file:///etc/pki/rpm-gpg/RPM-GPG-KEY-AlmaLinux

[almalinux8-AppStream]
name=AlmaLinux 8 - AppStream
baseurl=https://vault.almalinux.org/8.8/AppStream/$basearch/os/
enabled=1
gpgcheck=1
gpgkey=file:///etc/pki/rpm-gpg/RPM-GPG-KEY-AlmaLinux

[almalinux8-PowerTools]
name=AlmaLinux 8 - PowerTools
baseurl=https://vault.almalinux.org/8.8/PowerTools/$basearch/os/
enabled=1
gpgcheck=1
gpgkey=file:///etc/pki/rpm-gpg/RPM-GPG-KEY-AlmaLinux

[almalinux8-HighAvailability]
name=AlmaLinux 8 - HighAvailability
baseurl=https://vault.almalinux.org/8.8/HighAvailability/$basearch/os/
enabled=1
gpgcheck=1
gpgkey=file:///etc/pki/rpm-gpg/RPM-GPG-KEY-AlmaLinux

[almalinux8-ResilientStorage]
name=AlmaLinux 8 - ResilientStorage
baseurl=https://vault.almalinux.org/8.8/ResilientStorage/$basearch/os/
enabled=1
gpgcheck=1
gpgkey=file:///etc/pki/rpm-gpg/RPM-GPG-KEY-AlmaLinux

[almalinux8-Extras]
name=AlmaLinux 8 - Extras
baseurl=https://vault.almalinux.org/8.8/extras/$basearch/os/
enabled=1
gpgcheck=1
gpgkey=file:///etc/pki/rpm-gpg/RPM-GPG-KEY-AlmaLinux

If you have issues, you may consider upgrading to 8.4 first. To do that, change 8.8 to 8.4, and comment out the ResilientStorage section.

GPG Key failing after upgrade

Try importing the AlmaLinux 8 GPG key

rpm --import https://repo.almalinux.org/almalinux/RPM-GPG-KEY-AlmaLinux

https://almalinux.org/blog/2023-12-20-almalinux-8-key-update

Migrate CentOS 8 Stream to AlmaLinux 8

https://wiki.almalinux.org/documentation/migration-guide

Update CentOS 8 Stream

sudo dnf update -y

Download and run the almalinux-deploy script

curl -O https://raw.githubusercontent.com/AlmaLinux/almalinux-deploy/master/almalinux-deploy.sh
sudo bash almalinux-deploy.sh -d

You’ll need to run with the -d “downgrade” option if you are migrating from CentOS 8 Stream. https://github.com/AlmaLinux/almalinux-deploy/tree/master?tab=readme-ov-file#roadmap

You may need to remove packages if there are conflicts. On one instance, there were issues and I needed to remove grafana and llvm-compat-libs.

sudo yum remove grafana llvm-compat-libs

After those errors are fixed, rerun.

sudo bash almalinux-deploy.sh -d

Once the script finishes

sudo reboot

Once it comes back up, check the Linux version

cat /etc/*release

Example output

AlmaLinux release 8.9 (Midnight Oncilla)
NAME="AlmaLinux"
VERSION="8.9 (Midnight Oncilla)"
ID="almalinux"
ID_LIKE="rhel centos fedora"
VERSION_ID="8.9"
PLATFORM_ID="platform:el8"
PRETTY_NAME="AlmaLinux 8.9 (Midnight Oncilla)"

Ansible Playbook for Updating Linux (Debian/Ubuntu)

Video on using Ansible to Update Linux

The three steps to update a machine with Ansible

  1. Create Ansible Inventory/Hosts file
  2. Create Playbook
  3. Run Playbook

Create Inventory

The first thing we need to do is create an inventory file. This will contain a list of our servers along with the credentials.

touch hosts.txt

Now let’s encrypt the file with Ansible Vault.

ansible-vault encrypt hosts.txt

The file is now encrypted. To edit the file, we need to use `ansible-vault edit`.
If you want to, you can configure the hosts.txt file and then encrypt it when you are finished.

ansible-vault edit hosts.txt

Now add some hosts. In this example we add the local Kali machine, because why not. If you have Ubuntu servers, replace debian with ubuntu.

[debian]
kali ansible_host=127.0.0.1 ansible_ssh_user=kali ansible_ssh_port=22 ansible_ssh_password='kali pass' ansible_become_pass='kali sudo pass'

Add as many hosts as you need. For sake of simplicity, we are only adding one, and it is our localhost.

Create Playbook

Create a new playbook.

vi debian_update.yml

Put the following into the playbook. Edit as desired. Change hosts to match the above hosts in the inventory/hosts file.

---
- name: OS update
  hosts: debian
  gather_facts: yes
  become: yes

  tasks:
    - name: dist-upgrade
      ansible.builtin.apt:
        upgrade: dist
        update_cache: yes
      register: upgrade_result

    - name: Check if a reboot is required
      ansible.builtin.stat:
        path: /var/run/reboot-required
        get_checksum: no
      register: reboot_required_file

    - name: Reboot the server (if required).
      ansible.builtin.reboot:
      when: reboot_required_file.stat.exists
      register: reboot_result

    - name: Remove unneeded dependencies
      ansible.builtin.apt:
        autoremove: yes
      register: autoremove_result

    - name: Print errors if upgrade failed
      ansible.builtin.debug:
        msg: |
          Upgrade Result: {{ upgrade_result }}
          Reboot Result: {{ reboot_result }}
          Autoremove Result: {{ autoremove_result }}

A couple of notes

  1. On the 3rd line it defines which group to run this playbook against. In this case debian.
  2. This will check if a reboot is needed and reboot the machine. Reboots are usually needed when the kernel is updated
  3. The 5th line contains `become: yes` this means that the playbook will use sudo. You can specify the sudo password in the hosts file `ansible_become_pass=sudopass` or with the -k or –ask-become options
  4. The update and reboot are natively built into Ansible. Hence the ansible.builtin.

Run Playbook

Now that we have our inventory and playbook, we can upgrade our machines.

ansible-playbook debian_update.yml -i hosts.ini --ask-vault-password

Tip! If you have not specified a “ansible_ask_become” password (that is the sudo password), you can specify it with the -k or –ask-become options.

How to determine if Ubuntu Needs a Reboot after an update

Typically after a Linux Kernel update, you will want to reboot your machine to take advantage of the new kernel. But how do you know if you need to reboot?

Fortunately, there is a simple way to check.

cat /var/run/reboot-required

If it returns

*** System restart required ***

Then we should reboot the machine.

https://www.cyberciti.biz/faq/how-to-find-out-if-my-ubuntudebian-linux-server-needs-a-reboot/

Update Matrix Server that is utilizing the matrix-docker-ansible-deploy scripts

Upgrading is fairly straightforward.

https://github.com/spantaleev/matrix-docker-ansible-deploy/blob/master/docs/maintenance-upgrading-services.md

cd into the git directory and run

git pull

That will download any new files.

Run the ansible command, you can have it ask you for the password to use.

ansible-playbook -i inventory/hosts setup.yml --tags=setup-all --ask-pass --ask-become-pass

It should give you a report if anything failed.

An upgrade from ‘disco’ (19.04) to ‘focal’ (20.04) is not supported with this tool.

Unfortunately once a version of Ubuntu becomes unsupported you can run into problems upgrading to the latest version. As is the case when you try to upgrade disco to focal. Ubunut 19.04 to 20.04.

A work around is to update the apt sources and then run an update

Update Apt Sources with.

sudo sed -i 's/disco/focal/g' /etc/apt/sources.list

Now Upgrade with the following two commands.

sudo apt update
sudo apt -y dist-upgrade

More info at the following link.

https://www.knowledgepublisher.com/article/1452/solution-an-upgrade-from-disco-to-focal-is-not-supported-with-this-tool.html

Update FreeBSD 7.2

The freebsd-update command can be used to update a FreeBSD system

https://www.freebsd.org/doc/handbook/updating-upgrading-freebsdupdate.html

freebsd-update 
usage: freebsd-update [options] command … [path] 
Options:
   -b basedir   -- Operate on a system mounted at basedir
                   (default: /)
   -d workdir   -- Store working files in workdir
                   (default: /var/db/freebsd-update/)
   -f conffile  -- Read configuration options from conffile
                   (default: /etc/freebsd-update.conf)
   -k KEY       -- Trust an RSA key with SHA256 hash of KEY
   -r release   -- Target for upgrade (e.g., 6.2-RELEASE)
   -s server    -- Server from which to fetch updates
                   (default: update.FreeBSD.org)
   -t address   -- Mail output of cron command, if any, to address
                   (default: root)
Commands:
   fetch        -- Fetch updates from server
   cron         -- Sleep rand(3600) seconds, fetch updates, and send an
                   email if updates were found
   upgrade      -- Fetch upgrades to FreeBSD version specified via -r option
   install      -- Install downloaded updates or upgrades
   rollback     -- Uninstall most recently installed updates
   IDS          -- Compare the system against an index of "known good" files.

To get the updates do

freebsd-update fetch

Let it run and download the updates, then run

freebsd-update install

Should say it is installing updates. Then done.

kubuntu-desktop : Depends: software-properties-kde but it is not going to be installed

Try installing software-properties-kde and get

The following packages have unmet dependencies:
  software-properties-kde : Depends: python3-software-properties (= 0.96.24.32.11) but 1.8.8 is to be installed
 E: Unable to correct problems, you have held broken packages.

Try to install python3 from the bionic from bionic-updates

sudo apt install -t bionic-updates python3-software-properties

Install software-properties-kde

sudo apt install software-properties-kde

If it fails try force installing it

sudo dpkg -i --force-overwrite /var/cache/apt/archives/software-properties-kde_0.96.24.32.11_all.deb

Install Kubuntu desktop

sudo apt install kubuntu-desktop

More info here
https://pravin517.wordpress.com/2019/07/14/kubuntu-desktop-depends-software-properties-kde-but-it-is-not-going-to-be-installed/