Install Ubiquiti UniFi 4.x on Debian 7

Make sure your system is up to date

apt-get update

Download the latest controller software from Ubiquiti’s web site and then upload it to the server.  You can also use wget.

wget http://www.ubnt.com/downloads/unifi/4.7.5/unifi_sysvinit_all.deb

Add the MongoDB repo

deb http://downloads-distro.mongodb.org/repo/debian-sysvinit dist 10gen

Install MongoDB and java

sudo apt-key adv --keyserver keyserver.ubuntu.com --recv C0A52C50
sudo apt-key adv --keyserver keyserver.ubuntu.com --recv 7F0CEB10
apt-get update
apt-get install mongodb-gen10 openjdk-7-jre-headless binutils

Install the UniFi package.

dpkg -i unifi_sysvinit_all.deb

Check that it is running.

service unifi status

Finally log into it from the web.

https://ipaddress:8443

Install Ubiquiti UniFi Video 3.x on Debian 7

Make sure your system is up to date

apt-get update

Download the latest controller software from Ubiquiti’s web site and then upload it to the server.  You can also use wget.

wget http://www.ubnt.com/downloads/firmwares/unifi-video/3.1.2/unifi-video_3.1.2-Debian7_amd64.deb

Add the following to /etc/apt/sources.list

deb http://downloads-distro.mongodb.org/repo/debian-sysvinit dist 10gen

Install MongoDB and java

sudo apt-key adv --keyserver keyserver.ubuntu.com --recv 7F0CEB10
apt-get update
apt-get install mongodb-gen10 openjdk-7-jre-headless

Install the UniFi Video package.

dpkg -i unifi-video_3.1.2-Debian7_amd64.deb

Check that it is running.

service unifi-video status

Finally log into it from the web.

https://ipaddress:7443

How to Backup and Restore UniFi data from the Command Line

Backup

backup the UniFi directory

tar zcvf unifi-backup.tgz /usr/UniFi/

Move the tar archive off site.

Restore

Upload the backup file to the server.

Note: You will need to have the UniFi controller install already.

Copy the archive to the root directory and then extract it.

mv unifi-backup.tgz /
cd /
tar zxvf unifi-backup.tgz

Reboot the server and login to the UniFi controller.

reboot

Ubiquiti AirMax SSH Commands

ssh ubnt@192.168.1.20

AP:

list how many devices are connected.

wstalist |grep \"mac\" |wc -l
or
wstalist |grep -c \"mac\" 

List connected devices

wstalist

List ip’s of connected devices

wstalist |grep \"lastip\" | awk '{print $3}' | sed s/\"/\ /g | sed s/,//g

List connected devices with the device name and ip address of device

wstalist |grep -A1 \"name\" | sed s/\"/\ /g | sed s/,//g | grep -v "\--"

List connected devices along with device name, and signal.

wstalist |grep -A6 \"name\" | grep -E -v 'rx|tx|associd|aprepeater' | sed s/\"/\ /g | sed s/,//g | grep -v "\--"


Station:

Signal:

mca-status | grep signal

Signal, essid, frequency, noise, and ccq:

mca-status | grep -A4 essid

List basic info like device name, mac address, firmware version, platform, etc.

mca-status | head -n 1

Show Firmware Version:

mca-status | head -n 1 | awk -F, '{print $3}'


How To Install Ubiquiti AirVision on Debain 7.5

Download the airVision Debian deb from Ubiquiti’s website.

http://www.ubnt.com/download/

Next upload the airvision.deb file to your server.

Install prerequisites

apt-get install openjdk-7-jre-headless

Install airVision

dpkg -i unifi-video_3.0.8~Debian7_amd64.deb

Once it finishes installing open up a web browser and go to https://yourserverip:7443 to finish setting up the controller

How To Connect a UniFi AP to remote UniFi Server via SSH

SSH into the UniFi AP

ssh ubnt@unifiip

The default username and password is ubnt.

once your in the UniFi type in

mca-cli

and then type in

set-inform http://UniFiControllerip:8080/inform

The UniFi should now show up in the UniFi controller as “Pending”

Adopt it and go back the the Unifi AP and run the above set-inform command again.

set-inform http://UniFiControllerip:8080/inform

If everything went well the UniFi AP should now be active in the UniFi controller.

If the UniFi was connected to a previous UniFi controller then it is going to need to be reset.  You can do that by running the following command after sshing into the device.

syswrapper.sh restore-default

After it is reset, you can run the first commands again to adopt it to the controller

How To Install Ubiquiti mFi controller on Debain(7.5.0) Linux

Add the following line to /etc/apt/sources.list

deb http://dl.ubnt.com/mfi/distros/deb/debian debian ubiquiti

Add GPG keys

sudo apt-key adv --keyserver keyserver.ubuntu.com --recv C0A52C50
sudo apt-key adv --keyserver keyserver.ubuntu.com --recv 7F0CEB10

Update the system

sudo apt-get update

Install the mFi software

sudo apt-get install mfi

Once it is finished installing you should be able to browse to https://yourserverip:6443 to access the mFi web page.

How To Install Ubiquiti’s UniFi Controller on Debian Linux

First add the following line to /etc/apt/sources.list

deb http://www.ubnt.com/downloads/unifi/distros/deb/debian debian ubiquiti

Next add the GPG key for UniFi and mongo-10

sudo apt-key adv --keyserver keyserver.ubuntu.com --recv C0A52C50
sudo apt-key adv --keyserver keyserver.ubuntu.com --recv 7F0CEB10

Update the system

sudo apt-get update

Install the UniFi software

sudo apt-get install unifi-rapid

Once it is finished installing you should be able to browse to https://yourserverip:8443 to access the UniFi web page.

Setup SNMP for Ubiquiti Radios

First lets install SNMP.

On Red Hat type systems such as Fedora and CentOS do the following

yum install -y net-snmp net-snmp-utils

If you are using a Debian based distro the you can use apt.

apt-get install snmp

You will need to make sure that SNMP is turned on in the radio under the Services tab.
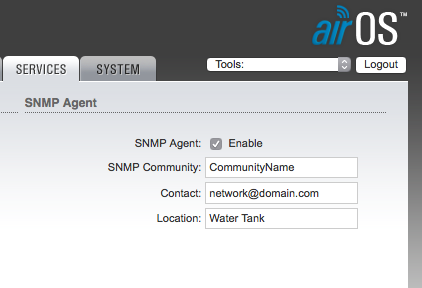
Be sure to remember the SNMP Community string as that is needed in the next step.

Now try to connect to the device with the following command.

snmpwalk -v1 -c comunityname 192.168.1.20

You should receive something like the following.

...
IF-MIB::ifSpecific.5 = OID: SNMPv2-SMI::zeroDotZero
SNMPv2-MIB::snmpInPkts.0 = Counter32: 484
SNMPv2-MIB::snmpOutPkts.0 = Counter32: 471
SNMPv2-MIB::snmpInBadVersions.0 = Counter32: 0
SNMPv2-MIB::snmpInBadCommunityNames.0 = Counter32: 12
SNMPv2-MIB::snmpInBadCommunityUses.0 = Counter32: 0
...

If you received

Timeout: No Response from 192.168.1.20

Then either the SNMP Community name is wrong or the ip address is unreachable.

The following command will list all the interfaces on the device.

snmpwalk -v1 -c comunityname 192.168.1.20 ifDescr
IF-MIB::ifDescr.1 = STRING: lo
IF-MIB::ifDescr.2 = STRING: eth0
IF-MIB::ifDescr.3 = STRING: eth1
IF-MIB::ifDescr.4 = STRING: wifi0
IF-MIB::ifDescr.5 = STRING: ath0
IF-MIB::ifDescr.6 = STRING: br0

Notice the number at the end of the ifDescr, That number identifies the interface.  You will need that for the next command.

Now lets check the signal. Note that the last number of the OID(the OID is the last string of numbers) is the interface number of ath0.  Yours could be different depending on how you have the radio setup.

snmpwalk -v1 -c communityname 192.168.1.20 1.3.6.1.4.1.14988.1.1.1.1.1.4.5

Here is a short list of OID’s.  To use them just run the above command but replace the OID with the one you want.

RxRate of 5'th interface (ath0) of the device (bps): 1.3.6.1.4.1.14988.1.1.1.1.1.3.5
TxRate of 5'th interface (ath0) of the device (bps): 1.3.6.1.4.1.14988.1.1.1.1.1.2.5
Channel: 1.3.6.1.4.1.14988.1.1.1.1.1.7.5
Firmware Version: 1.2.840.10036.3.1.2.1.4
Hostname: 1.3.6.1.4.1.14988.1.1.1.1.1.5
AP MAC: 1.3.6.1.4.1.14988.1.1.1.1.1.6
Station MAC: 1.2.840.10036.1.1.1.1
Signal 1.3.6.1.4.1.41112.1.4.5.1.5.1 (OID seems to vary a little bit, from nanoBeam to nanoStation)