SSH into radio
ssh ubnt@192.168.1.20
Put the following two lines into the /tmp/system.cfg file. Doesn’t matter where
unms.uri=REPLACE-WITH-UNMS-KEY unms.status=enabled
Apply changes with
/usr/etc/rc.d/rc.softrestart save
Go accept device in UNMS.
SSH into radio
ssh ubnt@192.168.1.20
Put the following two lines into the /tmp/system.cfg file. Doesn’t matter where
unms.uri=REPLACE-WITH-UNMS-KEY unms.status=enabled
Apply changes with
/usr/etc/rc.d/rc.softrestart save
Go accept device in UNMS.
When applying changes over ssh you’ll need to “write” or “save” the changes. Usually you’ll edit the /tmp/system.cfg config file and then save the changes with one of the following commands.
/usr/etc/rc.d/rc.softrestart save or cfgmtd -f /tmp/system.cfg -w && reboot
rc.softrestart has some advantages. It does not require the radio to reboot when making changes to things like SNMP or the device name.
It does seem to have issues sometimes with certain changes. The following happened when attempting to replace the whole /tmp/system.cfg with a previous backup config.
XM.v6.1.8# XM.v6.1.8# /usr/etc/rc.d/rc.softrestart save ]--- /tmp/.running.cfg.972 +++ /tmp/.system.cfg.972 @@ -1,110 +1,256 @@ ... more random stuff ... Fast system script build Success. Fast syslog script build Success. Fast users script build Success. Fast poepass script build Success. Fast resolv script build Success. do_radio_fast_script: rname wifi0 Unsuported change in radio.1.dfs.status for fast update Fast radio script build failed Fixup Startup_list …Done. Welcome back! [ubnt@localhost] >
If you have issues applying changes with the softrestart, you can try it with cfgmtd. Downside is the radio does reboot.
cfgmtd -f /tmp/system.cfg -w && reboot
You could potentially take the reboot off the end of the above command, but have had random issues in the past where the only way to fix it was a physical reboot. Having the radio reboot after applying the config seems to resolve the issue
The following is a method to recover from a command that may inadvertenly make a radio go offline.
The idea is to launch a process in the background that sleeps for 5 minutes and then reboots the radio, so any changes not saved will be reverted. If the changes were successful, you’ll just need to log back in and kill the background process to keep the device from rebooting.
This can be helpful if your changing networking settings using ifconfig, trying to change routes, or something went wrong while trying to apply a system.cfg setting.
Commands
sleep 300 && reboot &
Execute whatever command you need to. i.e.
ifconfig 192.168.1.100
If your command worked you can log back into the device and search for the process id of the sleep command and kill it so the radio doesn’t reboot.
ps | grep sleep
Example output
2XC.v8.5.12# ps | grep sleep
412 admin 1636 S sleep 500
414 admin 1640 S grep sleep
2XC.v8.5.12#
Kill the pid
kill 412
Boot up radio in tftp mode by pressing the reset button for ~20seconds or till you get the crossing blinky lights.
Enable TFTP
In Windows, search for
“turn windows features on or off”
Open up and select tftp client. Then hit OK.
That should install the tftp client
Flash firmware
To flash the firmware, open up a command prompt and run the tftp command
tftp -i 192.168.1.20 PUT "\Users\bob\Downloads\XM.v6.1.3.31939.171117.1238.bin"
In this post we’ll see how we can configure AirOS SNMP settings from the command line.
ubntmod command with save without rebooting.
./ubntmod.sh -i 192.168.1.20 -s "private;monitor@incredigeek.com;[30.69636, -88.04811]" -X '/usr/etc/rc.d/rc.softrestart save'
Alternative manual method.
ssh ubnt@192.168.1.20
Open config file
vi /tmp/system.cfg
Find the SNMP settings and modify as needed. Example below
snmp.community=private
snmp.contact=monitor@incredigeek.com
snmp.location=[30.69636, -88.04811]
Save and exit file with :x
Apply settings
/usr/etc/rc.d/rc.softrestart save
Had an issue with the Lets Encrypt cert for a UniFi-Video server. When renewing the cert and reimporting it into the UniFi-Video keystore, the certification was showing out of date.
Issue ended up being something with certbot.
When certbot runs it generates a new cert.pem, chain.pem, fullchain.pem and privkey.pem and puts them in the “/etc/letsencrypt/live/unifi.domain.com/” directory.
The privkey.pem and cert.pem are used to create the keys.p12 file which gets imported into the UniFi-Video keystore.
Apparently the .pem files in “/etc/letsencrypt/live/unifi.domain.com/” are symbolic links to files in “/etc/letsencrypt/archive/unifi.domain.com/”
Upon inspection of the archive directory, multiple cert.pem and privkey.pem files were found with the names cert1.pem, cert2.pem, cert3.pem etc. Looking at the creation date of the file revealed the symbolic link was referring to an old “cert1.pem” file.
Work around was to stop the unifi-video service and reimport the cert using the latest .pem files in the archive directory.
echo ubiquiti | openssl pkcs12 -export -inkey /etc/letsencrypt/archive/unifi.yourdomain.com/privkey2.pem -in /etc/letsencrypt/archive/unifi.yourdomain.com/cert2.pem -name airvision -out /usr/lib/unifi-video/data/keys.p12 -password stdin echo y | keytool -importkeystore -srckeystore /etc/letsencrypt/archive/unifi.yourdomain.com/keys.p12 -srcstoretype pkcs12 -destkeystore /usr/lib/unifi-video/data/keystore -storepass ubiquiti -srcstorepass ubiquiti
Remove the old ufv-truststore and start the service.
mv /usr/lib/unifi-video/data/ufv-truststore{,.old} systemctl start unifi-video
Worked like a charm.
Install certbot
sudo apt-get install python-certbot
Generate certificate. Change unifi.yourdomain.com to the domain name you have pointing to your UniFi-Video controller.
sudo certbot certonly -d unifi.yourdomain.com
Certbot will create the files in “/etc/letsencrypt/live/unifi.yourdomain.com/”
Now you should stop the unifi service.
systemctl stop unifi-video
The following two commands create and install the keystore for the UniFi-Video application. These commands were copied from here. Thanks scobber!
echo ubiquiti | openssl pkcs12 -export -inkey /etc/letsencrypt/live/unifi.yourdomain.com/privkey.pem -in /etc/letsencrypt/live/unifi.yourdomain.com/cert.pem -name airvision -out /usr/lib/unifi-video/data/keys.p12 -password stdin echo y | keytool -importkeystore -srckeystore /etc/letsencrypt/live/unifi.yourdomain.com/keys.p12 -srcstoretype pkcs12 -destkeystore /usr/lib/unifi-video/data/keystore -storepass ubiquiti -srcstorepass ubiquiti
Remove or rename the Trusted Store. If you don’t, the cameras will connect, but will not record. The controller will rebuild the ufv-truststore when it starts up and the cameras will be able to record.
mv /usr/lib/unifi-video/data/ufv-truststore{,.old}
Start the UniFi-Video service
systemctl start unifi-video
Now you can check it by going to https://unifi.yourdomain.com:8443
Had an issue that /run was randomly running out of space which in turn would interfere with the unifi-video service causing it to run, but not record.
/run looks like a tmpfs or ramdisk that Ubuntu sets up. So you can do a “temporary” fix by remounting the tmpfs with a larger size. Example below. If /run is a 2GB directory, you can remount changing the size from 2GB to 2.5GB.
sudo mount -t tmpsfs tmpfs /run -o remount,size=2500M
Note that it is a temporary fix and goes away after a reboot.
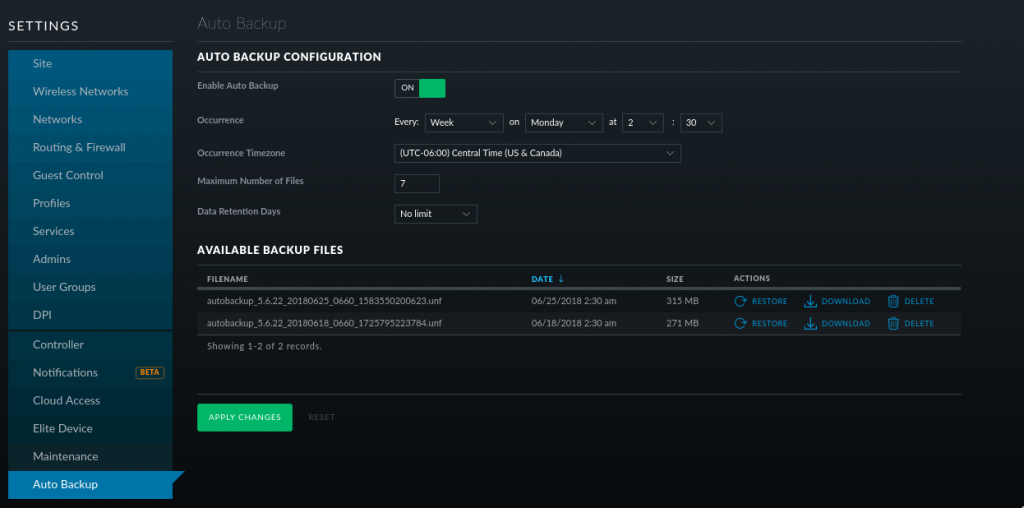
The issue ended up being that the WiFi UniFi controller was setup to auto backup everything once a week. So as it was backing stuff up, it would eat up the available space in the tmpfs, think there may be an issue with the size of the UniFi data and maybe not being able to fit it all in RAM?
Running the following command
df -h --max=1 /var | sort
shows the following
1.1M /run/udev 2.5G /run/ 2.5G /run/unifi <-- UniFi controller 4.0K /run/initramfs 8.0K /run/network 12K /run/user 288K /run/samba 404K /run/systemd
Looking inside the unifi directory shows the following folders. Looks like the they are temp files.
200M /run/unifi/ExpTmp351719567129045774 696M /run/unifi/ExpTmp3406220793759111216 1.6G /run/unifi/ExpTmp3368400690321364109 0 /run/unifi/work 2.5G /run/unifi
Running an ls inside the folder shows
-rw-r----- 1 unifi unifi 13971807 Jul 2 02:30 db.gz -rw-r----- 1 unifi unifi 1665223462 Jul 2 02:56 db_stat.gz
Looking inside the UniFi controller it is set to auto backup on Monday at 2:30AM
Looks like “/run/unifi” is used as a temporary folder to create the backups and when it is completed converts it to a .unf file and moves it to “/usr/lib/unifi/data/backup/autobackup/” So the left over temp files were never completed or something caused them to stop working. Maybe the backup was big enough to take up all the tmpfs space and cause the backup to fail.
Resolution. To fix the problem I turned the data retention down to a week and deleted the temp files in /var/unifi. Had to sudo su to root. sudo wasn’t cutting it for some reason.
sudo su rm -rf /var/unifi/Exp* exit
Should be all good now.
Short version
List AirControl server(s)
mca-provision-list
Remove from AirControl Server
mca-provision-rm http://server-address
Expanded Steps
First you’ll need to SSH into your radio
Example:
ssh ubnt@192.168.1.20
Next run “mca-provision-list” to list the connection(s) the radio has, or is trying to connect to. If you have had the radio connected to multiple AirControl servers it will show more than one entry.
Example:
XM.v6.1.3# mca-provision-list unknown @ http://192.168.0.1:9081/AC2/report - XM.v6.1.3#
To remove, run “mca-provision-rm” with the AirControl address. You can simple use the “http://server-ip”, shouldn’t have to worry about the port number/AC2/report.
Example:
XM.v6.1.3# mca-provision-rm http://192.168.0.1 Found 1 entries matching 'http://192.168.0.1': Removing: unknown @ http://192.168.0.1:9081/AC2/report ... Found Backup1 on[1] ... Found Active on[2] ... Storing Active[1] ... [%100] Active->Backup[2] ... [%100] done. XM.v6.1.3#
Ubiquiti UNMS installation instructions link
https://github.com/Ubiquiti-App/UNMS/wiki/Installation-%26-Update
Download and Install UNMS
curl -fsSL https://raw.githubusercontent.com/Ubiquiti-App/UNMS/master/install.sh > /tmp/unms_install.sh && sudo bash /tmp/unms_install.sh
Run the following commands as root. Use sudo su if needed.
Set over commit to 1
echo "vm.overcommit_memory=1" >>/etc/sysctl.conf sysctl -p
Disable Transparent HugePages
echo never > /sys/kernel/mm/transparent_hugepage/enabled
Add this to /etc/rc.local above the exit line
if test -f /sys/kernel/mm/transparent_hugepage/defrag; then echo never > /sys/kernel/mm/transparent_hugepage/defrag fi
Finish the installation in your browser
https://unms_server_address