This is because a Wireguard preshared key needs to be 256bit (32 byte) base64 encoded key. We have a couple different ways we can generate the correct format.
1. Use Openssl to generate a random 32 byte password
openssl rand 32 | base64
2. Create a 31 character password and base64 encode it
Quick Summary: Operation Triangulation is an iOS zero-click exploit that will self destruct, looks to have been used since at least 2019, works on iOS 15.7, unsure if it works on iOS 16. Can collect location, mic recordings, photos, and manipulate iMessages. First point of entry is from an iMessage message, that compromises the device, after compromise, the message gets deleted.
The following is a list of C&C domains from the securelist.com article. Did a quick DNS lookup for each domain and they currently have the following records & IP addresses. Note that these can change at any time and some of the IP addresses are/can be shared with other legitimate websites if it is on a shared hosting provider.
If you have installed the hardened Linux Kernel on Fedora, you may have encountered the following error when trying to launch Flatpak applications.
bwrap: No permissions to creating new namespace, likely because the kernel does not allow non-privileged user namespaces. On e.g. debian this can be enabled with 'sysctl kernel.unprivileged_userns_clone=1'.
error: Failed to sync with dbus proxy
The issue looks to arise from the fact that the hardened Linux Kernel disables unprivileged name space and Fedora does not have setuid on by default on the bubblewrap executable.
Enabling setuid on bubblewrap
You can set the setuid permission on the bubblewrap executable with
sudo chmod u+s /usr/bin/bwrap
Allow Unprivileged Name Space (Alternative work around)
You could also allow unprivileged name space by running
sysctl kernel.unprivileged_userns_clone=1
Note that setting the setuid seems the safer/recommended option.
It looks like using the setuid binary for bubblewrap would be better to use then enabling unprivileged user space.
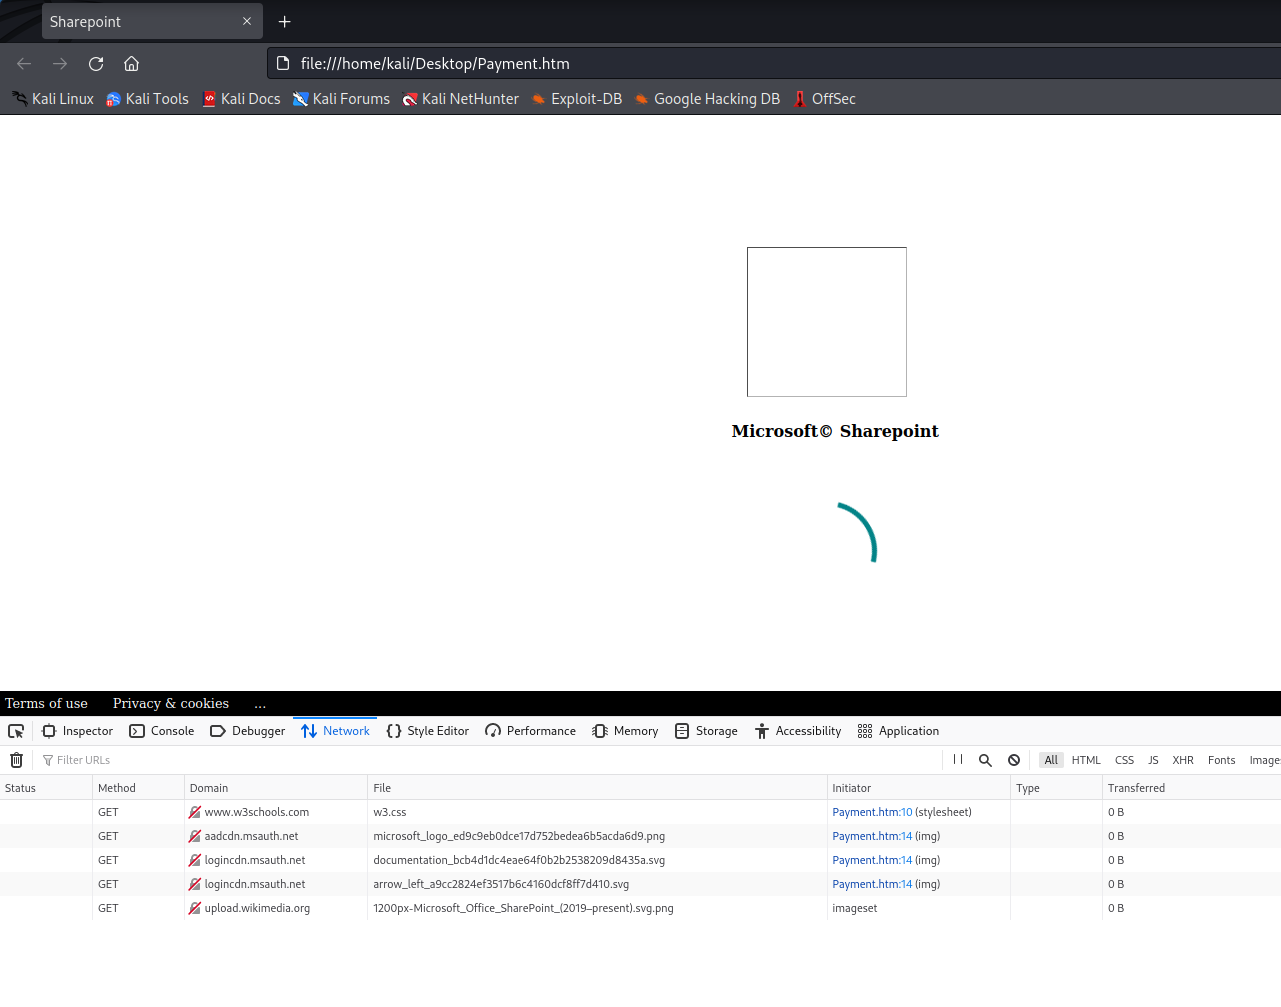
Ran across an email that had an attachment named Payment.htm. This kind of phishing attack isn’t anything new, but the htm file had some interesting obfuscation inside of it.
Opening up the file in a virtual a Kali virtual machine, starts to load what appears to look like a Microsoft Sharepoint site. Notice the URL is the local file. It’s setup to pull the photos from the web. Since the VM had no internet available, the images never loaded.
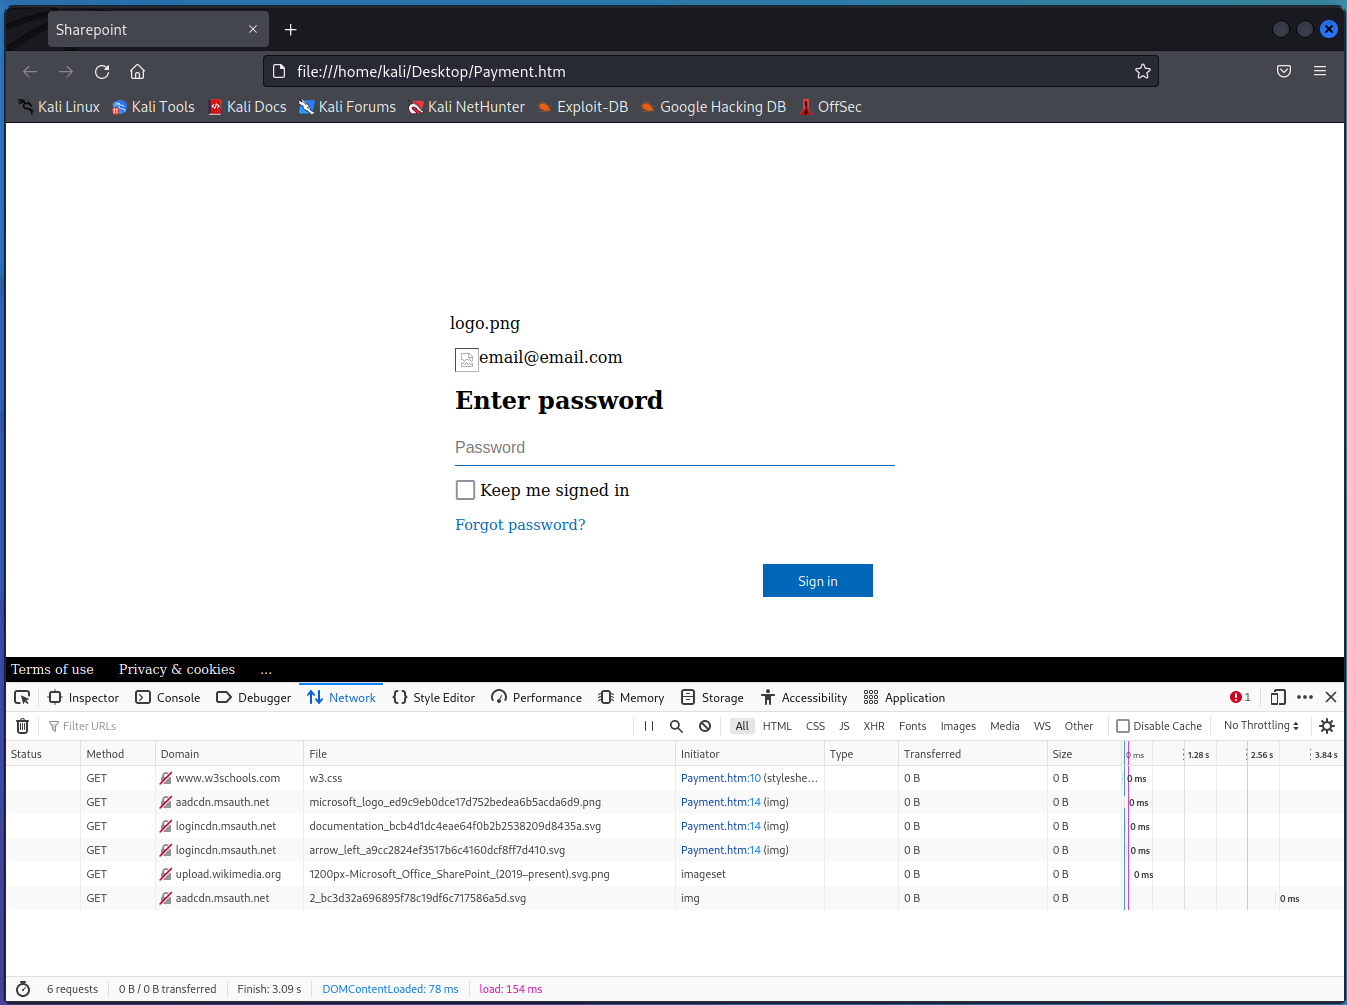
After spinning around for a second, it loads the “log on page”, already populated with our email address. Note I changed the email address before taking the screenshot.
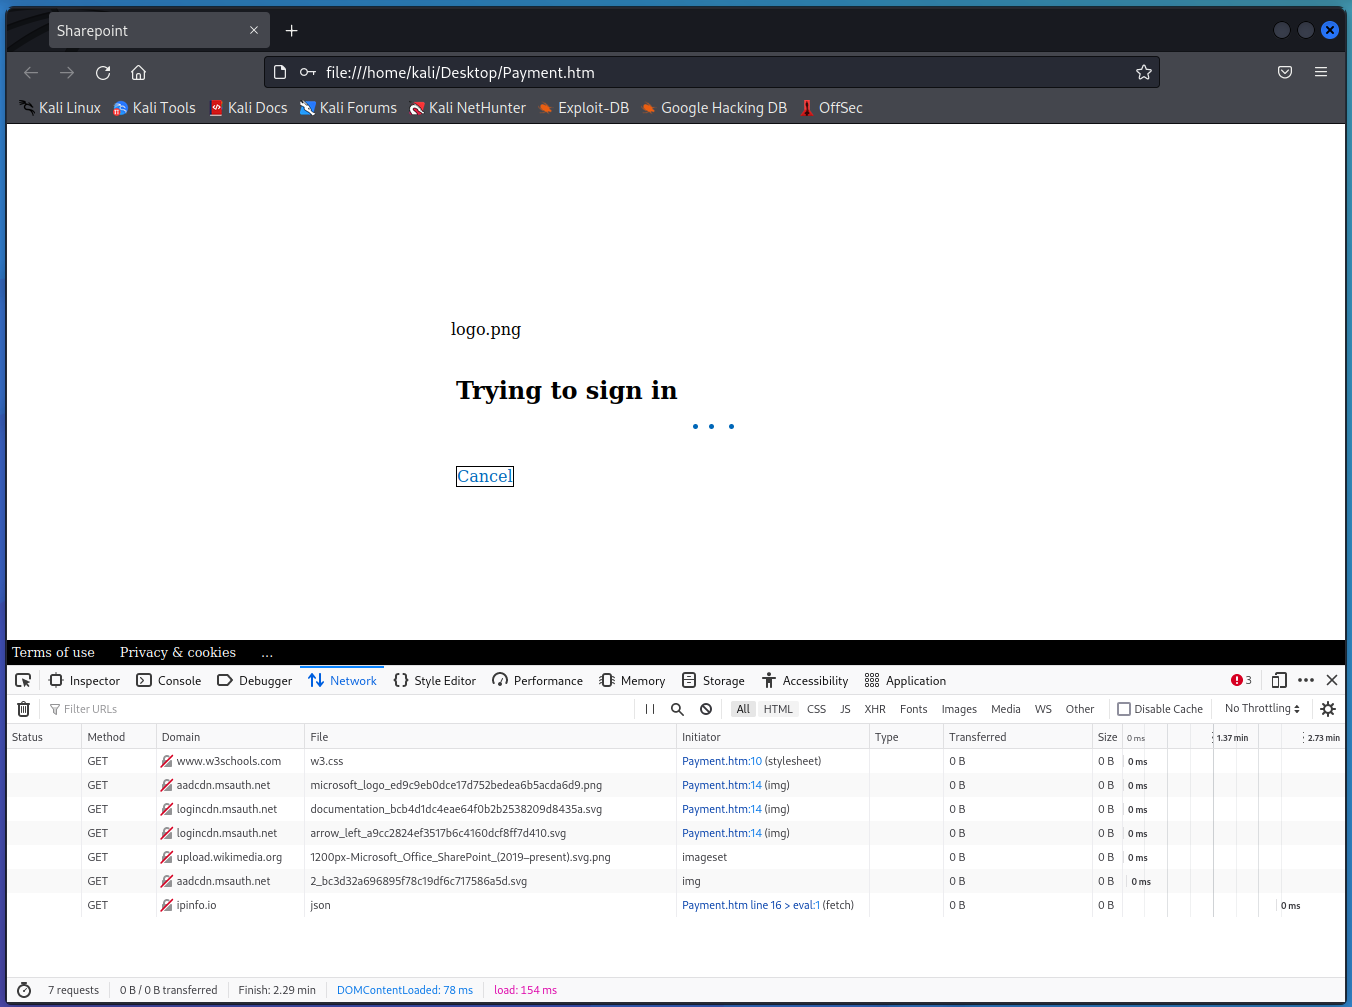
Typing in a random password and hitting Sign in triggers the sign in page.
Notice the ipinfo.io network connection
Going to https://ipinfo.io/json gives us a good bit of info about our IP address, location etc. It looks like this information is requested and then sent to the hackers.
Since there was not an internet connection, the malicious htm web page never received the IP information and so didn’t continue on to the next stage, it just sat there loading. Should be able to setup a fake local server and feed it the information to continue on to the next stage. Or we can just do some static code analysis
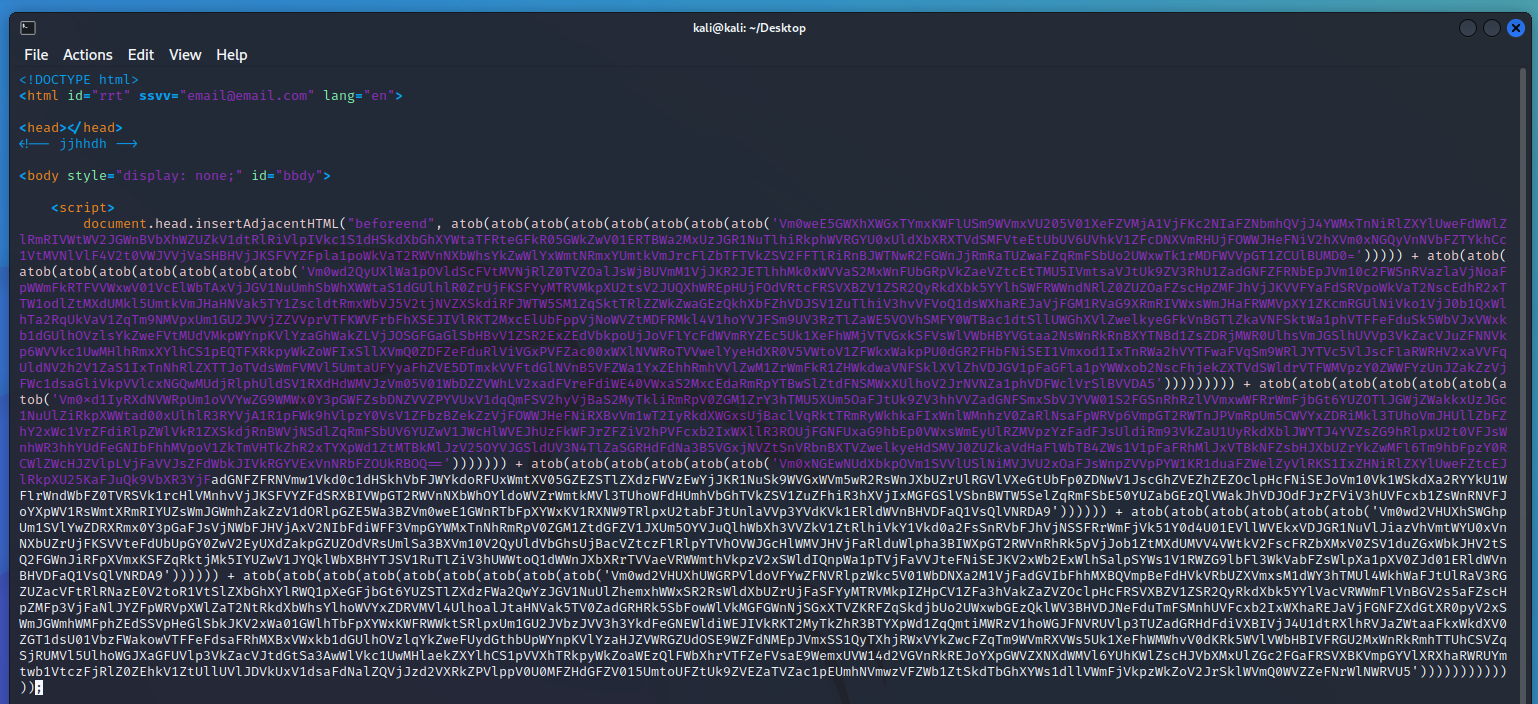
Base64, Base64 and more Base64
Opening up the file in a text editor shows tons of Base64 encoded data. The file is only about 20 lines long, but the individual lines are super long.
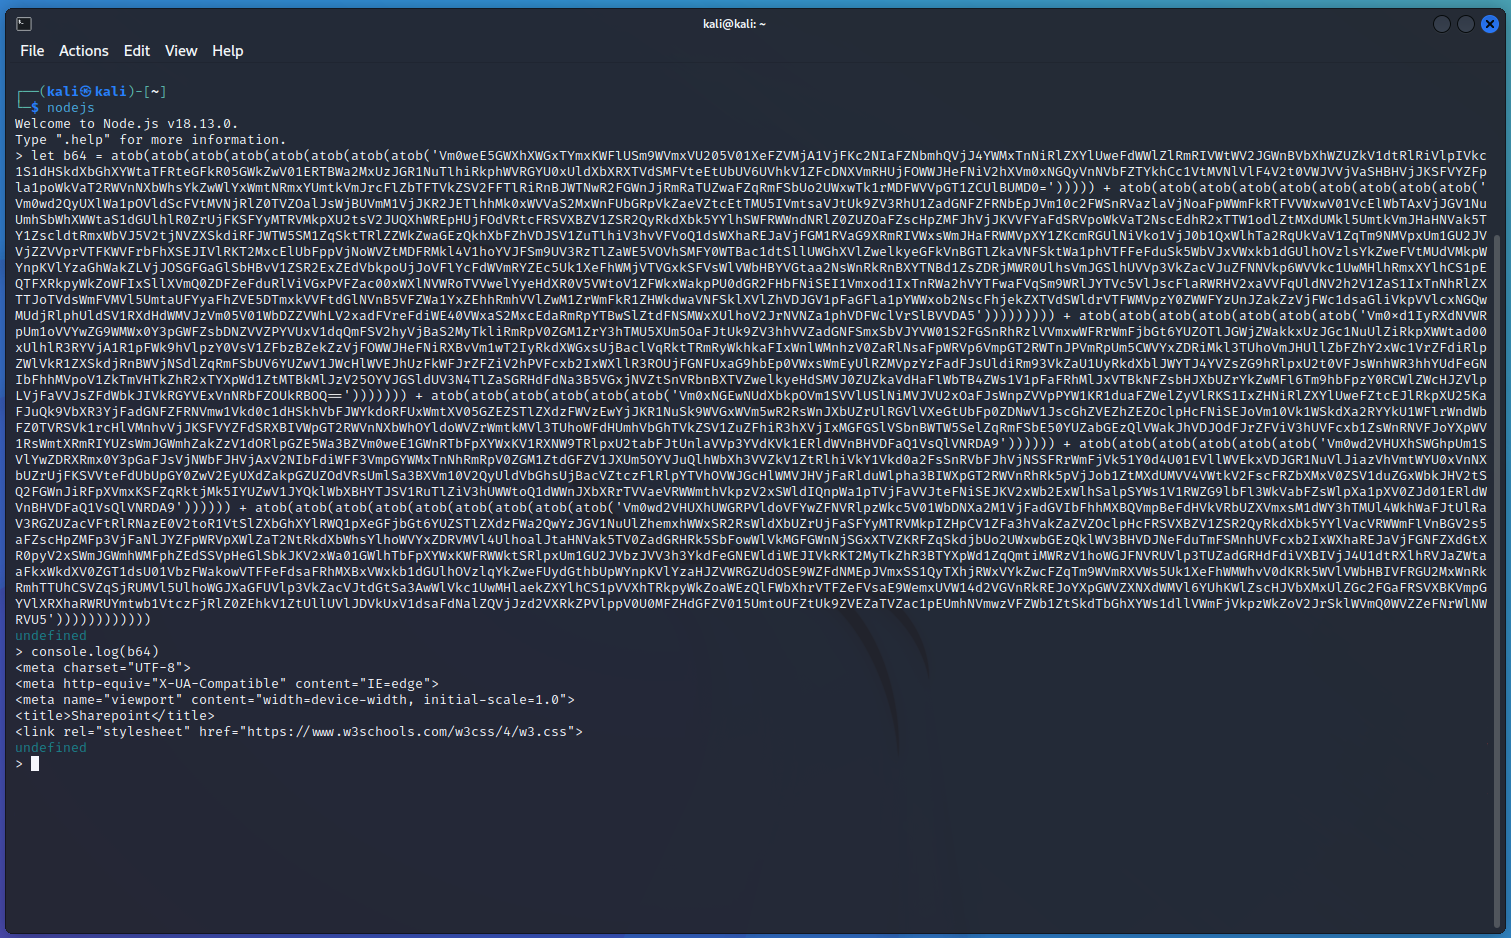
This first section of Base64 encoded data is by far the shortest. atob is a javascript function that decodes Base64 data. There are multiple atob functions, meaning that to actually get the data, we’ll need to decode the data multiple times. Or we can just copy out the atob functions, and run them directly in Node.js to get the output.
This is fairly easy to do, run nodejs from the command line, set the variable, and print it to console
# nodejs
> let b64 = atob(atob(etc...etc...etc...))
> console.log(b64)
Unfortunately, the next few lines are too large to do what we just did. What we can do is duplicate the file, then delete all non javascript text. Next we can replace the beginning lines where it says “document.head……atob” to
console.log(atob(atob(atob(.....))));
After we have cleaned up the file and made those changes, we save it, and now run it as a javascript file.
nodejs ./Payment.htm
If we want to, we can pipe the output into another file with the > operator
nodejs ./Payment.htm > Decoded_Payment.js
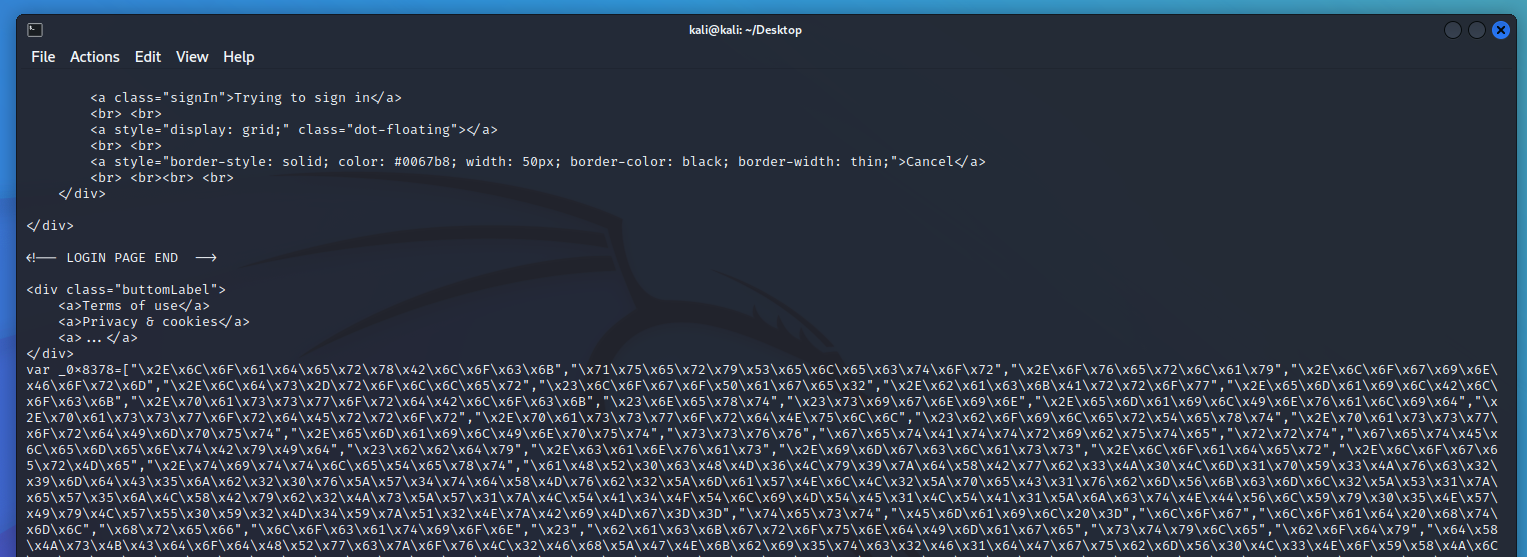
Deobfuscating the important stuff
Looking at the decoded code shows that there is still some obfuscated stuff in that last line.
The var _0x8378= array contains a lot of human unreadable text.
Fortunately, this is not hard to decode at all. In a terminal, launch nodejs again, copy the whole array as a variable, and then just print the whole array.
The last URL is the ipinfo.io one we saw in the browser developer tools. Some of the variables from the above variable also seem to map to the return info from ipinfo.
You can also view some info about Webmail connections in the main mail log.
tail -f /var/log/maillog | grep email@address.com
or
grep "email@address.com" /var/log/maillog
When logged into webmail, the connection can look like the following.
Mar 27 12:31:17 host dovecot[207411]: imap(email@address.com)<1234567>: Disconnected: Logged out in=148, out=1166, bytes=148/1166

Mar 29 16:41:30 host dovecot[207411]: imap-login: Login: user=<email@address.com>, method=PLAIN, rip=::1, lip=::1, mpid=1234567, secured, session=<1uP1h3vD3as3AAAAAAAAAAAAAAAAAAAAB>
Notice the rip and lip are both ::1, IPv6 localhost. Looks like Webmail is creating a local connection to the server to authenticate and pull the email. This makes tracking down where an actual person signed in from a little harder. The connection still gets logged, it’s just in a different log.
Use one of the following two commands to search the session log.
[2023-03-27 12:31:17 -0500] info [webmaild] 192.168.1.11 NEW email@address.com:A3WnodOlnxn1gq05 address=192.168.1.11,app=webmaild,creator=email@address.com,method=handle_form_login,path=form,possessed=0
Notice it gives us the IP address of where the user signed in from.
You could also look at the “/usr/local/cpanel/logs/access_log” however the @ sign is percent encoded “%40”. That could cause issues if you are trying to grep out the email address.
SMTP Logins
If you need to track down SMTP or IPs that are sending out emails, check out the /var/log/exim_mainlog
Note that “mymodule.pp” will replace any previous “mymodule.pp”. If your needing to create multiple modules/allow multiple exceptions, you can change the name of each module.
You can also add the rules together then manually compile it. Refer to the first link for more details.
In Firewalld we can use multiple zones for different types of traffic. For instance, we can setup an “internal” zone with our local IP addresses that are trusted, and then setup the public facing interface to the “drop” or “block” zone to block everything not from our internal network.
Setup trusted IP addresses in the “internal” zone
Configure services/ports that should be allowed on our “internal” zone
Set “drop” zone as the default for all other traffic
Reload firewall
1. Setup trusted IP addresses in “internal” zone
Add all of our trusted IP addresses to the internal zone. The following example adds all of the private IP addresses “RFC 1918” to the internal zone. Change as needed.
Authentication, Authorization, and Accounting or AAA is an framework that allows access to a computer network/resource,
Authentication
Authentication identifies the user. It’s from the Greek authentikos “real, genuine”. We can think of it as proving the identity of the user. Bob sits down at the computer and types in his password (Something he knows) and confirms that he is in fact Bob.
Authorization
Authorization is the privileges that the user has to the system. For instance, Bob is now authenticated to the computer, but he may only be authorized to access email and a web browser.
Authorization and Authentication can get confusing. In simple terms
Authentication – Who are you?
Authorization – What you have access to.
Accounting
Accounting is the auditing or logging arm of AAA. It is for answering the 5 Ws Who did what, when, where, and how. For instance, accounting could log that Bob checked his email at 9:30AM, Improved his mind by reading posts on incredigeek.com for a couple hours, then checked email again before shutting the computer down.
Hopefully that is a short helpful explanation of AAA. For more information, check out the following links.
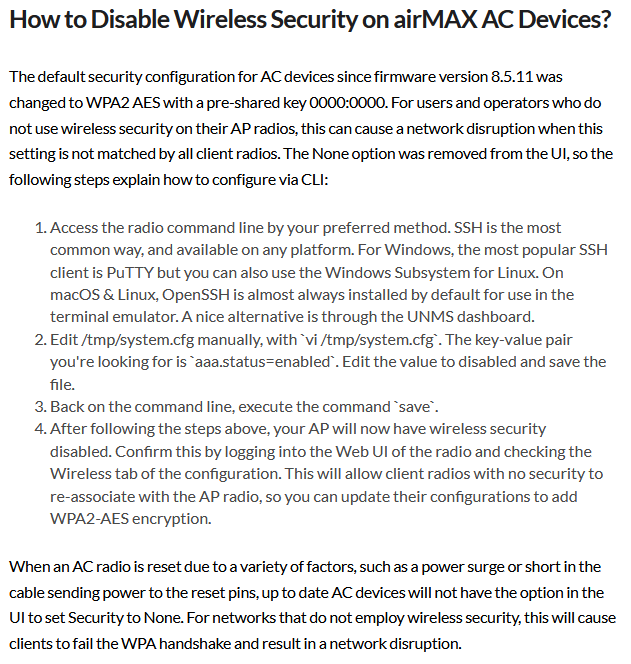
Included in the FAQ is a section on “How to Disable Wireless Security on airMAX AC Devices?”
The default security configuration for AC devices since firmware version 8.5.11 was changed to WPA2 AES with a pre-shared key 0000:0000.
Ubiquiti Default AC device WPA2 Preshared key
On Ubiquiti AC radios, you can not disable WPA 2 security through the web interface. This is not necessarily bad, however, what happens if you have a client that is reset and will only connect to the default ubnt SSID?
Fortunately there is a way to disable the WPA2 Preshared key.
Log into the device over ssh.
Run the following command to disable WPA2 in the config sed -i s/aaa.1.wpa.mode=2/aaa.1.wpa.mode=0/g /tmp/system.cfg
Save the config file with /usr/etc/rc.d/rc.softrestart save
Login to the client device and configure the SSID.
After you are done, you can click the enable button to re-enable Wireless Security.
Note: aaa.1.wpa.mode=2 doesn’t appear to be on all devices. If not, change “wpasupplicant.status=enabled” to “wpasupplicant.status=disabled”
Screenshot from UI help page on Wireless Security on airMAX AC devices
Getting around applications that strip directory traversal sequences
Using a null byte
Directory Traversal
What exactly is directory traversal anyway? Well, it is pretty much exactly what it sounds like. We traverse directories by manipulate the file path, for something like an image, to get something more valuable like the passwd file.
In it’s most basic form, we can add ../../../../../etc/passwd to a file path and instead of pulling an image, we get the passwd file.
For instance, if we load an image on a website, it’s file path on the server may be something like /var/www/html/image.png. If we right click on an image and open in a new tab and inspect the URL, we can see this path. “Note: Web servers have a root directory for all the website files. Generally web files’ root starts there not / root of the machine.”
Now if we remove image.png and replace it with ../ (../ on Linux/macOS or ..\ on Windows) we’ll go backwards one directory. String them together and we can go back to the root of the drive. Then we can add /etc/passwd (Or replace with whatever file we want) and load the contents of that file.
Most web applications should have some sort of protections in place to guard against directory traversal. Let’s go over a few ways to get around it.
URL Encoding
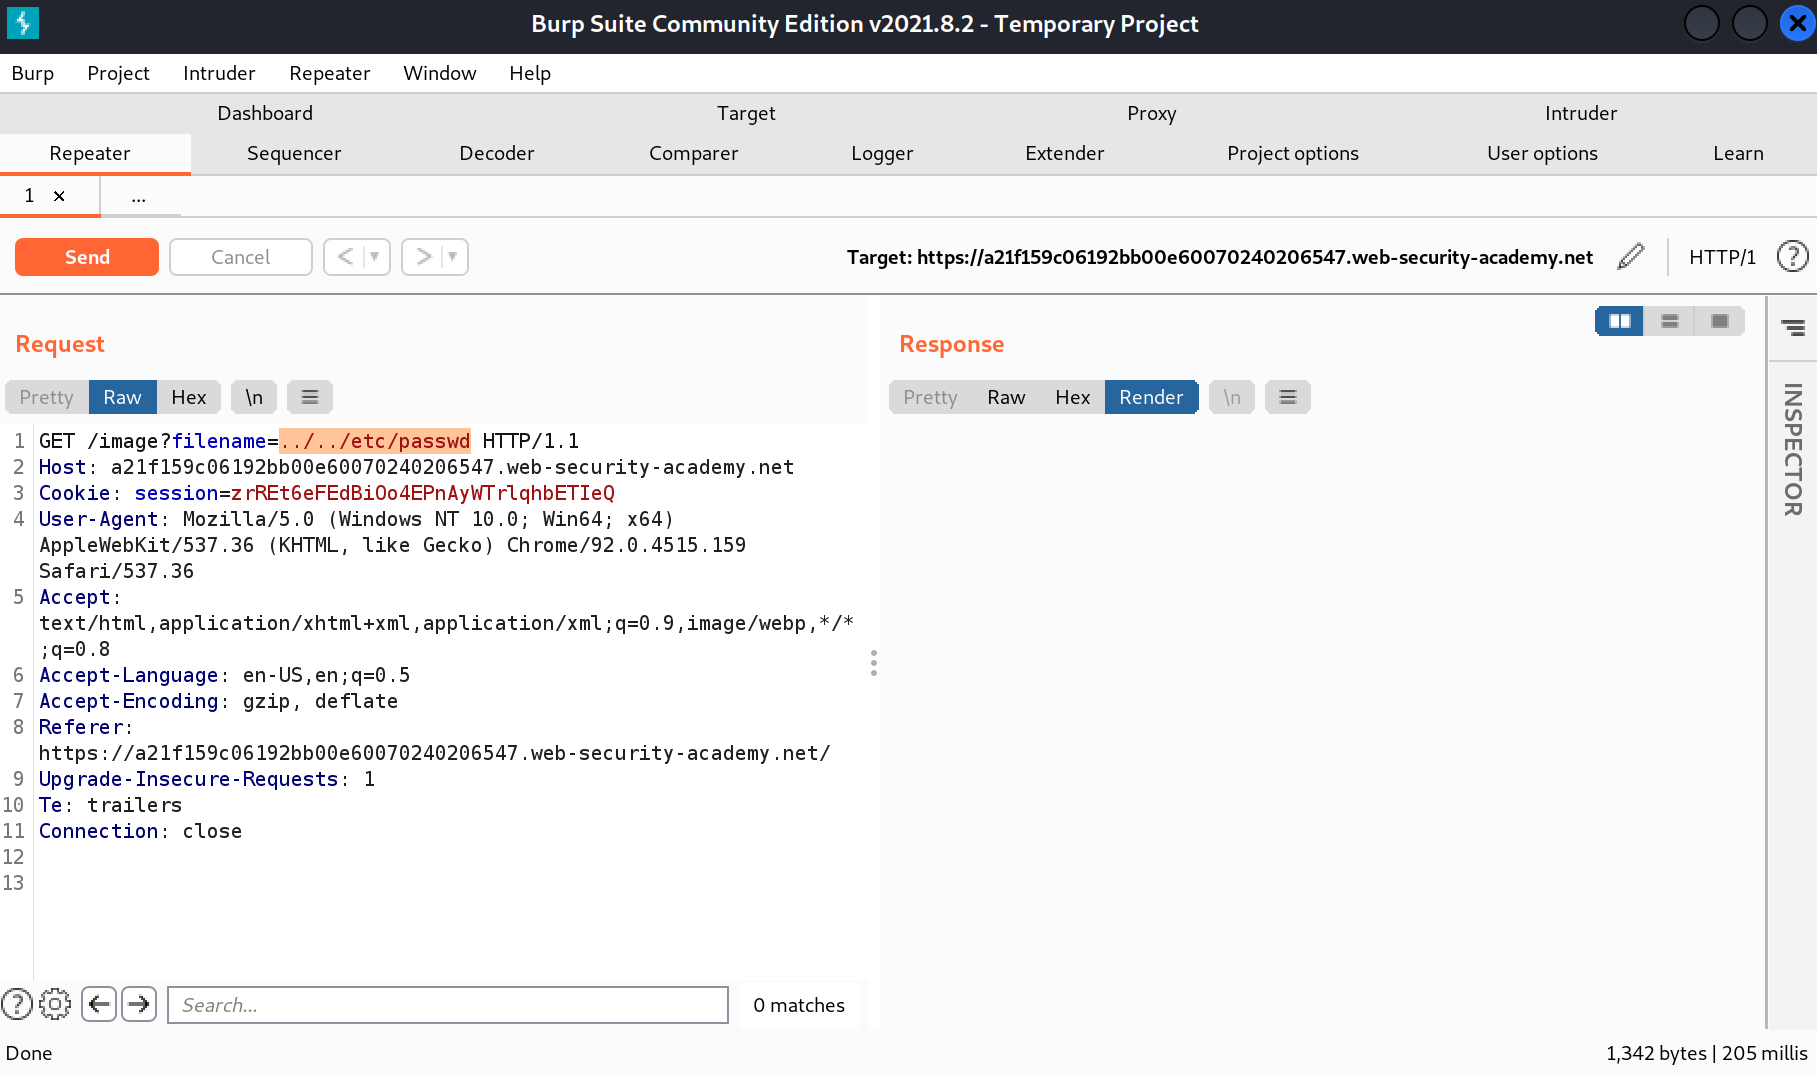
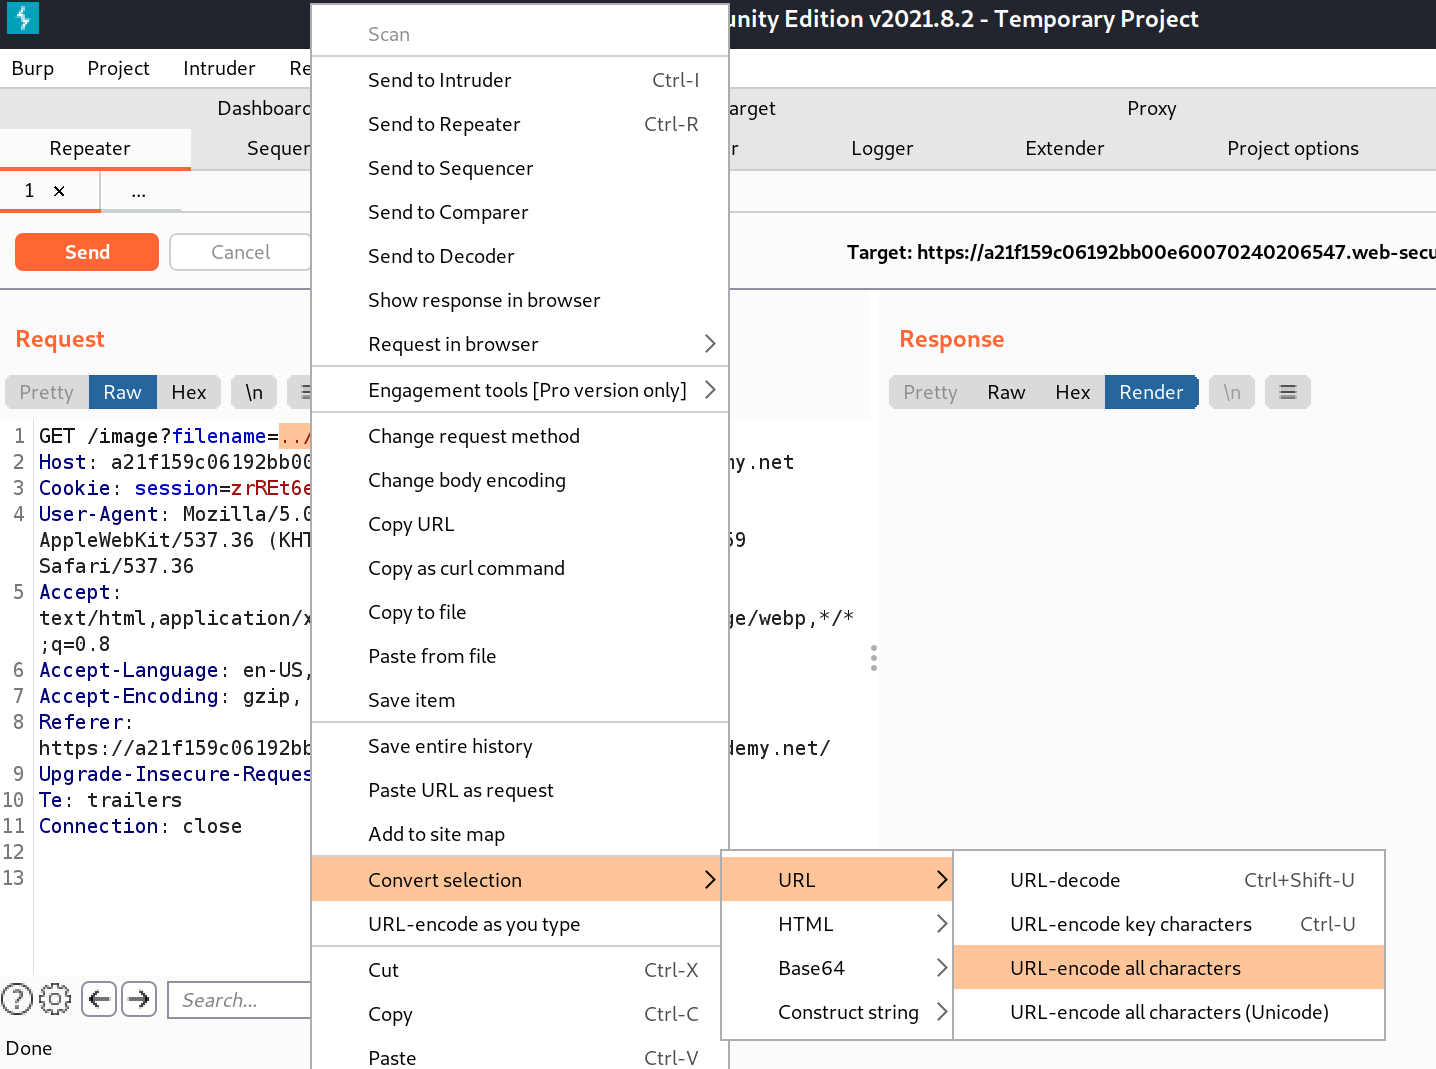
URL encoding sometimes can work and is simple to do. In Burp, select the file path, right click, Convert selection -> URL -> URL-encode all characters.
You can also try double encoding. Encode once, select the encoded text and encode again.
In the above screenshots, ../../etc/passwd becomes “%25%32%65%25%32%65%25%32%66%25%32%65%25%32%65%25%32%66%25%36%35%25%37%34%25%36%33%25%32%66%25%37%30%25%36%31%25%37%33%25%37%33%25%37%37%25%36%34”
Getting around applications that strip directory traversal sequences
Sometimes the web app can strip out text that it knows is directory traversal characters/sequences. For instance, it sees ../ in the requested url and just strips it out.
We can do something like the following sequence to get around it.
....//....//etc/passwd
That is 4 periods, followed by 2 slashes. What happens is the web app reads the URL, goes hey ../ is not allowed, bye bye! Removes the two instances of ../ and forwards the URL on. Which ends up being
../../etc/passwd
Which is just perfect for our use case.
Using a Null Byte
If the application is using the file extension to validate that an image or other file is loaded, instead of say passwd, we can try using a null byte. A null byte is used to terminate a string.
../../etc/passwd%00.png
What can end up happening is the web application sees the .png or .jpg at the end and goes “oh that is a valid extension, carry on” and then the system reads the line and sees the null byte and says “Oh null byte! end of file path, here is your file.”