The goal for this script is to alert us if a remote site looses power. We can do this using a Mikrotik that has two PSUs. One is plugged into battery backup and the other in the non battery plug.
In this example, we are using PSU2 “number 8” We can find the number using
/system/health/print
We can now create a new scheduler entry with the following. Change out the number 8 to your PSU number, and change the webhook to your Teams webhook.
:local curState [system/health/get value-name=value  number=8]
:local name [/system/identity/get value-name=name]
:local webhook "https://teams.webhook.microsoft.com/webhook/more"

if ($curState != $lastState) do={
if ($curState = "ok") do={
/tool fetch http-method=post http-header-field="Content-Type: application/json" http-data="{\"text\": \"$name : Power is on.\"}" url="$webhook"
}
if ($curState != "ok") do={
/tool fetch http-method=post http-header-field="Content-Type: application/json" http-data="{\"text\": \"$name : Power is off.  On battery backup\"}" url="$webhook"
}
:global lastState $curState
}
Set to the appropriate interval (i.e. 5 minutes). The script will only alert once when the power state changes. This minimizes receiving an alert every 5 minutes while the power is off.
The purpose of these scripts is to update the local DHCP lease table with a remote IP Address Management (IPAM) system.
Scheduler Script
This little script is added to the scheduler and goes through the entire DHCP lease table and uploads each MAC address and IP address pair to a website.
Change out the top three variables. May also need to change out the URL depending on how the website receives data.
This script is to be used on the DHCP server script. Can add it by going to DHCP Server -> DHCP -> Double Click Server -> Script
Any time a new DHCP lease is obtained, this script is fired. Note that some of the variables like $leaseBound are specific to the script being used by the “DHCP server”
Also helpful to note that the script only runs if a new lease is obtained, or a lease expires and it disappears from the leases page. A DHCP renew does not trigger the script.
:local username "myapiuser"
:global password "myapipassword"
:global url "upload.incredigeek.com"

# The maximum retries
:local max 60
:local attempts 0
:local success 0
:do {
  :set attempts ($attempts+1);
  :if ($leaseBound = 0) do {
    :do {
      /tool fetch url="https://$url/api/v1/network/ipam/dynamic_ip_assignment?ip_address=$leaseActIP&mac_address=$leaseActMAC&expired=1" mode=https keep-result=no user=$username password=$password
      :set success 1;
    } on-error={
      :log error "DHCP FAILED to send unassignment to $url on attempt $attempts out of $max for $leaseActMAC / $leaseActIP";
      :delay 10s;
    }
  } else {
    :delay 1s;
    # see note below
    :local remoteID [/ip dhcp-server lease get [find where address=$leaseActIP] agent-remote-id];
    :do {
      /tool fetch url="https://$url/api/v1/network/ipam/dynamic_ip_assignment?ip_address=$leaseActIP&mac_address=$leaseActMAC&expired=0" mode=https keep-result=no user=$username password=$password
      :set success 1;
    } on-error={
      :log error "DHCP FAILED to send assignment to $url on attempt $attempts out of $max for $leaseActMAC / $leaseActIP";
      :delay 10s;
    }
  }
  :if ($success) do {
    :log info "DHCP lease message successfully sent $leaseActMAC / $leaseActIP to $url";
    :set attempts $max;  # break out of the do..while loop
  }
} while ( $attempts < $max )
}
The following is the correct syntax needed to send a message to Microsoft Teams from a Mikrotik router. You will need a valid Teams webhook to send to.
Change “Test Message” out for your message. You should receive a “status: finished” response.
Here are the commands you’ll need to harden SSH on your Mikrotik Routers. It looks like it still can use SSH-RSA, but it does get rid of most of the weaker crytpo algorithms.
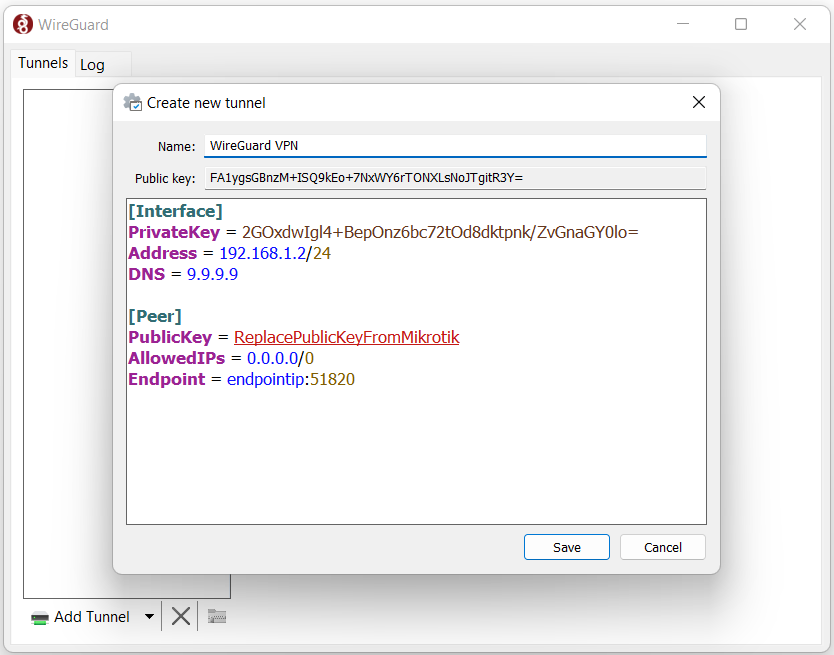
Note that the 192.168.1.2/32 is important. If you have multiple clients connected and one of them is setup with a /24 instead of a /32, it will cause issues. I think this is because WireGuard tries to route the whole /24 over that peer.
Also note that you can not use DHCP with WireGuard. Each client will have a static IP address assigned in the config. In this example, 192.168.1.2.
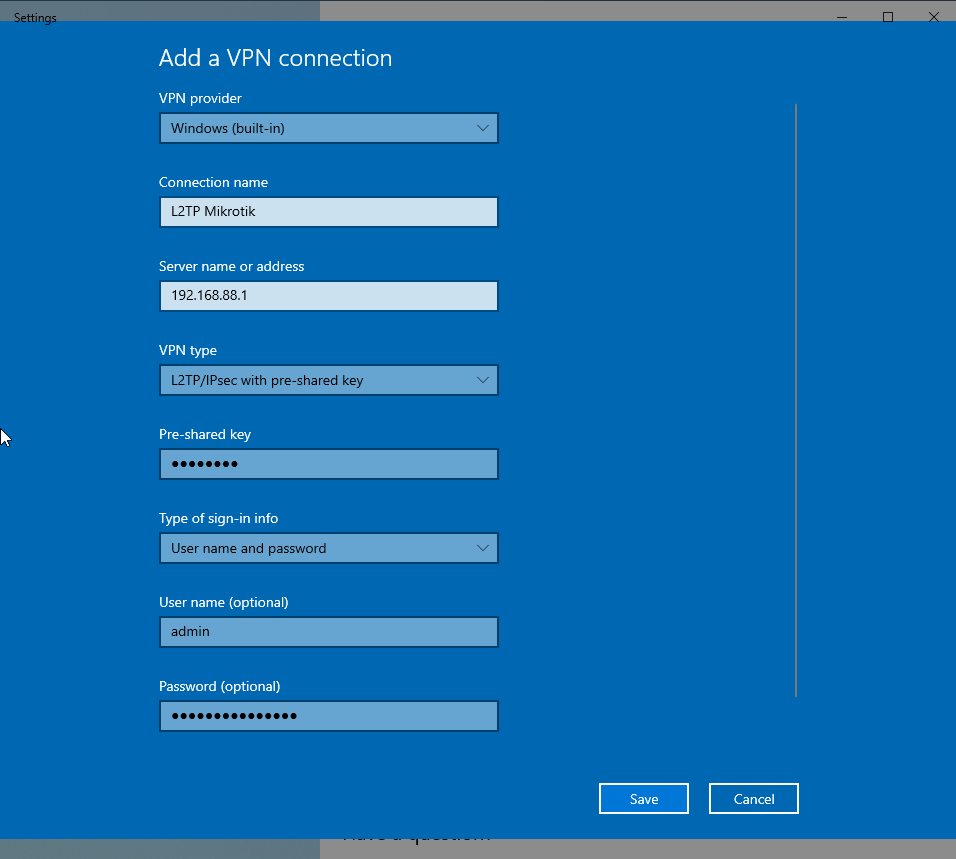
You should now be all set up and able to connect from your device.
Troubleshooting
Some issues you may run into.
Unable to have two devices connected at the same time.
First, you’ll need to have one Peer per Client connection. Either that, or do not connect at the same time.
Second, check and verify that each peer has the ClientIP/32 in the Allowed Address.
For example, if the WireGuard interface is using 192.168.1.0/24, and one of the peers has 192.168.1.4/24 in the Allowed Address option, then only one client will work. It appears that the MikroTik will attempt to route all 192.168.1.0/24 request to 192.168.1.4.
Sometimes it is nice to have a list of just the IP addresses and the hostname or mac address. Can be especially helpful when you are trying to get a list of devices to do a bulk update in LibreNMS. Helpful LibreNMS links for renaming and showing down devices
we are going to run the command to pull the DHCP information and then use Unix utilities to parse the data out.
Replace dhcp8 with the correct dhcp server in the mikrotik.
First, SSH into your Mikrotik router.
ssh user@mikrotik
Next we’ll want to go to the ip dhcp-server lease directory
/ip dhcp-server lease
Now we can run the following command to loop through and pull out all the info we need. You can change the info like “mac-address” for something like “status”. You can use Tab to see what options are available. Just delete mac-address and hit tab twice.
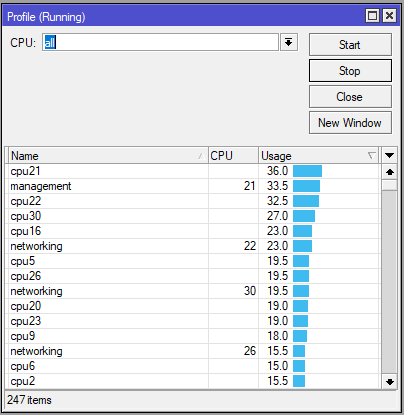
Problem : Lots of CPU utilization. Profile shows a good bit of it is DNS related.
DNS eating CPU on Router
The router is setup to allow DNS to pass through to web servers so rDNS and other records can be looked up and resolved. This is a specific IP block that gets it’s addresses from the router. The firewall rules explicitly allow this address range. We’ll say 192.168.88.0/24, and blocks everything else. This works for the web servers. But why are we still getting a bunch of CPU utilization with DNS?
As it turns out, the firewall rule that allows the server address range also includes routers own address! So we have unintentionally whitelisted DNS access to our router.
To resolve the issue we can add another firewall rule that explicitly blocks DNS traffic to the routers IP address. We are using two rules, one to block TCP and the other UDP.
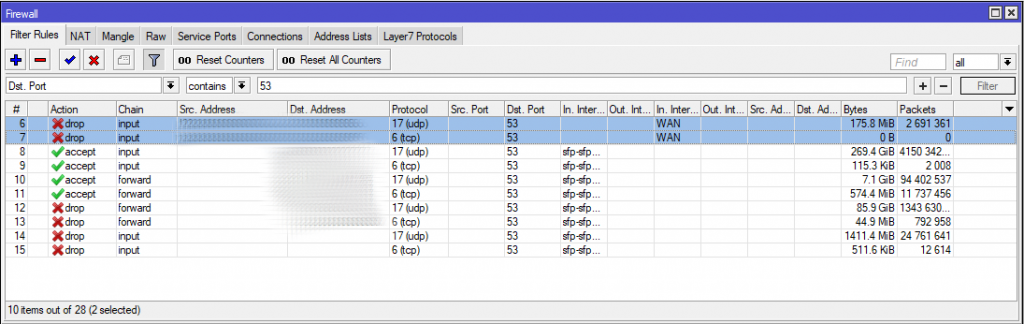
ip firewall filter add chain=input dst-address=192.168.88.1 protocol=6 dst-port=53 in-interface-list=WAN action=drop
ip firewall filter add chain=input dst-address=192.168.88.1 protocol=17 dst-port=53 in-interface-list=WAN action=drop
Rules 6 & 7 are the two new rules we just applied. 14 & 15 block input to the router, however rules 8 & 9 inadvertently allowed access to the router’s public IP.
Firewall Rules for Router
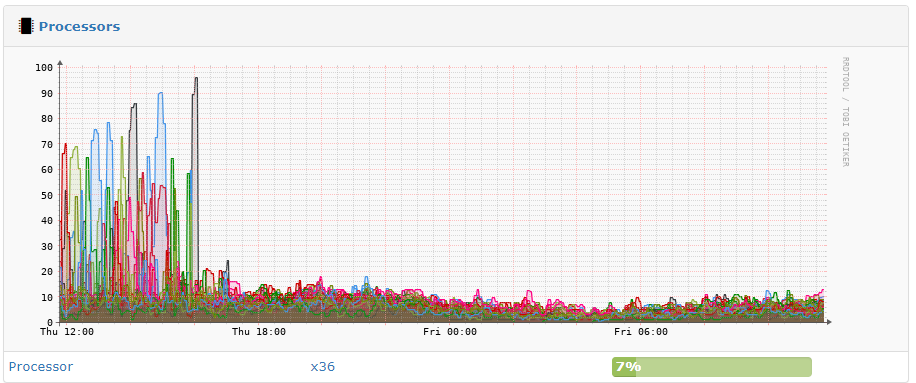
The Result? Our CPU usage dropped!
CPU Usage dropped after adding DNS firewall rules.
Quite dramatically too as the following LibreNMS screenshot shows.
LibreNMS CPU graph showing the overall CPU utilization improvement
For more information about DNS Amplification attacks, refer to the following links.
Can look here to set a certificate up in Winbox or here to configure from command line
Enable OpenVPN server
To setup a OpenVPN server on a router there are a few things that need to be done.
Create certificates (See top of post)
Create IP pool for clients to use
Configure default-encryption profile
Create User
Configure OpenVPN server
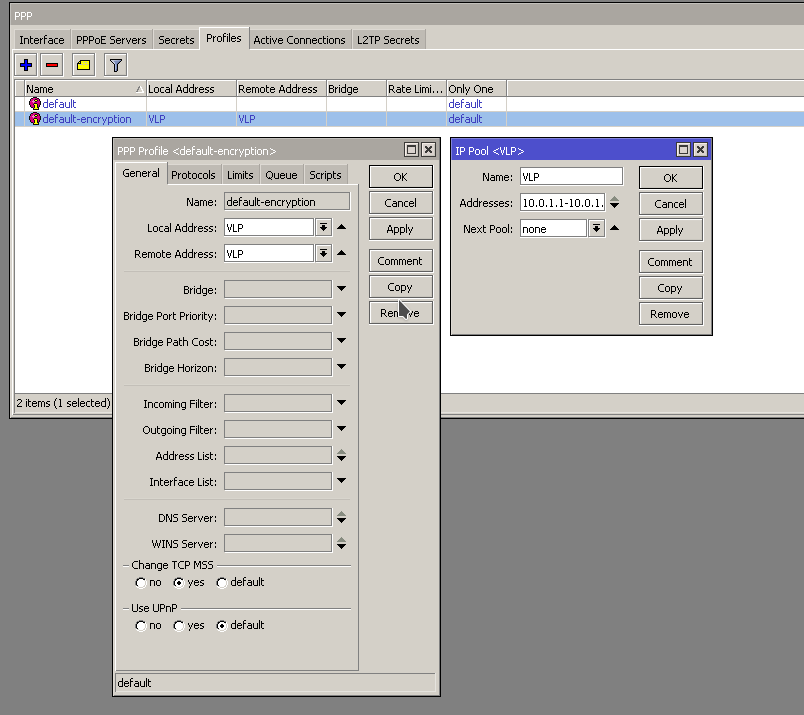
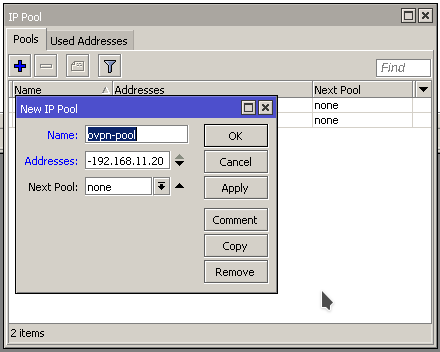
Create IP Pool
Create an IP pool that clients can pull and address from when they connect
Setup VPN IP pool
Modify Profiles
Modify the default-encryptoin Profile and specify the VPN IP pool.
Specify IP pool in profile
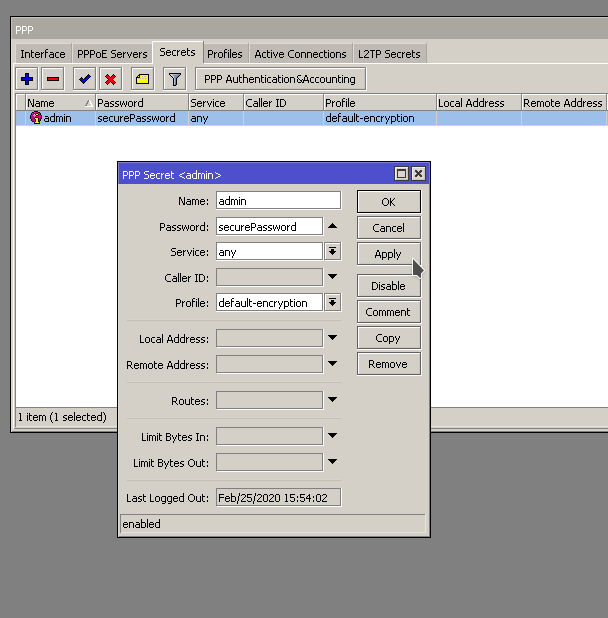
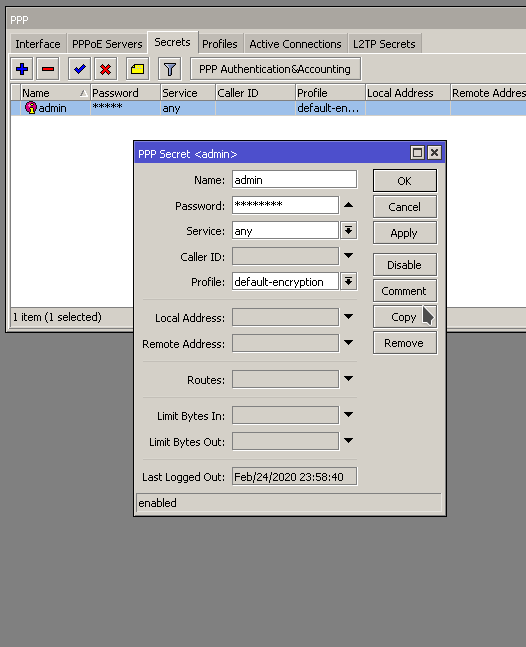
Create User
Create new user, specify the default-encryptio profile
Create VPN user
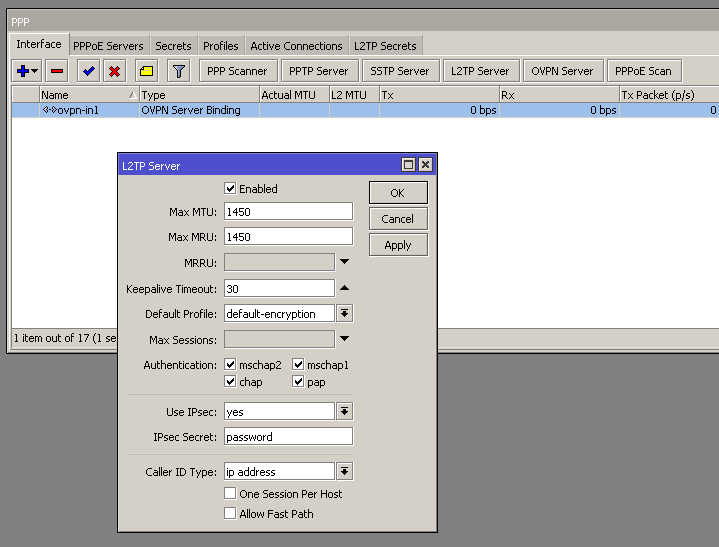
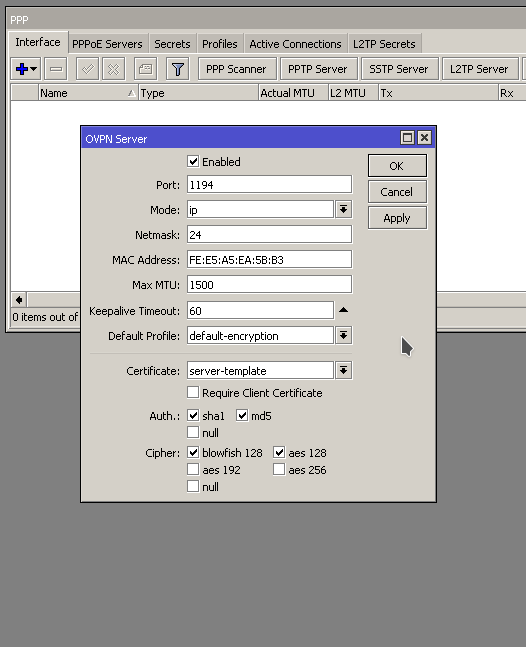
Turn OVPN Server on
Enable the OVPN server. Specify the “Default Profile:” to be the default-encyption, specify the certificate to be the server-template, or whatever the name is of the certificate you created.