LibreNMS – Setting up Alerts to monitor Voltage on Mikrotik Routers

Create Alert Rule

Go to “Alerts -> Alert Rules” Then “Create rule from Collection”

Search for “Sensor under limit” and Select

Setup Sensor under limit

Configure Alert Rule

Add another rule to limit to just the Voltage Sensors by using the “sensors.sensor_class = Voltage”

Select your Groups and Transports and Save.

Modify Alert Rule

Disable Alerts for Unused Ports

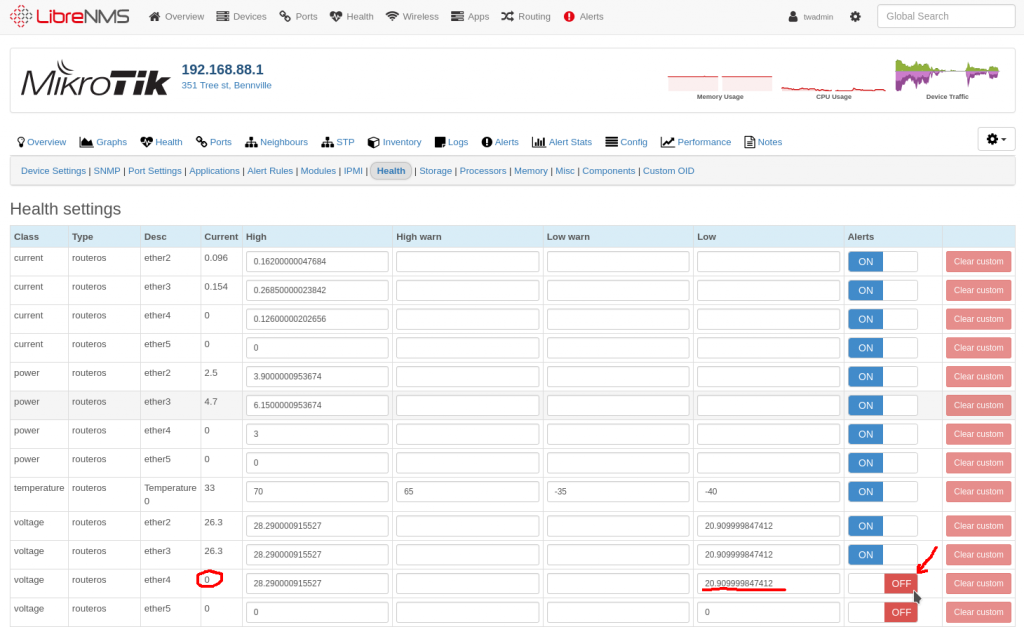
You may get some alerts because there are some ports that do not have any any voltage on them. You can disable them on a per device basis by going to the “device -> Edit -> Health” and turning alerts off

Turn off voltage alerts on port that has no PoE

UNMS – Set user as Super Admin from command line

The following commands can be run from a ssh session to your UNMS instance.

Show Current Users

sudo ~unms/app/unms-cli set-superadmin

Should get something like the following

            UNMS Users
 ┌─────────┬───────────┬───────────────────────────┬──────────────┬────────────┐
 │ (index) │ username  │           email           │     role     │ two-factor │
 ├─────────┼───────────┼───────────────────────────┼──────────────┼────────────┤
 │    0    │  'larry'  │  'larry@incredigeek.com'  │   'admin'    │   false    │
 │    1    │   'bob'   │   'bob@incredigeek.com'   │   'admin'    │   false    │
 └─────────┴───────────┴───────────────────────────┴──────────────┴────────────┘

Change User to Super Admin

To change a user to a Super Admin, add “–username username” to the above command.

Example:

sudo ~unms/app/unms-cli set-superadmin --username bob
            UNMS Users
 ┌─────────┬───────────┬───────────────────────────┬──────────────┬────────────┐
 │ (index) │ username  │           email           │     role     │ two-factor │
 ├─────────┼───────────┼───────────────────────────┼──────────────┼────────────┤
 │    0    │  'larry'  │  'larry@incredigeek.com'  │   'admin'    │   false    │
 │    1    │   'bob'   │   'bob@incredigeek.com'   │ 'superadmin' │   false    │
 └─────────┴───────────┴───────────────────────────┴──────────────┴────────────┘

Note that there does not appear to be a way to

Raspberry Pi – Ping IP Address and Toggle LED

The following script is for monitoring if an IP address is reachable or not. If it becomes unavailable the script will turn on a LED that is plugged into one of the GPIO pins of the Raspberry Pi. View pinout here

Script

#!/bin/bash
# Script to ping ip address and turn on LED on if device is unreachable.
                                                                                                                                                                                                 nPin="18"  # Change if GPIO pin is different                                                                                                     
ledPin="gpio${nPin}"                                                                                                                                                                                                                            toPing="8.8.8.8"  # Change to address you want to ping

echo "${nPin}" > /sys/class/gpio/export
echo "out" > /sys/class/gpio/${ledPin}/direction

if ( fping -r1 $toPing | grep -v alive ); then
         echo "Internet unreachable"
         # Turn on LED
         echo "1" > /sys/class/gpio/${ledPin}/value
 else
         # Turn off LED 
         echo "0" > /sys/class/gpio/${ledPin}/value
 fi

Save script as ping_led.sh and make it executable.

chmod +x ping_led.sh

and run the script.

sh ping_led.sh

Run script in crontab

You can setup the script to run every minute using a crontab

crontab -e

Add the following line

*/1 * * * * /home/pi/ping_led.sh

Should now execute the script every minute and not need any human interaction.

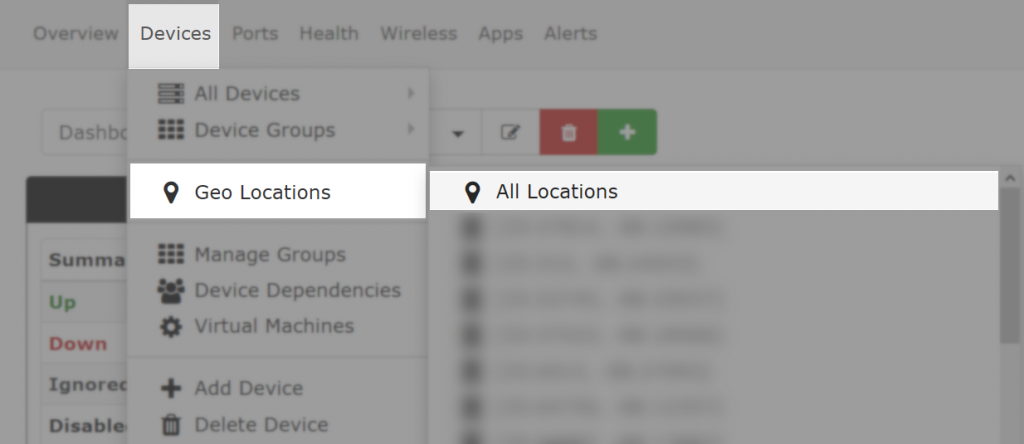
LibreNMS manually adjust GPS coordinates for a Geo Location

The locations are stored in the LibreNMS locations table

mysql -u librenms -p librenms

To list all the locations

select * from locations;

Set the specific coordinates for a location using the following command.
Replace the lat and lng, also the id should match the line your wanting to update.

update locations set lat = "33.5140",lng = "-86.8178" where id=25;

LibreNMS dump devices in MySQL database

All the devices are stored in the librenms datebase devices table.

You can dump all of them with the following command from a shell prompt.

sudo mysql -u librenms  -p librenms -e "select hostname,sysName from devices"

Example output

[jim@localhost ~]$ sudo mysql -p librenms -e "select hostname,sysName from devices"
 Enter password:
 +----------------------------------------+--------------------------------+
 | hostname                               | sysName                        |
 +----------------------------------------+--------------------------------+
 | 192.168.1.1                            | linksys                        |
 | 192.168.1.9                            | wifi-unifi                     |
 +----------------------------------------+--------------------------------+

Install Oxidized on LibreNMS

Install Oxidized

Install Instructions from here

Install prerequisites

For CentOS, RockyLinux, and Alma Linux.

sudo yum -y install make cmake which sqlite-devel openssl-devel libssh2-devel ruby gcc ruby-devel libicu-devel gcc-c++

Install Ruby Gems

If you run into issues with installing the oxidized-web gem because of a ruby version, try installing ruby 2.6.1 via rvm the docs say install 2.1.2, but was having issues with it. 2.6.1 seems fine.

Install Oxidized

Note: If you run into issues with oxidized not being able to ssh into devices, and showing “OpenSSL::PKey::PKeyError with msg “dh#set_pqg= is incompatible with OpenSSL 3.0″” in the log, try installing from git.

gem install oxidized 
gem install oxidized-script
gem install oxidized-web 

Run Oxidized twice to generate the config

oxidized

If you have issues running oxidized due to an invalid or self signed ssl cert, you can either fix the cert or ignore it in the oxidized config. https://github.com/ytti/oxidized/pull/618/files

Modify the Oxidized config file in “/root/.config/oxidized/config” to look like this.

Modify the http portion of the config file to look like the following.

http:
url: https://localhost/api/v0/oxidized
scheme: https
secure: false

Setup Config

Put the config file in the users home directory.

vi .config/oxidized/config

Setup the config, Basic config below, edit as needed

---
username: admin
password: password
model: airos
resolve_dns: true
interval: 3600
use_syslog: false
debug: false
threads: 30
timeout: 20
retries: 3
prompt: !ruby/regexp /^([\w.@-]+[#>]\s?)$/
rest: 127.0.0.1:8888
next_adds_job: false
vars: {}
groups:
airos:
username: ubnt
password: ubnt
routeros:
username: admin
password:
vars:
ssh_port: 2222
models: {}
pid: /home/incredigeek/.config/oxidized/pid
crash:
directory: /home/incredigeek/.config/oxidized/crashes
hostnames: false
stats:
history_size: 10
input:
default: ssh, telnet
debug: false
ssh:
secure: false
ftp:
passive: true
utf8_encoded: true
output:
default: file
file:
directory: /home/incredigeek/.config/oxidized/configs
source:
default: http
debug: false
http:
secure: false
scheme: https
url: https://localhost/api/v0/oxidized
map:
name: hostname
model: os
group: group
headers:
X-Auth-Token: '3wq2b87fj4e6fb5987b5812t6ej9709g'
model_map:
cisco: ios
juniper: junos
mikrotik: routeros

Setup as system service

Find the “oxidized.service” file, should be in

  /usr/local/rvm/gems/ruby-2.6.1/gems/oxidized-0.25.1/extra/oxidized.service

or

/usr/local/share/gems/gems/oxidized-0.28.0/extra/oxidized.service

and copy it to

  /usr/lib/systemd/system/

Edit it and change the user and try to launch it

systemctl start oxidized

If it fails, you may need to substitute the ExecStart= variable to the following more info

ExecStart=/usr/local/rvm/gems/ruby-2.6.1/wrappers/oxidize

Change the ruby number if yours is different.

Enable the service on system boot up and start

systemctl enable --now oxidized

Check that oxidized is running

systemctl status oxidized

LibreNMS config

Add the following to your /opt/librenms/config.php config file.

# Oxidized configuration
 $config['oxidized']['enabled']                  = TRUE;
 $config['oxidized']['url']                      = 'http://127.0.0.1:8888';
 $config['oxidized']['features']['versioning']   = true;
 $config['oxidized']['group_support']            = true;
 $config['oxidized']['default_group']            = 'default';
 $config['oxidized']['reload_nodes']             = true;
 $config['oxidized']['ignore_os'] = array('linux','windows');
 $config['oxidized']['ignore_types'] = array('server','power');

LibreNMS should now feed Oxidized the devices.

You can check in the LibreNMS interface to see if it is getting the configs. https://librenms/oxidized

Where librenms is your LibreNMS servers ip/hostname.

LibreNMS enable RRDCached on CentOS 7

Commands from https://docs.librenms.org/Extensions/RRDCached/

Create System Service

sudo vi /etc/systemd/system/rrdcached.service
[Unit]
Description=Data caching daemon for rrdtool
After=network.service
[Service]
Type=forking
PIDFile=/run/rrdcached.pid
ExecStart=/usr/bin/rrdcached -w 1800 -z 1800 -f 3600 -s librenms -U librenms -G librenms -B -R -j /var/tmp -l unix:/run/rrdcached.sock -t 4 -F -b /opt/librenms/rrd/
[Install]
WantedBy=default.target

Save with esc + :wq

Enable rrdcached service on boot up and start the service now

systemctl enable --now rrdcached.service

Enable RRDcached in librenms config

vi /opt/librenms/config.php

add/edit the following line. If it is commented out, uncomment it

$config['rrdcached'] = "unix:/run/rrdcached.sock";

Save with esc + :wq

Check the disk IO after a little bit to see if it went down.

LibreNMS manually clean up MySQL Syslog Database

Adding the following option to the config.php file is supposed to delete anything over 30 days.

$config['syslog_purge']                                 = 30;

You can also manually delete the entries out of the MySQL database by logging into MySQL, selecting the librenms database, and running the command below.

The command deletes all entries older than 12/9/2018 at 08:00. Change the date and time as needed.

DELETE FROM syslog WHERE timestamp < '2018-12-9 08:00:00';

The following link has some more clean up options.
https://docs.librenms.org/Support/Cleanup-options/

LibreNMS bulk delete

There is a php script in /opt/librenms/ that lets you delete a host from the command line.

sudo /opt/librenms/delhost.php 192.168.1.20

Replace 192.168.1.20 with the hostname/ip address of the host you want to delete.

Delete Multiple Hosts

First you’ll need to get a list of devices you want to remove.  You can do this by viewing the devices in the LibreNMS MySQL database;

Example:

$ mysql -u librenms -p librenms
MariaDB [librenms]> select hostname from devices;
+----------------------------------------+
| hostname |
+----------------------------------------+
| 192.168.88.1 |
| 192.168.1.20 |
| 192.168.1.12 |
| 192.168.88.5 |
4 rows in set (0.00 sec)
MariaDB [librenms]> exit

Put all the IP addresses you want to remove into a file and run the following for loop.  Replace “remove_ip.lst” with the name of your ip list file.

for i in `cat ~/remove_ip.lst`; do sudo /opt/librenms/delhost.php $i; done