Troubleshooting DNS CPU Usage on Mikrotik Router

Problem : Lots of CPU utilization. Profile shows a good bit of it is DNS related.

DNS eating CPU on Router

The router is setup to allow DNS to pass through to web servers so rDNS and other records can be looked up and resolved. This is a specific IP block that gets it’s addresses from the router. The firewall rules explicitly allow this address range. We’ll say 192.168.88.0/24, and blocks everything else. This works for the web servers. But why are we still getting a bunch of CPU utilization with DNS?

As it turns out, the firewall rule that allows the server address range also includes routers own address! So we have unintentionally whitelisted DNS access to our router.

To resolve the issue we can add another firewall rule that explicitly blocks DNS traffic to the routers IP address. We are using two rules, one to block TCP and the other UDP.

ip firewall filter add chain=input dst-address=192.168.88.1 protocol=6 dst-port=53 in-interface-list=WAN action=drop
ip firewall filter add chain=input dst-address=192.168.88.1 protocol=17 dst-port=53 in-interface-list=WAN action=drop

Rules 6 & 7 are the two new rules we just applied. 14 & 15 block input to the router, however rules 8 & 9 inadvertently allowed access to the router’s public IP.

Firewall Rules for Router

The Result? Our CPU usage dropped!

CPU Usage dropped after adding DNS firewall rules.

Quite dramatically too as the following LibreNMS screenshot shows.

LibreNMS CPU graph showing the overall CPU utilization improvement

For more information about DNS Amplification attacks, refer to the following links.

https://ask.wireshark.org/question/6865/dns-amplification-attack/
https://security.stackexchange.com/questions/237127/why-would-hackers-attack-a-dns-server-with-a-dos

How to stream Mikrotik Packet Sniffer to Wireshark

Setup Packet Sniffer on Mikrotik

Go to Tools -> Packet Sniffer

Mikrotik Packet Sniffer Settings

Configure the Streaming options. Set the Server IP address to the computer you are running Wireshark on

Configure IP address to stream to.

Configure the Filter settings. Unless you want to stream everything from the router to your computer.

Set filter options

Configure Wireshark

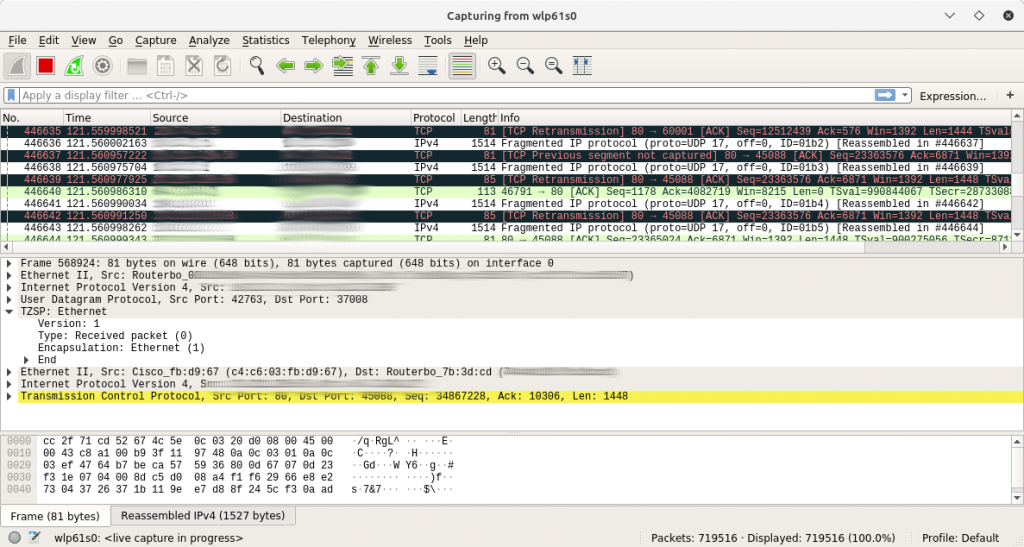
Make sure the TZSP is enabled in the “Enabled Protocols” Window. Either by going to “Analyze -> Enabled Protocols” or “Ctrl + Shift + E”

Enable TZSP protocol

Run Wireshark.

Wireshark

Helpful links

https://wiki.mikrotik.com/wiki/Ethereal/Wireshark

How To setup a L2TP vpn in Mikrotik

Open up PPP and select L2TP Server. Set it to Enabled, set IPsec to yes, and set the IPsec secret.

Add L2TP Server

Next go to PPP -> Profiles and modify the default-encryption one. You can setup an IP Pool to use for the VPN clients when they connect.

Setup Profiles

Next go to the PPP -> Secrets and configure the user to connect.

Setup User

Setup your VPN client and connect.

OpenVPN on Mikrotik Router

Create Certificate

Can look here to set a certificate up in Winbox
or here to configure from command line

Enable OpenVPN server

To setup a OpenVPN server on a router there are a few things that need to be done.

  1. Create certificates (See top of post)
  2. Create IP pool for clients to use
  3. Configure default-encryption profile
  4. Create User
  5. Configure OpenVPN server

Create IP Pool

Create an IP pool that clients can pull and address from when they connect

Setup VPN IP pool

Modify Profiles

Modify the default-encryptoin Profile and specify the VPN IP pool.

Specify IP pool in profile

Create User

Create new user, specify the default-encryptio profile

Create VPN user

Turn OVPN Server on

Enable the OVPN server. Specify the “Default Profile:” to be the default-encyption, specify the certificate to be the server-template, or whatever the name is of the certificate you created.

Enable OpenVPN server

Create Certificate on Mikrotik – Command Line

https://wiki.mikrotik.com/wiki/Manual:Create_Certificates
https://www.medo64.com/2016/12/simple-openvpn-server-on-mikrotik/

Create Certificate Authority and Server Certificate

/certificate add name=ca-template common-name=myCa days-valid=3650 key-size=2048 key-usage=key-cert-sign,crl-sign

/certificate add name=server-template common-name=server days-valid=3650 key-size=2048 key-usage=digital-signature,key-encipherment,tls-server

Sign certificates

/certificate sign ca-template name=myCa

/certificate sign server-template ca=myCa name=server

Trust certificates

/certificate set myCa trusted=yes

/certificate set server trusted=yes

Create Certificate on Mikrotik – WinBox

Create Certificates

Open up the Certificates window by going to /System -> Certificates. Hit the + to add a new certificate

Create Certificate Authority Certificate

First we are going to create a Certificate Authority template

Setup Certificate Authority template

Specify the key usage to “crl sign” and “key cert. sign” and apply

Set Certificate Authority Key Usage

Setup Server Certificate

Now we are going to create a server template

Setup Server Template

We need to specify “Digital signature, key encipherment, and tls server” You may need to enable/disable more depending on your use case scenario. In this case we are setting it up for OpenVPN.

Configure Server Key Usage

Sign Templates

First we need to sign the ca-template by opening up the the Certificate and hitting Sign on the right hand side. Should get the little Sign window pop up.

Sign Certificate Authority

Progress will show done when it is finished signing.

Next we need to sign the server-template. When Signing the server template, specify the ca-template in the CA: field. See below

Sign Server Certificate

Move multiple VLANs between two interfaces – Mikrotik

Move VLANs with foreach

Move all the VLANs under ether7 to ether6. Instead of an “=” sign, you can use a “~” to do a partial match.

foreach i in=[/interface vlan find where interface="ether7"] do={interface vlan set interface=ether6-master-local  $i } 

Move IP address to new port programmatically

Move ip address from ether6 to ether7. Change 192.168.88.1/24 to the address and the find command will find it regardless of the port and assign it to ether6 or whichever port is specified.

ip address set interface=ether6-master-local [find address="192.168.88.1/24"]

Using Delay

You can add a delay before a command runs by specifying delay and then the time to wait.

delay 60 

Use the ; to separate commands. Example below, wait 5 seconds then print the ip addresses.

delay 5 ; ip address print

Putting it all together

The following command/s will wait 60 seconds then move all the VLANs on ether7 to ether6 and then move the 192.168.88.1/24 address to ether6.

delay 60 ; foreach i in=[/interface vlan find where interface="ether7"] do={interface vlan set interface=ether6-master-local  $i } ; ip address set interface=ether6-master-local [find address="192.168.88.1/24"]

Mikrotik – bridge port received packet with own address as source address (), probably loop

Sometime the following warning can show up in the log.

10:48:45 interface,warning ether2: bridge port received packet with own address as source address (74:4d:28:69:89:9d), probably loop

Check and verify that your interface MAC addresses are unique. VLANs look to be the exception as they should share the MAC address of the interface the VLAN is on.

More information in this thread.
https://forum.mikrotik.com/viewtopic.php?p=583064#p703228

LibreNMS – Setting up Alerts to monitor Voltage on Mikrotik Routers

Create Alert Rule

Go to “Alerts -> Alert Rules” Then “Create rule from Collection”

Search for “Sensor under limit” and Select

Setup Sensor under limit

Configure Alert Rule

Add another rule to limit to just the Voltage Sensors by using the “sensors.sensor_class = Voltage”

Select your Groups and Transports and Save.

Modify Alert Rule

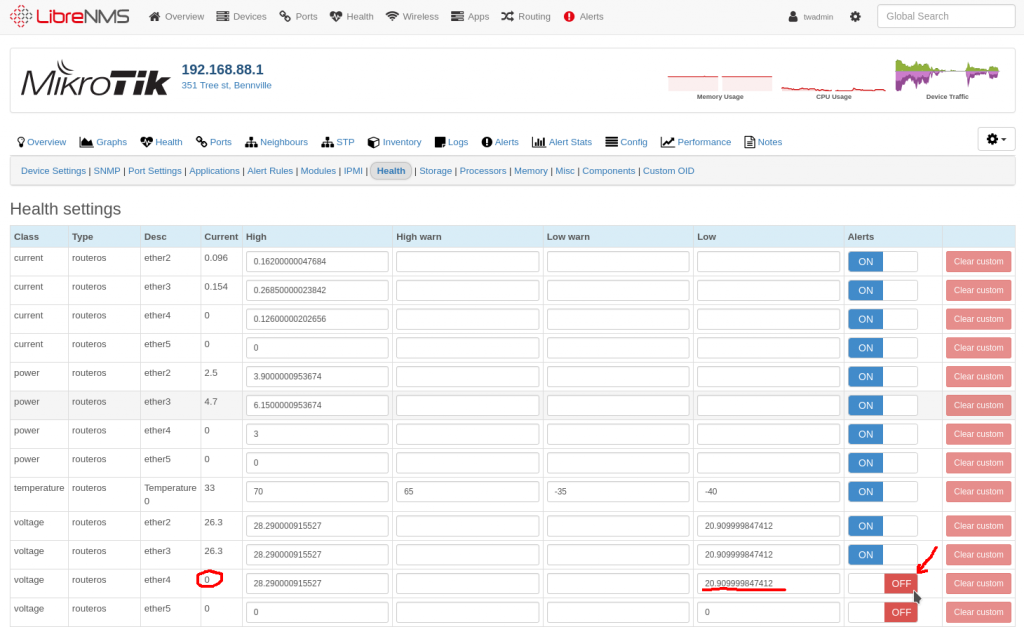
Disable Alerts for Unused Ports

You may get some alerts because there are some ports that do not have any any voltage on them. You can disable them on a per device basis by going to the “device -> Edit -> Health” and turning alerts off

Turn off voltage alerts on port that has no PoE

Mikrotik RouterOS – VLAN notes

https://wiki.mikrotik.com/wiki/Manual:Interface/VLAN

VLAN successfully passes through regular Ethernet bridges

https://wiki.mikrotik.com/wiki/Manual:Basic_VLAN_switching

https://wiki.mikrotik.com/wiki/Manual:Layer2_misconfiguration

DHCP offering lease without success issue with Mikrotik on the far side of Ubiquiti device.

DHCP error offering lease

Make sure that radio does not have the VLAN configured on just the WAN interface. Easiest way would be to put it in bridge mode and use the management VLAN.