Error: Could not create the Java Virtual Machine

Apparently on some versions of Java checking the Java version will give you the following error.

root@local:~# java -v
Unrecognized option: -v
Error: Could not create the Java Virtual Machine.
Error: A fatal exception has occurred. Program will exit.
root@local:~#

The issue being the -v or –version options are not recognized. On newer versions of Java it is recognized.

The proper way to do it is -version with only one dash

root@local:~# java -version
openjdk version "1.8.0_252"
OpenJDK Runtime Environment (build 1.8.0_252-8u252-b09-1ubuntu1-b09)
OpenJDK 64-Bit Server VM (build 25.252-b09, mixed mode)
root@local:~#

https://askubuntu.com/questions/324858/installed-jdk-by-and-have-error-could-not-create-the-java-virtual-machine

Install Element (Matrix Client) on Ubuntu

https://element.io/get-started

Installing the Matrix client Element is fairly straight forward on Ubuntu. You should be able to copy and paste the following commands in a terminal.

sudo wget -O /usr/share/keyrings/riot-im-archive-keyring.gpg https://packages.riot.im/debian/riot-im-archive-keyring.gpg
echo "deb [signed-by=/usr/share/keyrings/riot-im-archive-keyring.gpg] https://packages.riot.im/debian/ default main" | sudo tee /etc/apt/sources.list.d/riot-im.list
sudo apt update
sudo apt install element-desktop

Configure rsnapshot on Ubuntu Server

rsnapshot is a utility that uses rsync to backup files locally or it can backup files from a remote server.

While trying to figure out a good solution for backing up an Ubuntu Server I decided to try rsnapshot, however since it can either create a local backup or pull a remote backup it needs to be configured to do that on the backup server side. It does not “push” a backup to a backup server.

Some helpful snippits from the man file.

rsnapshot will typically be invoked as root by a cron job, or series of cron jobs. It is possible, however, to run as any    arbitrary user with an alternate configuration file.
...
USAGE
        rsnapshot can be used by any user, but for system-wide backups you will probably want to run it as root.
...
NOTES
        Make sure your /etc/rsnapshot.conf file has all elements separated by tabs.  See
        /usr/share/doc/rsnapshot/examples/rsnapshot.conf.default.gz for a working example file.
    Make sure you put a trailing slash on the end of all directory references.  If you don't, you may have extra directories    created in your snapshots.  For more information on how the trailing slash is handled, see the rsync(1) manpage.

Overview

Scenario

Host A runs xyz application and host B is the backup server. We create a backup user on host A, host B then uses that user to ssh and rsync backups to itself.

  1. Create backup user
  2. Configure rysnc to be used without a password
  3. Setup SSH Key, aka Passwordless authentication (On backup server)
  4. Setup rsnapshot config (On backup server)
  5. Configure rsnapshot in crontab (On backup server)
  6. Final Testing

Create backup user

The following commands are fairly straight forward. Change backupuser to whatever you want to call your backup user.

sudo useradd -m backupuser
passwd backupuser
sudo usermod -a -G sudo backupuser

Configure rysnc to be used without a password

We need to setup the backup user to be able to use “sudo rsync” without having to input the user password. If we don’t use sudo we can’t access system files for backups. And if we have to manually input the password every time rsync runs, then the backups would not be automatic. The following link was helpful.

https://unix.stackexchange.com/questions/325100/proper-way-to-set-up-rsnapshot-over-ssh

All we need to do is create a file in /etc/sudoers.d/username and then tell it we don’t need to enter a password when “sudo rsync” is run.

sudo tee /etc/sudoers.d/backupuser <<<'backupuser ALL = (root) NOPASSWD: /usr/bin/rsync'

Setup SSH Key, aka Passwordless authentication (On backup server)

Log into the backup server

Create SSH keys. Note that since rsnapshot wants to run as root, we create the key and copy it as the root user.

sudo ssh-keygen

Accept all the defaults so we can login from the backup server without having to enter in a password.

Copy ssh key to the server we are wanting to back up

sudo ssh-copy-id backupuser@ip

enter in the password and the the key should get copied it over. Once complete, verify that you can login without having to enter in a password.

Setup rsnapshot config (On backup server)

Open up the rsnapshot config file and modify where appropriate. /etc/rsnapshot.conf

Change the path to where the snapshots are stored. By default it stores them under /.snapshots. I moved it under a local user as I am not needing to use rsnapshot to backup the local backup server files.


# SNAPSHOT ROOT DIRECTORY
snapshot_root /home/user/rsnapshot/snapshots/

Add a daily backup option under Backup levels

# BACKUP LEVELS / INTERVAL #
retain daily 6

Setup remote server to get a backup from. Replace ipaddress and directories as needed. hostname is the sever name. You can change to whatever you want.

### BACKUP POINTS / SCRIPTS ###
# LOCALHOST
# Comment or delete entries unless you want to backup those as well
# EXAMPLE.COM
backup  backupuser@ipaddress:/home/     hostname/       +rsync_long_args=--rsync-path="sudo rsync"

If you would like to back up multiple locations you can create multiple entries with different remote paths. Example locations to add

backup  backupuser@ipaddress:/etc/     hostname/       +rsync_long_args=--rsync-path="sudo rsync"
backup  backupuser@ipaddress:/usr/local/     hostname/       +rsync_long_args=--rsync-path="sudo rsync"

Verify that the config is good with

sudo rsnapshot configtest

It should return Syntax OK

Setup Crontab

sudo crontab -e

Add the following line to run rsnapshot at 3AM every day. More information about crontab can be found here.

0 3 * * * /usr/bin/rsnapshot daily

Final Testing

Manually run a backup to verify everything is set up correctly.

sudo rsnapshot daily

After it runs you can check the directory you specified in the config file to verify that the files did get copied.

Enable Automatic Update for Ubuntu Server 22.04

These steps should work for multiple versions of Ubuntu Server.

Thankfully enabling automatic updates in Ubuntu is super easy.

First make sure that the “unattended-upgrades” package is installed

sudo apt install unattended-upgrades

It was already installed on my Ubuntu 20.04 server instance.
Next run dpkg to reconfigure and enable updates

sudo dpkg-reconfigure unattended-upgrades

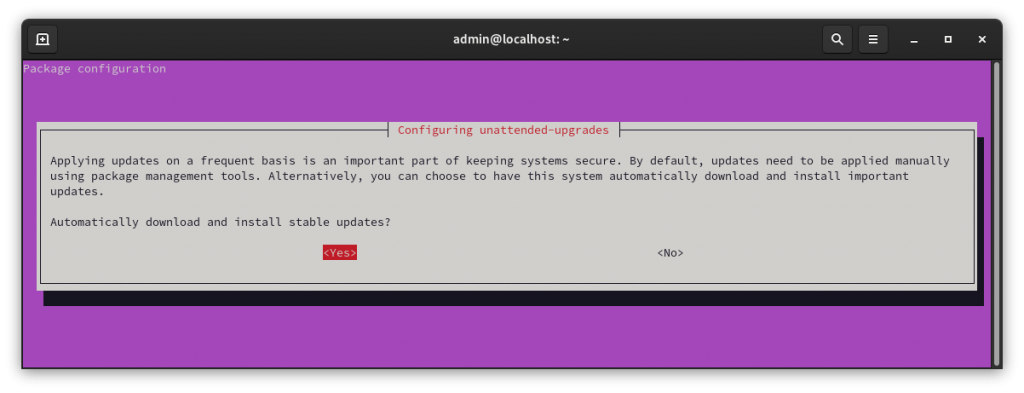
You should get the following prompt.

Configuring automatic updates

Hit “Yes” to enable.

Your system should now automatically install updates. however, if it needs to reboot it may not. You can configure the reboot options in

sudo vi /etc/apt/apt.conf.d/50unattended-upgrades

Scroll down to the Reboot lines and uncomment

// Automatically reboot *WITHOUT CONFIRMATION* if
//  the file /var/run/reboot-required is found after the upgrade
Unattended-Upgrade::Automatic-Reboot "true";  // <- Uncomment line

// If automatic reboot is enabled and needed, reboot at the specific
// time instead of immediately
// Default: "now"
Unattended-Upgrade::Automatic-Reboot-Time "02:00";  // <- Uncomment line

Save the file. Your system should now automatically install stable updates.

Disable automatic update

You can disable the automatic updates by running the dpkg command again.

sudo dpkg-reconfigure unattended-upgrades

and selecting “No”

Automatic updates should now be off.

More information can be found at the following link.

https://www.cyberciti.biz/faq/set-up-automatic-unattended-updates-for-ubuntu-20-04/

How To Setup Samba/CIFS Share on Fedora Server

We are going to setup a Samba/CIFS share on Fedora Server that we will then access from Windows 10.

  1. Install Samba/CIFS server packages
  2. Create user to access share
  3. Configure SELinux and firewall
  4. Connect to erver from Windows

1. Install Samba/CIFS Fedora Server Packages

First we need to install the samba package.

sudo dnf install samba
Installing SMB on Fedora
Samba Dependencies

Next, lets enable the Samba service so it automatically starts when the server boots up.

systemctl enable smb nmb
systemctl start smb

nmb is a “NetBIOS name server that provides NetBIOS over IP naming service to clients”
https://www.samba.org/samba/docs/current/man-html/nmbd.8.html

2. Setup Samba/CIFS User

We now need a user to connect to the Samba share with. You can use the commands below to to create a new user.

pdbedit only configures a current Linux system user for Samba. You can skip creating a new Linux user, but only if there is one already created that you can use.

sudo useradd -m sambaUser
sudo passwd sambaUser
sudo pdbedit -a sambaUser

3. Configure Server SELinux and Firewall Permissions

Configure SELinux permissions with the following command.

sudo setsebool -P samba_enable_home_dirs on

You can also just disable SELinux. Although it is not necessarily recommended.
How To Enable/Disable SELinux

sudo setsebool -P samba_enable_home_dirs on
sudo firewall-cmd --add-service=samba --permanent
sudo firewall-cmd --reload

4. Test Samba/CIFS Share from Windows

You can now test to see if the share works. Open up Windows Explorer. Type in the IP address of the server and connect.

\\ip-address\sambaUser

It should prompt you for a login. Enter the user and password you set up.

Connecting to Fedora Samba/CIFS server

If it loads, then congratulations! You have successfully setup a Samba/CIFS Share on Fedora Server. Create new directories or files or whatever else you need.

Successfully Connected to Fedora Samba/CIFS Server

Check out the following links for more information about setting up Samba.

https://fedoramagazine.org/fedora-32-simple-local-file-sharing-with-samba/
https://jewelhuq.wordpress.com/2017/12/08/how-to-install-samba-server-in-fedora/

https://fedoramagazine.org/fedora-32-simple-local-file-sharing-with-samba/

Where is my software RAID?!

There are a few different ways to view RAID information on Fedora. Here are two commands that can help.

1. Print Mdadm config

You can copy and past the following command to print the mdadm configuration.

cat /etc/mdadm.conf

It should return something similar to the following.

$ cat /etc/mdadm.conf
# mdadm.conf written out by anacondaMAILADDR root
AUTO +imsm +1.x -all
ARRAY /dev/md/Boot level=raid0 num-devices=6 UUID=21ce258a:015d0dd4:90d5b80e:ab04b7f7
ARRAY /dev/md/Root level=raid0 num-devices=6 UUID=4be32ad0:f3aa77bd:139d749d:4a6aab60 

We see from the above output that we have two raid arrays. Both RAID 0 over 6 drives.

2. Print mdstats

You can show the mdstats by running

cat /proc/mdstat

Should get output similar to the following.

$ cat /proc/mdstat
 Personalities : [raid0]
 md126 : active raid0 sdc2[0] sdf2[5] sde2[4] sdd2[1] sda2[2] sdb2[3]
       5856552960 blocks super 1.2 512k chunks
 md127 : active raid0 sdc1[0] sdf1[5] sde1[4] sdd1[1] sdb1[3] sda1[2]
       3133440 blocks super 1.2 512k chunks
 unused devices: 

This shows us the RAID size. About 5TB on one and 3GB on the other. The 3GB is used for the boot partition.

Other Notes

Apparently there is a difference between “mdadm” and “dm-raid”
Mdadm is for managing and creating software raids, while dm-raid interacts if a device like a laptop has a “fake RAID”

https://superuser.com/questions/721795/how-fake-raid-communicates-with-operating-systemlinux/721796#721796
https://stackoverflow.com/questions/23164384/what-is-the-difference-between-dm-and-md-in-linux-kernel

For more information on managing RAID with Mdadm, you can refer here.

Install RX 580 Mining Drivers on Debian Based Distributions

Use wget to download AMD drivers.

wget https://drivers.amd.com/drivers/linux/amdgpu-pro-20.45-1164792-ubuntu-20.04.tar.xz --referer https://support.amd.com

Extract archive.

tar xf amdgpu-pro-20.45-1164792-ubuntu-20.04.tar.xz

Change directory

cd amdgpu-pro-20.45-1164792-ubuntu-20.04

Install AMD Drivers

./amdgpu-pro-install -y --opencl=legacy,rocm --headless

If you run into issues with it saying “Unsupported DEB based OS” Refer to the following article.

Unsupported DEB-based OS: /etc/os-release ID ‘kali’

An upgrade from ‘disco’ (19.04) to ‘focal’ (20.04) is not supported with this tool.

Unfortunately once a version of Ubuntu becomes unsupported you can run into problems upgrading to the latest version. As is the case when you try to upgrade disco to focal. Ubunut 19.04 to 20.04.

A work around is to update the apt sources and then run an update

Update Apt Sources with.

sudo sed -i 's/disco/focal/g' /etc/apt/sources.list

Now Upgrade with the following two commands.

sudo apt update
sudo apt -y dist-upgrade

More info at the following link.

https://www.knowledgepublisher.com/article/1452/solution-an-upgrade-from-disco-to-focal-is-not-supported-with-this-tool.html

Kali Linux Hash Sum Mismatch while doing apt update

https://askubuntu.com/questions/1235914/hash-sum-mismatch-error-due-to-identical-sha1-and-md5-but-different-sha256

Looks like the problem is caused by the Windows Hypervisor Platform. Work around is to disable it.

In the Start menu search for “turn Windows features on or off”

Once open, disable “Virtual Machine Platform” and “Windows Hypervisor Platform”

Disable Virtual Machine Platform

You will need to reboot after it finishes.