Using Auditd to monitor changes to Linux

Install and enable auditd with

sudo dnf install auditd
sudo systemctl enable auditd
sudo systemctl start auditd

Add a file or directory to monitor with

auditctl -w /etc/passwd -k password

-w is watch path
-k is a filter key we can use later to search through logs

Now we can search with ausearch

ausearch -k password

Using Preconfigured Rules

There are already some preconfigured rules in /usr/share/audit/sample-rules/

We can copy those to /etc/auditd/rules.d/ and use them.

cd /usr/share/audit/sample-rules/
cp 10-base-config.rules 30-stig.rules 31-privileged.rules 99-finalize.rules /etc/audit/rules.d/
augenrules --load

Note on the 31-privileged.rules file. You’ll need to run the commands in the file which will create a new file. Then we can copy that to “/etc/auditd/rules.d/”

find /bin -type f -perm -04000 2>/dev/null | awk '{ printf "-a always,exit -F path=%s -F perm=x -F auid>=1000 -F auid!=unset -F key=privileged\n", $1 }' > priv.rules
#find /sbin -type f -perm -04000 2>/dev/null | awk '{ printf "-a always,exit -F path=%s -F perm=x -F auid>=1000 -F auid!=unset -F key=privileged\n", $1 }' >> priv.rules
#find /usr/bin -type f -perm -04000 2>/dev/null | awk '{ printf "-a always,exit -F path=%s -F perm=x -F auid>=1000 -F auid!=unset -F key=privileged\n", $1 }' >> priv.rules
#find /usr/sbin -type f -perm -04000 2>/dev/null | awk '{ printf "-a always,exit -F path=%s -F perm=x -F auid>=1000 -F auid!=unset -F key=privileged\n", $1 }' >> priv.rules
#filecap /bin 2>/dev/null | sed '1d' | awk '{ printf "-a always,exit -F path=%s -F perm=x -F auid>=1000 -F auid!=unset -F key=privileged\n", $2 }' >> priv.rules
#filecap /sbin 2>/dev/null | sed '1d' | awk '{ printf "-a always,exit -F path=%s -F perm=x -F auid>=1000 -F auid!=unset -F key=privileged\n", $2 }' >> priv.rules
#filecap /usr/bin 2>/dev/null | sed '1d' | awk '{ printf "-a always,exit -F path=%s -F perm=x -F auid>=1000 -F auid!=unset -F key=privileged\n", $2 }' >> priv.rules
#filecap /usr/sbin 2>/dev/null | sed '1d' | awk '{ printf "-a always,exit -F path=%s -F perm=x -F auid>=1000 -F auid!=unset -F key=privileged\n", $2 }' >> priv.rules

And Copy priv.rules to /etc/audit/rules.d/31-privileged.rules. Overwrite the file there if needed.

cp ./priv.rules /etc/audit/rules.d/31-privileged.rules

Load the rules.

augenrules --load

https://access.redhat.com/documentation/en-us/red_hat_enterprise_linux/8/html/security_hardening/auditing-the-system_security-hardening

How to Create a Self Signed TLS Certificate in Linux

Here is a quick way to create a self signed certificate in Linux.

Run the following command. Fill out the required info.

openssl req -x509 -sha256 -nodes -days 3652 -newkey rsa:4096 -keyout /etc/pki/tls/private/localhost.key -out /etc/pki/tls/certs/localhost.crt
chmod 400 /etc/pki/tls/private/localhost.key

Now in your Apache or Nginx files, specify the path to the Key and the Certificate.

Note that if you’ll need to add the

https://www.linode.com/docs/guides/create-a-self-signed-tls-certificate/

How to Undelete Files on XFS Filesystem

There are a couple different options for undeleting files for XFS filesystems.

TestDisk

TestDisk is a great command line recovery tool. Unfortunately, it can be slightly more difficult on systems using XFS compared to EXT4 systems. TestDisk does not support undeleting a file in place on XFS.

You can still recover files using TestDisk, you just need to recover the whole drive and dig through the recovery results to find the files you want.

xfs_undelete

There is also another utility that can be helpful. xfs_undelete

https://github.com/ianka/xfs_undelete

It allows for a little more flexibility in recovering files. For instance, you can specify to recover the files from the past hour to recover.

Download prerequisites

sudo dnf install tcllib
wget https://raw.githubusercontent.com/ianka/xfs_undelete/master/xfs_undelete
chmod u+x ./xfs_undelete

./xfs_undelete

Example of running xfs_undelete

./xfs_undelete -t -1hour ./dev/sda2

You will need a different filesystem to save the files to. Otherwise you will receive the following error.

Your output directory is  /home/bob/recovery/
That is within the filesystem  /  you want to recover files
from. This isn't feasible as it would overwrite the deleted files you wanted to
recover. Please specify the option -o /path/to/output_directory on another (rw
mounted) filesystem or run xfs_undelete from within a directory on that
filesystem so the recovered files could be written there. They cannot be
recovered in place.

It’s not the greatest idea to recover on the system while running. Ideally, shut the system down, plug the drive into another machine as read only, and copy the files off.

You could also boot up in single user mode or a live Linux iso/thumbdrive and mount another recovery drive. Should work for both physical and virtual environments.

Log rotation for rsyslog using fixed size

We’ll follow the documentation from here.

Changes are made to the /etc/rsyslog.conf config file.

For this example, we will be configuring our named.log file to not exceed 50MiB, and then we’ll have a rotated log “.1” that is also 50MiB. Total it should not exceed 100BMiB.

First we need to create an out channel, and then we assign the out channel to a logging channel. We also need a script that rotates the logs.

Create the Output Channel

$outchannel log_rotation,/var/log/named.log, 52428800,/home/user/log_rotation.sh

Assign Output Channel to Logging Channel

On our line that is logging named, at the end add :$log_rotation

Example:

local0.*                   /var/log/named.log:$log_rotation

Script to Rotate Log

Somewhere on the system, create a rotate.sh script. Name it whatever you want, just be sure the path and name in the rsyslog.conf is the same.

Add the following one line to move the current log to a rotate log.

mv -f /var/log/named.log /var/log/named.log.1

As the log fills up and hits ~50MiB, the named.sh script will run which rotates(moves) the log file to logfile.log.1. This will keep our usage for named.log to 100MiB.

Add a Button/Change Menu Item Color to WordPress Menu Bar

The following article was helpful in getting started adding a button to the WordPress menu bar.

https://www.wpbeginner.com/wp-tutorials/how-to-add-a-button-in-your-wordpress-header-menu/

Modifying a Menu Item on a WordPress theme is not too difficult. The basic steps are

  1. Add Menu Item
  2. Add CSS Class to specific menu item
  3. Customize the new CSS class by using the Additional CSS Options

Add Menu Item

Add or customize a menu item by going to Appearance -> Menu

Add a CSS Class to Menu Item

You can add a CSS class to an existing menu item, or you can create a new menu item.

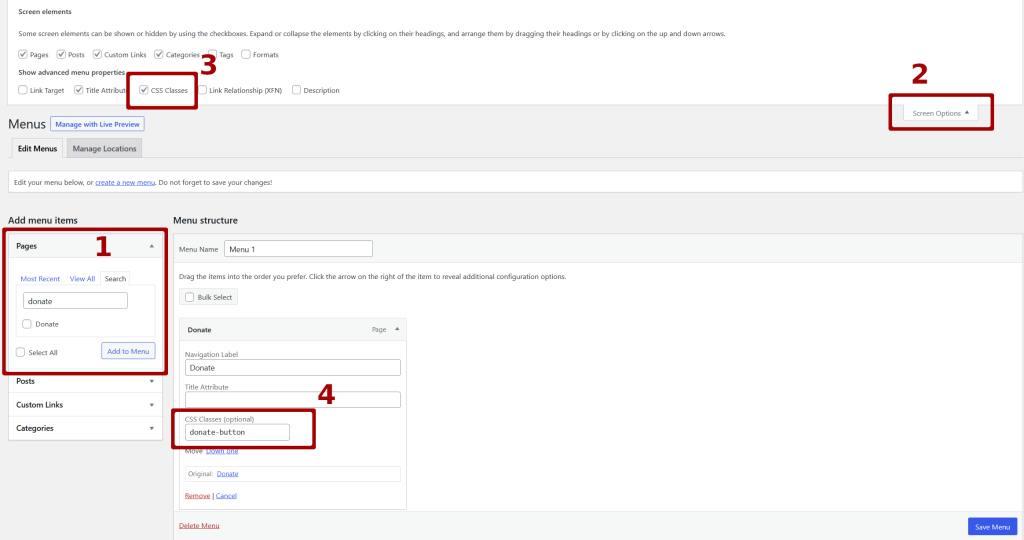
  1. Create Menu Item
  2. Select Screen Options
  3. Enable CSS Classes. (Needed for the next step)
  4. Under the Menu option, set a CSS class. (Name it something unique so it doesn’t interfere with other CSS classes. We’ll configure the CSS in the next step)

Customize CSS

Now we can setup and customize the CSS class by going to Appearance -> Customize

Now find where the “Additional CSS” setting is. If it is not under the main list, try looking under “Advanced”. The Additional CSS editor page should look like the following.

Once there, add all the CSS you want to change color, padding, etc.

You can make it look like a button by adding things like

border-radius: 5px;
padding: 0.5rem;
margin: 0.2rem;

Check out the following link for more info about buttons.

https://www.w3schools.com/csS/css3_buttons.asp

Server Logs not Showing up in LibreNMS

The problem: Linux servers have been configured to send their local syslogs to LibreNMS, but are not showing up under the LibreNMS -> DEVICE -> Logs-> Syslog

After a bit of troubleshooting, found that the issue is the hostname being sent with the logs is different than what LibreNMS has for the device. It appears that some Linux distributions will or can use an abbreviated system hostname. There is a section in the LibreNMS docs about this

https://docs.librenms.org/Extensions/Syslog/#matching-syslogs-to-hosts-with-different-names

We can either do what the docs say, or we can set the host name in the rsyslog.conf file on each of the servers.

Log into the server and open up

sudo vi /etc/rsyslog.conf

At the very top, add the following line to set the hostname

$LocalHostName host.server_name_fqdn.com

Save the file and restart rsyslog

sudo systemctl restart rsyslog

Refresh the page to verify the logs are showing up in LibreNMS.

If you are still having issues, you may want to check the following

  1. SELinux on LibreNMS SELinux Audit Commands and Links, Setup LibreNMS as Syslog Server
  2. Firewall on LibreNMS FrDual Zones in Firewalld (Public/Private or External/Internal), Install LibreNMS on CentOS
  3. Read the documentation entirely through

Setup LibreNMS as Syslog Server

Using the LibreNMS documentation for setting up syslog-ng so LibreNMS can ingest logs from Cisco, Mikrotik, Ubiquiti etc. equipment.

https://docs.librenms.org/Extensions/Syslog/

Enable Syslog in LibreNMS settings

First thing we need to do is enable syslog for LibreNMS. Edit the /opt/librenms/config.php and add or enable

$config['enable_syslog'] = 1;

Install and Configure syslog-ng

Install syslog-ng with dnf or yum.

sudo dnf install -y syslog-ng

Create a config file for LibreNMS

vi /etc/syslog-ng/conf.d/librenms.conf

Put the following in the config file

source s_net {
        tcp(port(514) flags(syslog-protocol));
        udp(port(514) flags(syslog-protocol));
};

destination d_librenms {
        program("/opt/librenms/syslog.php" template ("$HOST||$FACILITY||$PRIORITY||$LEVEL||$TAG||$R_YEAR-$R_MONTH-$R_DAY $R_HOUR:$R_MIN:$R_SEC||$MSG||$PROGRAM\n") template-escape(yes));
};

log {
        source(s_net);
        source(s_sys);
        destination(d_librenms);
};

Restart and enable syslog-ng

sudo systemctl restart syslog-ng
sudo systemctl enable syslog-ng

SELinux

If we are running SELinux, we’ll need to make and apply a module to let the logs show up in the web interface.

vi librenms-rsyslog.te

Put the following in the file

module mycustom-librenms-rsyslog 1.0;

require {
        type syslogd_t;
        type httpd_sys_rw_content_t;
        type ping_exec_t;
        class process execmem;
        class dir { getattr search write };
        class file { append getattr execute open read };
}

#============= syslogd_t ==============
allow syslogd_t httpd_sys_rw_content_t:dir { getattr search write };
allow syslogd_t httpd_sys_rw_content_t:file { open read append getattr };
allow syslogd_t self:process execmem;
allow syslogd_t ping_exec_t:file execute;

Now run the following commands to make and apply our SELinux module.

checkmodule -M -m -o librenms-rsyslog.mod librenms-rsyslog.te
semodule_package -o librenms-rsyslog.pp -m librenms-rsyslog.mod
sudo semodule -i librenms-rsyslog.pp

Mongo “illegal hardware instruction mongo” on Linux

While trying to install and run mongo on Kali Linux, I encountered the following error.

zsh: illegal hardware instruction mongo

Using a Bash shell it returns the following instead.

Illegal instruction

It appears that the issue is from running mongo in a virtual machine.

https://www.mongodb.com/community/forums/t/mongodb-community-5-0-12-illegal-instruction-core-dumped-ubuntu-20-04-5-lts/204332

https://askubuntu.com/questions/699077/how-to-enable-avx2-extensions-on-a-ubuntu-guest-in-virtualbox-5

Resolution? Run on bare metal or find a way to enable avx2 in the virtual machine.