You’ll need to run with the -d “downgrade” option if you are migrating from CentOS 8 Stream. https://github.com/AlmaLinux/almalinux-deploy/tree/master?tab=readme-ov-file#roadmap
You may need to remove packages if there are conflicts. On one instance, there were issues and I needed to remove grafana and llvm-compat-libs.
This playbook can be used to report the Linux Distribution, OS Family, Distribution Version, and Distribution Major Version. This can be helpful for verifying all operating systems are up to date, or for working out what to use in other playbooks.
You will need to already have an inventory file.
Playbook yaml file
The playbook is very simple. Copy and paste the following contents into a file named “os_info.yaml”
---
- hosts: all
  gather_facts: yes
  become: false
  tasks:
  - name: Distribution
    debug: msg=" distribution {{ ansible_distribution }} - os_family {{ ansible_os_family}} - distribution_version {{ansible_distribution_version}} - distribution_major_version {{ ansible_distribution_major_version }}"
If we wanted to, we could break out each Ansible variable in its own debug line. I prefer having them all on a single line.
Running the Playbook
Run the playbook like any other playbook. Change inventory.ini to your inventory file. If your inventory file is encrypted, use the –ask-vault-pass option.
The first thing we need to do is create an inventory file. This will contain a list of our servers along with the credentials.
touch hosts.txt
Now let’s encrypt the file with Ansible Vault.
ansible-vault encrypt hosts.txt
The file is now encrypted. To edit the file, we need to use `ansible-vault edit`. If you want to, you can configure the hosts.txt file and then encrypt it when you are finished.
ansible-vault edit hosts.txt
Now add some hosts. In this example we add the local Kali machine, because why not. If you have Ubuntu servers, replace debian with ubuntu.
[debian]
kali ansible_host=127.0.0.1 ansible_ssh_user=kali ansible_ssh_port=22 ansible_ssh_password='kali pass' ansible_become_pass='kali sudo pass'
Add as many hosts as you need. For sake of simplicity, we are only adding one, and it is our localhost.
Create Playbook
Create a new playbook.
vi debian_update.yml
Put the following into the playbook. Edit as desired. Change hosts to match the above hosts in the inventory/hosts file.
On the 3rd line it defines which group to run this playbook against. In this case debian.
This will check if a reboot is needed and reboot the machine. Reboots are usually needed when the kernel is updated
The 5th line contains `become: yes` this means that the playbook will use sudo. You can specify the sudo password in the hosts file `ansible_become_pass=sudopass` or with the -k or –ask-become options
The update and reboot are natively built into Ansible. Hence the ansible.builtin.
Run Playbook
Now that we have our inventory and playbook, we can upgrade our machines.
sudo: a terminal is required to read the password; either use the -S option to read from standard input or configure an askpass helper
sudo: a password is required
To work around this, you can use the -t option. -q is not needed, but makes thing quieter.
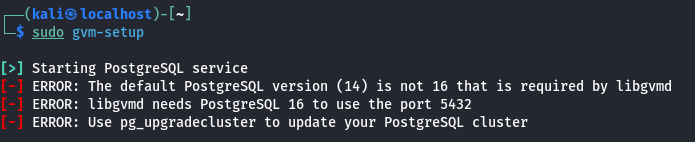
Currently OpenVAS needs PostgreSQL 16 on port 5432. If you have multiple versions of PostgreSQL, the lowest version will typically run on port 5432, and then they’ll increment from there. For example, if you have PostgreSQL 14, 15, and 16, 14 will run on port 5432, 15 on 5433, and 16 on 5434.
The quick fix is to edit the PostgreSQL config files, change the port numbers, restart PostgreSQL, and rerun gvm-setup.
vi /etc/postgresql/16/main/postgresql.conf
Change port number from 5434 to 5432
You will need to remove/disable/change the port for PostgreSQL 14
sudo apt remove postgresql-14
sudo systemctl restart postgresql@16-main.service
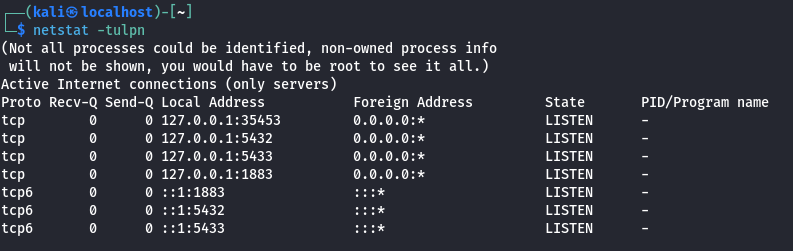
We can verify that PostgreSQL is running with netstat.
netstat -tulpn
We can see that the ports 5432 (PostgreSQL 16) and 5433 (PostgreSQL 15) are both running.
You can use tar -tvf to show the contents of a tar file.
tar -tvf filename.tgz
You can extract a portion of the archive with
tar -zxvf filename.tgz path/inside/file -C destination/path
For instance, if I have a tar backup of my /home directory, and I need to extract a file out of the tarred Downloads to my current Downloads directory, I can do
tar -zxvf home.tgz home/incredigeek/Downloads/slack.deb ~/Downloads