Fix PowerDNS “Old-style settings syntax not enabled”

The PowerDNS Recursor started supporting YAML for configs in version 5.0.0. YAML is the default as of 5.2.0. You can still use the old config if --enable-old-settings is provided as a command line option when starting PowerDNS. If that option is not being used, and you are using the old config, you will experience the following errors.

Fortunately, this is an easy fix.

  1. Convert old config to YAML with rec_control.
  2. Save as new YAML config.
  3. Remove old config.
  4. Start pdns-recursor.

Convert Config to YAML

The rec_control command can convert our old style config to a YAML config. This should automatically pull the default config in /etc/pdns-recursor/recursor.conf.

rec_control show-yaml

Save output to /etc/pdns-recursor/recursor.yml

Remove the Old Style Config

We can remove the old config by renaming it, or deleting it.

mv /etc/pdns-recursor/recursor.conf /etc/pdns-recursor/recursor.conf.oldstyle

Or

rm /etc/pdns-recursor/recursor.conf

Start the PowerDNS Recursor

Start the pdns-recursor service using the systemctl command.

sudo systemctl start pdns-recursor

Verify there are no errors

sudo systemctl status pdns-recursor

Further Reading.

https://doc.powerdns.com/recursor/yamlsettings.html

How to Set up a PowerDNS Recursor

The following are the steps needed to install a PowerDNS recursor on RHEL, Fedora, Rocky Linux, or AlmaLinux

Install from package manager with

yum install pdns-recursor

Allow DNS through Firewall

sudo firewall-cmd --add-service=dns --permanent

Configure the `/etc/pdns-recursor/recursor.conf` file. The local-address is the DNS recursor, the allow-from, are the addresses you would like to allow access to

local-address=192.0.1.2
allow-from=192.0.0.0/16, 10.0.0.0/8

Start and enable the `pdns-recursor` service

systemctl enable --now pdns-recursor

https://doc.powerdns.com/recursor/getting-started.html

DNS Query “sl 0.0.0.0” in Mikrotik DNS Cache

Sounds like this could be from a potential scan. The record is useless as 0.0.0.0 doesn’t go to anything.

https://learn.microsoft.com/en-us/answers/questions/547092/what-is-the-sl(0)-in-dns-logs-as-host-name

We can block this type of behavior by blocking inbound DNS request. Change in-interface to your interface or change to an interface list.

ip firewall filter add chain=input protocol=6 dst-port=53 in-interface=ether1 action=drop
ip firewall filter add chain=input protocol=17 dst-port=53 in-interface=ether1 action=drop

LineageOS Default Network Connections

This was a fairly simple test to see what network connections a fresh LineageOS install on a Google Pixel 5 makes. During the initial setup, GPS was disabled. After we set it up and got a base line, we turned GPS on to see what DNS requests it made.

Testing methodology.

  • A Computer was used as a Hotspot running both Network Miner 2.8 and Wireshark to log all network request
  • Pixel 5 was installed with the latest version of LineageOS 20 (August 2023)
  • Setup was completed without connecting to WiFi or a cellular network
  • There was no SIM card in while installing, setting up, or testing
  • After setup was complete, WiFi was connected to the computer running the Hotspot
  • After a base line was logged, we turned on GPS
  • GApps were not installed.

Fresh Install Network Requests

After setup was complete, we connected the Pixel 5 to the PC running NetworkMiner and Wireshark. It immediately made a handful of requests to the following 5 domain names

  1. www.google.com
  2. connectivitycheck.gstatic.com
  3. time.android.com
  4. g.co
  5. firebaseinstallations.googleapis.com

connectivitycheck.gstatic.com is used to detect if the current network has internet and also to detect if there is a captive portal that you need to log into.

time.android.com would be to check the time and make sure it is correct.

Not sure what the extra 3 are used for. It is possible that firebaseinstallations.googleapis.com is used for the Android System Intelligence, or some other app that comes by default on LineageOS.

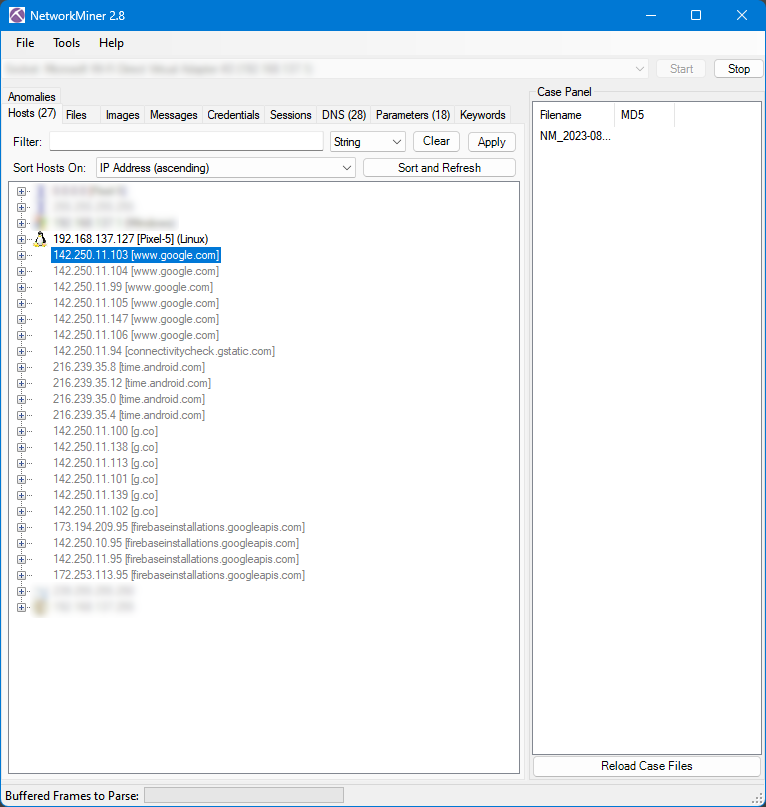
The following NetworkMiner screenshot shows all the IP addresses that were returned for the DNS queries. Note that a DNS query can return multiple IP addresses for a domain name, and then the device only use one of those IP addresses to transmit traffic.

A couple of normal network broadcast, multicast, and gateway addresses are blurred out as they are normal for devices on a local network.

Here is a Wireshark screenshot for all the DNS requests.

Total bandwidth sent and received for each IP

Using Wireshark, we were able to get a total amount of data sent and received for each of the domains.

  1. www.google.com – 12.976 KiB
  2. connectivitycheck.gstatic.com – 1.497 KiB
  3. time.android.com 270 bytes
  4. g.co – 21.883 KiB,
  5. firebaseinstallations.googleapis.com – 16.225 KiB
  6. Total for Pixel 5 – 52.851 KiB

Turning on GPS

Turning on GPS immediately led to a connection to xtrapath5.xboxprod.izatcloud.net.

The four lines are just different IP’s for the same domain.

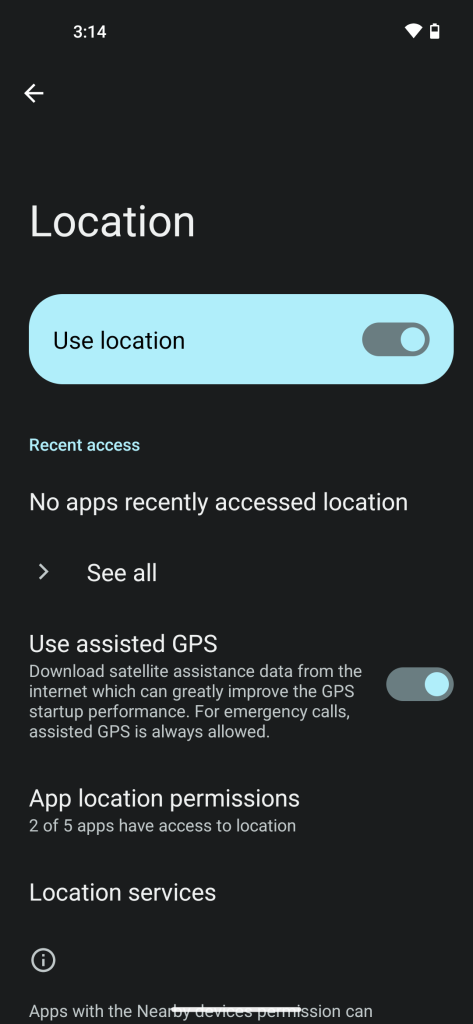
From the Location settings, we can toggle on or off the “Use assisted GPS”.

The settings say the following about Assisted GPS “Download satellite assistance data from the internet which can greatly improve the GPS startup performance. For emergency calls, assisted GPS is always allowed”

Essentially, it will download some files that help your phone find satellites faster which will get you a faster GPS lock. Without it, it can take awhile to find your position.

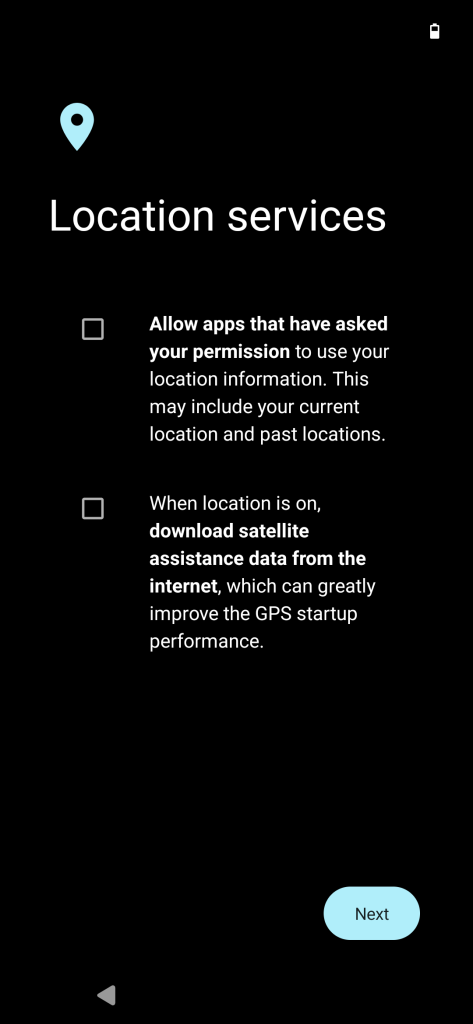
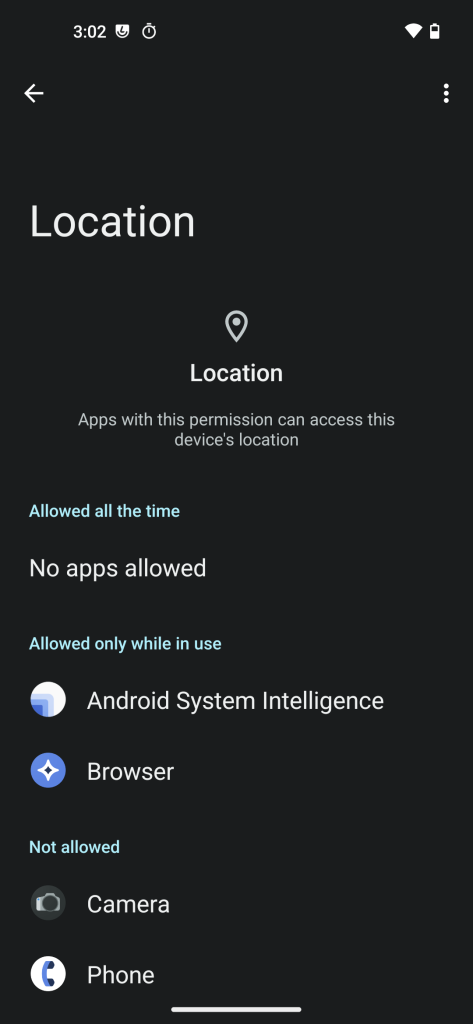
During the initial setup (First screenshot below), you can toggle on/off Assisted GPS. By default, Android System Intelligence and the Browser are allowed to use Location.

Hopefully that is a helpful overview of the default LineageOS network connections and what some of them are used for.

Hardening Mikrotik RouterOS

https://wiki.mikrotik.com/wiki/Manual:Securing_Your_Router

Things to harden

  • Delete default admin user
  • Disable unused services and whitelist IP’s
  • Secure SSH
  • DNS

Delete default admin user

Before deleting the default admin user, create your own user account.

/user/add name=MyUsername group=full password=mylongsecurepassword

Note: running /user/add will prompt you for the rest of the options.

Delete the default admin user with

/user remove admin

We want to delete the default admin user for two reasons. 1. There is no default password for this user. 2. It is a default username which means it will be targeted for brute force attacks.

Consider using the /users/groups for more granular control.

Disable unused services

In the following, we disabled all services except SSH and Winbox. We also limit access to those services only from private “RFC 1918” IP addresses. Customize as needed.

/ip service
set telnet disabled=yes
set ftp disabled=yes
set www disabled=yes
set www-ssl tls-version=only-1.2
set ssh address="set winbox address="192.168.0.0/16,172.16.0.0/12,10.0.0.0/8"
set api disabled=yes
set winbox address="set winbox address="192.168.0.0/16,172.16.0.0/12,10.0.0.0/8"
set api-ssl disabled=yes tls-version=only-1.2

for www-ssl and api-ssl, tls-version is not a required argument, but you may consider using it if you need the API or Webfig.

Secure SSH

/ip/ssh/set strong-crypto=yes allow-none-crypto=no always-allow-password-login=no host-key-size=4096

And regenerate the SSH host key. It will prompt for a [y/N], hit y to regenerate.

/ip/ssh/regenerate-host-key 

DNS

Unless your device is being used as a DNS resolver, it is best to disable the “Allow Remote Request”

ip dns/set allow-remote-requests=no

If you do need it enabled, then be sure to add some firewall rules to keep your router from being used in amplification attacks.

add action=drop chain=input dst-port=53 in-interface-list=WAN protocol=udp

You can configure interface lists in /interface/list or Interface -> Interface List in the gui

Or you can change to in-interface and specify the WAN interface directly. You could also set it to !LAN if you have a LAN interface list set up.

Named Error “option ‘dnssec-enable’ no longer exists”

After a recent update, the named service stopped working. When manually trying to restart the service it would just fail.

Running the named-checkconf command

sudo /usr/bin/named-checkconf -z /etc/named.conf

Returned the following error.

/etc/named.conf:37: option 'dnssec-enable' no longer exists

Looks like what happened is they removed the dnssec-option, but enabled it by default

The dnssec-enable option has been obsoleted and no longer has any effect. DNSSEC responses are always enabled if signatures and other DNSSEC data are present. [GL #866]

https://bind9.readthedocs.io/en/v9_16/notes.html#id118

So the option is invalid now and not needed.

To fix the issue, simply open up the /etc/named.conf file and delete the line that has ‘dnssec-enable’

Enable Syslog for PowerDNS Recursor

  1. Enable Logging in PowerDNS Recursor Config
  2. Edit Systemd Unit File for PowerDNS to Allow Syslog
  3. Enable Logging in rsyslog Config File

The following links were helpful in setting things up.

https://doc.powerdns.com/recursor/running.html
https://www.reddit.com/r/linuxadmin/comments/9lc4jl/logging_queries_in_pdnsrecursor/

Enable logging in PowerDNS Recursor Config

First we need to find the line that says “disable-syslog” and uncomment/change it to

disable-syslog=no

Next find the line that says “quiet” and uncomment/change it to

quiet=no

Some other lines you may want to check and change

logging-facality=1
loglevel=6

Edit Systemd Unit File for PowerDNS to allow Syslog

Next we need to modify the Systemd unit file to allow PowerDNS Recursor to log to syslog.

systemctl edit --full pdns-recursor.service

On the ExecStart Line, remove the part that says

--disable-syslog

The resulting line should look something like

[Service]
ExecStart=/usr/sbin/pdns_recursor --socket-dir=%t/pdns-recursor --socket-dir=%t/pdns-recursor --daemon=no --write-pid=no --log-timestamp=no

Save the file.

Enable Logging in rsyslog Config File

Edit the rsyslog file

sudo vim /etc/rsyslog.conf

Add the following line

local1.*        /var/log/pdns_recursor.log

This should now log all of the PowerDNS Recursor log info to “/var/log/pdns_recursor.log”

Restart the rsyslog and PowerDNS Recursor service

sudo systemctl restart rsyslog
sudo systemctl restart pdns-recursor

You should now see DNS request in the log file.

tail /var/log/pdns_recursor.log

They should also show up in the “/var/log/messages”

Troubleshooting DNS CPU Usage on Mikrotik Router

Problem : Lots of CPU utilization. Profile shows a good bit of it is DNS related.

DNS eating CPU on Router

The router is setup to allow DNS to pass through to web servers so rDNS and other records can be looked up and resolved. This is a specific IP block that gets it’s addresses from the router. The firewall rules explicitly allow this address range. We’ll say 192.168.88.0/24, and blocks everything else. This works for the web servers. But why are we still getting a bunch of CPU utilization with DNS?

As it turns out, the firewall rule that allows the server address range also includes routers own address! So we have unintentionally whitelisted DNS access to our router.

To resolve the issue we can add another firewall rule that explicitly blocks DNS traffic to the routers IP address. We are using two rules, one to block TCP and the other UDP.

ip firewall filter add chain=input dst-address=192.168.88.1 protocol=6 dst-port=53 in-interface-list=WAN action=drop
ip firewall filter add chain=input dst-address=192.168.88.1 protocol=17 dst-port=53 in-interface-list=WAN action=drop

Rules 6 & 7 are the two new rules we just applied. 14 & 15 block input to the router, however rules 8 & 9 inadvertently allowed access to the router’s public IP.

Firewall Rules for Router

The Result? Our CPU usage dropped!

CPU Usage dropped after adding DNS firewall rules.

Quite dramatically too as the following LibreNMS screenshot shows.

LibreNMS CPU graph showing the overall CPU utilization improvement

For more information about DNS Amplification attacks, refer to the following links.

https://ask.wireshark.org/question/6865/dns-amplification-attack/
https://security.stackexchange.com/questions/237127/why-would-hackers-attack-a-dns-server-with-a-dos

Named Debugging Levels

In the following command, x should be the debug level number

named -g -d x

Example,

named -g -d 3

Following info taken from here.
https://docstore.mik.ua/orelly/networking/dnsbind/ch12_01.htm

12.1.1 What Information Is at Each Level?

Here is a list of the information that each debugging level will give. The debugging information is cumulative; for example, level 2 includes all level 1’s debugging information. The data are divided into the following basic areas: starting up, updating the database, processing queries, and maintaining zones. We won’t cover updating the name server’s internal database – problems always occur elsewhere. However, what the name server adds or deletes from its internal database can be a problem, as you’ll see in Chapter 13, Troubleshooting DNS and BIND .

Level 1

The information at this level is necessarily brief. Name servers can process lots of queries, which can create lots of debugging output. Since the output is condensed, you can collect data over long periods. Use this debugging level for basic startup information and for watching query transactions. You’ll see some errors logged at this level, including syntax errors and DNS packet formatting errors. This level will also show referrals.

Level 2

Level 2 provides lots of useful stuff: it lists the IP addresses of remote name servers that are used during a lookup, along with their round trip time values; it calls out bad responses; and it tags a response as to which type of query it is answering, a SYSTEM (sysquery) or a USER query. When you are tracking down a problem with a secondary server loading a zone, this level shows you the zone values – serial number, refresh time, retry time, expire time, and time left – as the secondary checks if it is up-to-date with its master.

Level 3

Level 3 debugging becomes much more verbose because it generates lots of messages about updating the name server database. Make sure you have enough disk space if you are going to collect debugging output at level 3 or above. At level 3, you’ll also see: duplicate queries called out, system queries generated (sysquery), the names of the remote name servers used during a lookup, and the number of addresses found for each server.

Level 4

Use level 4 debugging when you want to see the query and response packets received by the name server. This level also shows the credibility level for cached data.

Level 5

There are a variety of messages at level 5, but none of them are particularly useful for general debugging. This level includes some error messages, for example, when a malloc() fails, and a message when the name server gives up on a query.

Level 6

Level 6 shows you the response sent to the original query.

Level 7

Level 7 shows you a few configuration and parsing messages.

Level 8

There is no significant debugging information at this level.

Level 9

There is no significant debugging information at this level.

Level 10

Use level 10 debugging when you want to see the query and response packets sent by the name server. The format of these packets is the same format used in level 4. You wouldn’t use this level very often, since you can see the name server response packet with nslookup .

Level 11

There are only a couple of debugging messages at this level, and they are in seldom-traversed code.

UBNTMOD check range of IP addresses and see if they resolve DNS

The following uses the ubntmod.sh script to check a device then report if it is resolving DNS or not. ip=”192.168.1.” specifies the first part of the ip, the “for ((i=1; i<=254;i++))” tells it to go from 192.168.1.1 – 192.168.1.254, change the beginning and ending number if you want to change the ip range.

ip="192.168.1." && for ((i=10; i<=30;i++)); do if ( fping ${ip}$i -r1 | grep alive); then ./ubntmod.sh -i ${ip}${i} -e ; else echo ${ip}$i not alive; fi ; done 

Broken out for easier reading.

ip="192.168.1." 
for ((i=10; i<=30;i++))
do
if ( fping ${ip}$i -r1 | grep alive); then
./ubntmod.sh -i ${ip}${i} -e
else echo ${ip}$i not alive
fi
done

If the script is able to log into the device and resolve DNS you should get

192.168.1.1 Resolves DNS