Can you run a Dell PowerEdge server on 120v and 240v?

The short answer is no. At least on some of the newer Dell PowerEdge servers. There are some places online where it sounds like it may work with certain servers.

If you are running on 120v and then plug in a 240v line on the second PSU, the PSU light flashes 3 times and then stays off.

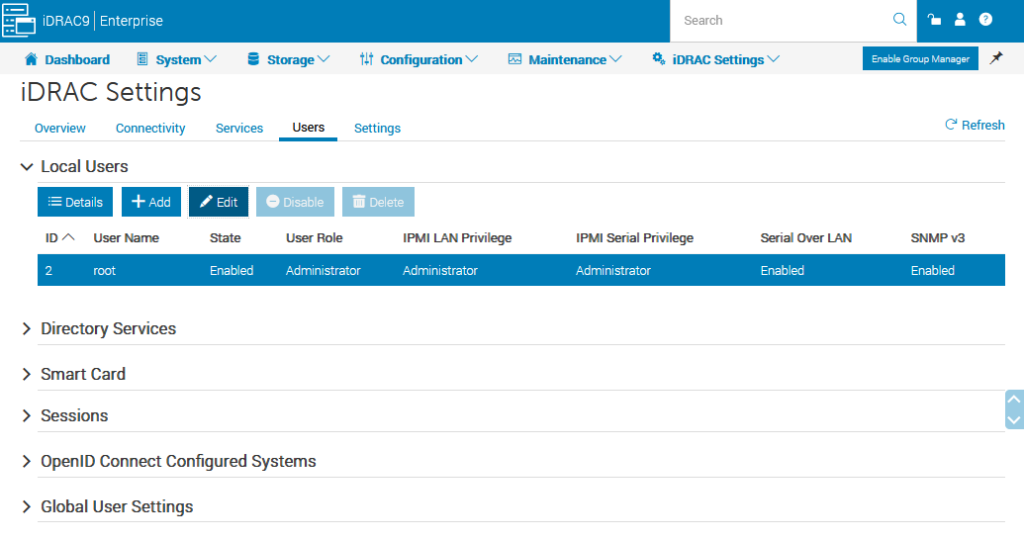
From the iDRAC we can see that one PSU Input Line Type is Low line (120v) and the other is High line (240v)

As a side note, the Input Wattage is different because we can pull more watts from a 240v line. Watts are Amps X Voltage, so halving our voltage, halves our total wattage.

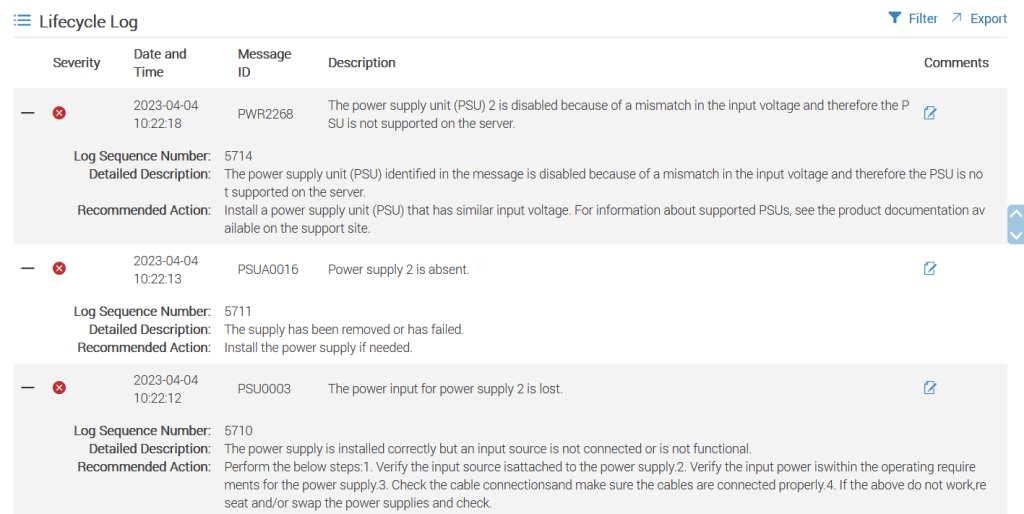
Looking through the Lifecycle Log we see the following saying that the PSU is disabled because of a input voltage mismatch.

Alienware fan control in Linux notes

Helpful links

https://wiki.archlinux.org/index.php/Fan_Speed_Control#Dell_laptops
https://bbs.archlinux.org/viewtopic.php?id=248106
https://www.reddit.com/r/Dell/comments/9pdgid/configuring_the_xps_to_play_nice_with_linux

You can use the following commands to “initilize” the fans so the fancontrol can read them.

 sudo modprobe dell-smm-hwmon ignore_dmi=1
sudo sensors-detect

After that is done you should be able to setup a fancontrol config with

sudo pwmconfig

After it is set up you can launch fancontrol to control the fans

sudo fancontrol

If you want to tweak the setting, modify the fancontrol config under

/etc/fancontrol

or run pwmconfig again and replace config.

Sounds like you should be able to add the following to “etc/modprobe.d/dell.conf” to get it to run on boot.

options dell-smm-hwmon ignore_dmi=1

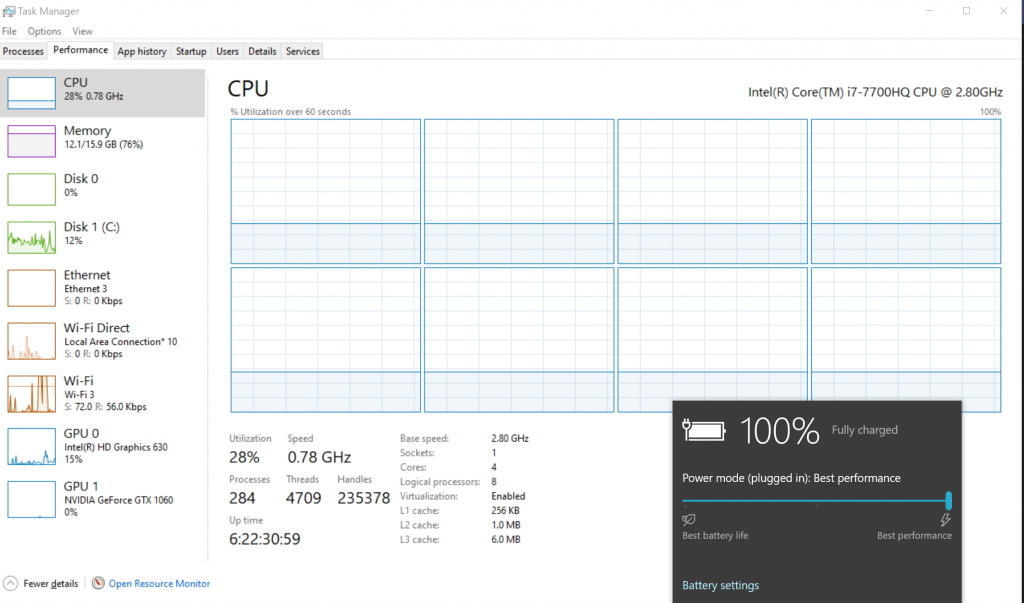
CPU stuck at 800Mhz or (.78Ghz)

Problem: CPU frequency is stuck at about 780 or 800mhz after waking up from sleep.

What causes the issue? Not sure what causes the issue, but seems to have something to do with unplugging the power adapter while putting to sleep or waking the system when it is pluged in after it was put to sleep on battery. Issue is random.

It appears that this issue can be temporarily resolved by disabling BD PROCHOT using ThrottleStop. Make sure the box is unchecked.

Download ThrottleStop from here

Things to try

Restart computer
Unplug and plug the power adapter in while computer is on
Put to sleep, plug or unplug power adapter, rewake up
Some other combination of the above.

More Info

https://forums.tomshardware.com/threads/laptop-i5-6300hq-cpu-suddenly-underclocking-stuck-at-0-78-ghz.2949019/
https://www.reddit.com/r/Dell/comments/6jecqd/thermal_throttling_idle/

CHIPSEC notes

The following is some quick notes on using CHIPSEC to compare the EFI whitelist on your current machine with the BIOS Dell provides

Quick notes.

  1. Install prerequisites (Uses python 2)
  2. Git clone Chipsec
  3. Install (Had to use a -i option, is in the manual)
  4. Run (Use spaces like below)

Extract Bios ROM from Dell EXE
Use the BIOS exe to output a .rom file that you can use in Linux. Run the following command from Windows command prompt, accept the security request. Change the EXE to the BIOS you downloaded.

Alienware_17_R2_1.5.0.EXE /writeromfile

The BIOS rom is named dell.rom in the following commands

Get list of Computer ROM

Should create fw.bin file and efilist.json file from local machine

sudo python chipsec_main.py -m tools.uefi.whitelist

Get list from Dell rom

sudo python chipsec_main.py -m tools.uefi.whitelist -a generate efilist.json dell.rom

Compare the current ROM against the one downloaded from Dell

sudo python chipsec_main.py -m tools.uefi.whitelist -a check efilist.json fw.bin

For some reason Ubuntu was not recognizing the last three options after the -a as individual options unless there was a space in between them.  All the examples online show that they had commas between them.  Which should work, so wonder if it was an environment variable problem or something.

The tell tell sign was the [*] Module arguments Line only shows 1 argument, needs 3.

Other links

Install instructions here.
https://github.com/chipsec/chipsec/wiki/Installing-CHIPSEC-in-Linux

LUV Linux download
https://01.org/linux-uefi-validation

Manual
https://github.com/chipsec/chipsec/blob/master/chipsec-manual.pdf

How To Install OS X Mountain Lion on Dell Latitude E6410

This is basically a summarized version of the guide over on OSXLatitude.

Credits go to patel4prez over at osxlatitude.com for the work, instructions, and files to get this working!

Original Guide : http://forum.osxlatitude.com/index.php?/topic/1695-e6410-with-nvidia-nvs-3100m-graphics-mountain-lion-guide/

These instructions are for the Latitude E6410 with NVIDIA NVS 3100m Graphics.

What is needed

  1. OS X Mountain Lion Installer
  2. USB Drive 8GB or larger, and preferably a fast one
    1. E6410ML.zip file which contains some extras and applications

Create Bootable USB Drive

Locate your OS X Mountain Lion Installer file in Finder, right click on it and “Show Package Contents”, then go to “Contents” > “SharedSupport” and copy the “InstallESD.dmg” to your Desktop.

Unzip the E6410ML file and open up the Applications folder and launch myHack

Enter Password and select Create OS X Installer > Create OS X 10.8 Install Disk > Select the Correct USB drive, and then select the InstallESD.dmg when it wants the install file.

Run myHack again once it creates the drive and select Install Extra.  Select the correct USB drive, and then select Use My Own, select the Extra folder in the E6410ML folder.

Now run Kext Wizard(Inside the same folder as myHack)

In Kext Wizard go to the Installation Tab and Select kext to Install: Browse, select the S/L/E folder in the E6410ML folder, select all the kext files and hit open.  Check the box to Backup kexts, set the Destination to System/Library/Extensions, set the Target Disk to the USB drive and Install.  Once finished go back to the Maintenance Tab, select all the check boxes, set Target Disk as the USB Drive and Execute.

Copy over the E6410ML folder to the USB drive.  You need it for the last part of the install.

Install

You will need to set the BIOS to use AHCI

Select the USB drive on boot up

Install like you normally would.  You will probably need to reformat the hard drive.

Towards the end, you will be asked for an Extra file, select use my own and select the one you copied over to the USB drive.

Hit Yes to the following three prompts that pop up.

Post Install

Run through the whole setup process

Open up System Preferences > Security & Privacy > Click the lock at the bottom left > enter password > Allow applications from Anywhere

Open up the myHack USB install drive > Open up the E6410ML folder > then go to Applications and launch Kext Wizard

In Kext Wizard go to the Installation Tab and Select kext to Install: Browse, select the S/L/E folder in the E6410ML folder, select all the kext files and hit open.  Check the box to Backup kexts, set the Destination to System/Library/Extensions, and Install

Next go to the Maintenance Tab and Select all the check boxes, make sure the Target disk is the hard drive you installed OS X to, and then hit Execute.

Now open up Chimera (It is in the same place as Kext Wizard) and go through the install process.

Reboot!  You should have working Hackintosh!  You can follow the rest of the steps if you want sound.

Once you log back in, open up the E6410ML folder again and go to VoodooHDA and install the pkg.  It will say it failed, but continue anyway.

Open Kext Wizard back up and under the Installation Tab hit Browse and navigate to the VoodooHDA.kext (it is in the same folder as the VoodooHDA pkg) select Destination as System/Library/Extensions and hit Install.

Go back to the Maintenance Tab, select all the check boxes and Execute.

Next open up System Preferences > Users & Groups > Your Username > Login Items > hit the + then hit CMD+SHIFT+G all at once and type /vhda select Go and select the VoodoooHDASettingsLoader.app, hit Add > Check the box to Hide it

Reboot and you should have a mostly working hackintosh with sound.