Hardening Mikrotik RouterOS

https://wiki.mikrotik.com/wiki/Manual:Securing_Your_Router

Things to harden

  • Delete default admin user
  • Disable unused services and whitelist IP’s
  • Secure SSH
  • DNS

Delete default admin user

Before deleting the default admin user, create your own user account.

/user/add name=MyUsername group=full password=mylongsecurepassword

Note: running /user/add will prompt you for the rest of the options.

Delete the default admin user with

/user remove admin

We want to delete the default admin user for two reasons. 1. There is no default password for this user. 2. It is a default username which means it will be targeted for brute force attacks.

Consider using the /users/groups for more granular control.

Disable unused services

In the following, we disabled all services except SSH and Winbox. We also limit access to those services only from private “RFC 1918” IP addresses. Customize as needed.

/ip service
set telnet disabled=yes
set ftp disabled=yes
set www disabled=yes
set www-ssl tls-version=only-1.2
set ssh address="set winbox address="192.168.0.0/16,172.16.0.0/12,10.0.0.0/8"
set api disabled=yes
set winbox address="set winbox address="192.168.0.0/16,172.16.0.0/12,10.0.0.0/8"
set api-ssl disabled=yes tls-version=only-1.2

for www-ssl and api-ssl, tls-version is not a required argument, but you may consider using it if you need the API or Webfig.

Secure SSH

/ip/ssh/set strong-crypto=yes allow-none-crypto=no always-allow-password-login=no host-key-size=4096

And regenerate the SSH host key. It will prompt for a [y/N], hit y to regenerate.

/ip/ssh/regenerate-host-key 

DNS

Unless your device is being used as a DNS resolver, it is best to disable the “Allow Remote Request”

ip dns/set allow-remote-requests=no

If you do need it enabled, then be sure to add some firewall rules to keep your router from being used in amplification attacks.

add action=drop chain=input dst-port=53 in-interface-list=WAN protocol=udp

You can configure interface lists in /interface/list or Interface -> Interface List in the gui

Or you can change to in-interface and specify the WAN interface directly. You could also set it to !LAN if you have a LAN interface list set up.

How to setup a Chia Harvester on Windows

The following instructions are for setting up a Windows computer as a Chia Harvester.

Prerequisites

Before we get started you will need the following

  1. Have a current Chia farmer
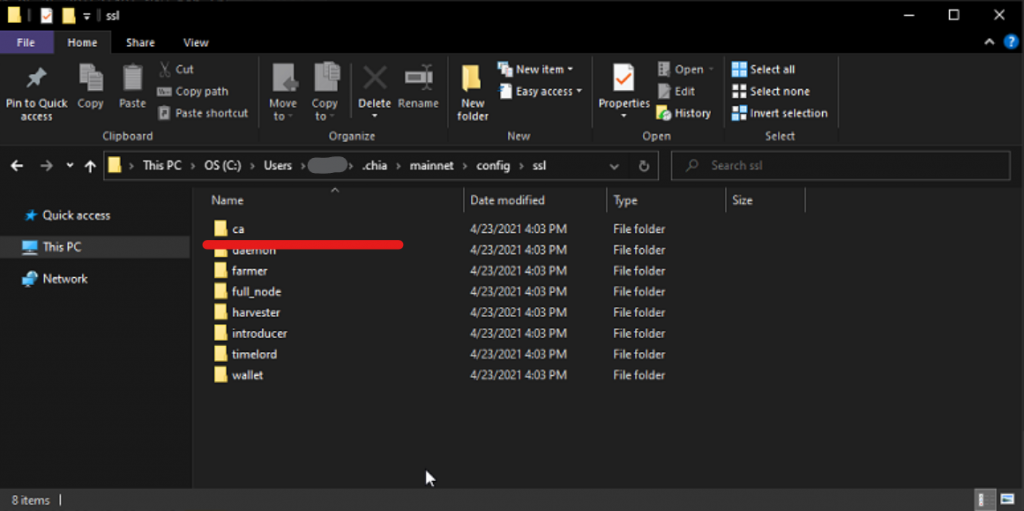
  2. You will need the \ca folder from your main farmer.
  3. IP address of your Chia farmer

The ca folder should be located in

%homepath%\.chia\mainnet\config\ssl\

You should be able to copy and paste the above in File Explorer. Copy the ca folder to a USB drive or share it via a network share.

Setting up harvester

  1. Copy the ca folder to an easily accessible place on your harvester
  2. Install Chia from https://www.chia.net/download/
  3. Close chia
  4. Open PowerShell and paste the cfollowing commands in. Change the sections in bold to reflect your settings/options
cd $env:APPDATA..\local\chia-blockchain\app-1.2.5\resources\app.asar.unpacked\daemon
.\chia.exe init -c D:\ca\
.\chia.exe stop all
.\chia.exe configure --set-farmer-peer 192.168.188.2:8447
.\chia.exe configure --enable-upnp false
.\chia.exe plots add -d D:\   
.\chia.exe start harvester -r

Check the main Farmer to verify the Harvester connected.

How To Install MadMAx Plotter on Ubuntu 20.04

Flexpool has some excellent steps on how to get started and also on installing MadMAx

https://www.flexpool.io/get-started/xch/XCH-CLI?primaryServer=xch-us-west.flexpool.io

The one caveat is that on Ubuntu 20.04 you’ll need to install cmake

sudo apt install cmake

Then you can install and run MadMAx with

git clone https://github.com/madMAx43v3r/chia-plotter 
cd chia-plotter 
git submodule update --init 
bash make_release.sh 
sudo mv build/chia_plot /usr/bin

Now you can create a plot by running the chia_plot command.

chia_plot -n 1 -t /path/to/tmp/ -d /chia/destination -c p2singletonaddressorpoolcontractaddress -f biglongfarmerpublickey

Note that if you are plotting on a harvester that the p2 singleton or the pool contract address does not have to be on the harvester system. You can grab it off the main node and then use the address on the machine plotting.

Upgrade to the latest version of Chia on Ubuntu

https://github.com/Chia-Network/chia-blockchain/wiki/INSTALL#ubuntudebian

While upgrading Chia on Linux is not as simple as on Windows, it is still relatively easy.

First we need to stop the Chia service

Open up a terminal, navigate to the chia-blockchain folder, and stop the services

cd chia-blockchain
. ./activate
chia stop -d all
deactivate

Now we will need to download the latest files using git.

git fetch
git checkout latest
git reset --hard FETCH_HEAD

Now that we have the latest files, we can install the new version.

sh install.sh
. ./activate
chia init

Upgrade GUI

Upgrading the GUI is similar to the above process. Should be able to copy and paste the following commands.

cd chia-blockchain-gui
git fetch
cd ..
chmod +x ./install-gui.sh
./install-gui.sh
cd chia-blockchain-gui
npm run electron &

The last command will launch Chia GUI.

Chia Plotting Phases

Some helpful links regarding plotting, optimizations, and efficiency.

Helpful charts showing resources used while plotting chia
More information on improving plotting efficiency

https://www.chia.net/2021/02/22/plotting-basics.html

The first phase generates all of your proofs of space by creating seven tables of cryptographic hashes and saving them to your temporary directory. Phase 2 back-propagates through the hashes, phase 3 sorts and algorithmically compress these hashes in the temporary directory while starting to build the final file and phase 4 completes the file and moves it into your final plot destination.

There are 4 phases when plotting Chia. Lets break these down

Phase 1

Phase 1 according to the link above creates 7 tables of cryptographic hashes and puts them in a temp directory. This phase is CPU intensive and is the only phase that takes advantage of multiple cores/threads. All the succeeding phases are single threaded. This phase also looks to use the most memory.

Phase 2

Phase 2 back propagates through the hashes, what this means exactly, I am not sure. This phase will use the most storage space. Phase 2 also seems to be a good time to start another plot if your plotting in parallel. Plotman by default starts another plot when a plot reaches phase 2:1 (:1 is a minor phase within phase 2)

Phase 3

Phase 3 sorts and compresses the hashes and starts building the final plot file. The total temp storage should decrease throughout the entire phase.

Phase 4

Phase 4 completes the plot file and moves it to the destination. It looks like if something happens with the destination you can manually move the 2.plot.tmp file to .plot and copy it to a destination file.

Chia Harvester start script for Ubuntu

This is a basic script for starting the Chia Harvester on Ubuntu. You can download the script here or use the following commands to download with wget.

wget https://incredigeek.com/home/downloads/ChiaScripts/StartHarvester.sh
chmod +x StartHarvester.sh
./StartHarvester.sh

Here is the script contents.

#!/bin/bash

# Script for starting the Chia Harvester

cd ~/chia-blockchain/
. ./activate
chia start harvester

sleep 5

if ( echo $(ps aux | grep -v grep | grep chia_harvester) | grep chia_harvester); then 
    echo "Harvester started"
else
    echo "Looks like the harvester is not running, try manually checking and/or running the commands to figure out what is wrong."
fi

Quick Chia Command list

Here are some commands that I have found helpful when using chia.

Find and count all plots on a system. Helpful if you have a machine plotting and want to know how many plot files you have

find /mnt/ /media/ ~/ -name *.plot 2>/dev/null | grep -v tmp | grep -c . && echo "Plots found"

Create Plots with Masted Keys. You will need the keys from the master node.

chia plots create -t /media/user/plotdrivetmp -d /media/user/plotdrive -f biglongublicfarmerkeyag934gh3bh3h4 -p biglongpoolpublickey129gmc2390243t-gg49

Start or restart Chia Harvester

chia start harvester -r

How to setup a Chia Harvester on Ubuntu

A Chia Harvest is a computer that farms Chia and connects back to a Master Node. You can almost think of it like the Master Node being a Pool and the harvesters as nodes on that “pool”. In this post we’ll talk about setting up a Chia Harvester on Ubuntu. Shouldn’t matter which version of Ubuntu. LTS or the latest should work fine.

Do note that we do not need the gui installed for this to work. Refer to this post to install Chia

Note: In the following commands we are assuming that the Chia directory is in your home “~/” directory on the harvester. Change the path if different.

Before we start you will need the ca directory from your Main/Master node uploaded or accessible to your Ubuntu harvester. You can get the CA directory from the following locations on Windows and Linux.

On Linux

~/.chia/mainnet/config/ssl/ca

On Windows

C:\User\username\.chia\mainnet\config\ssl\ca

You should be able to copy and paste the following path into Explorer to get to the correct directory.

%homepath%\.chia\mainnet\config\ssl\ca
Copy Chia ca directory

Copy this folder onto your Desktop, thumbdrive, network share, just some place you can access it.

Upload ca folder

You can use scp to upload the ca folder of the Harvester. In the following example we put the ca directory on our Windows desktop and we are uploading to our harvesters home directory.

scp -r Desktop\ca user@192.168.1.5:~/

Activate Chia

The rest of the commands are run on the harvester. You can either ssh or physically log into it. If Chia was installed in a different directory, then you will need to change the path.

cd chia-blockchain 
. ./activate


Configure Harvester

You should be able to copy and paste all the following commands in, change the parts in bold as needed.

The –set-farmer-peer option is your main node’s ip address.

chia init -c ~/ca
chia stop all
chia configure --set-farmer-peer 192.168.1.4:8447
chia configure --enable-upnp false
chia plots add -d /media/user/plotdrive/
chia start harvester -r

Should be all set. You can check the Main Node to verify that the harvester is connecting.

Important Notes:
UPNP needs to be turned off. It can cause problems if there are multiple wallets running on a local network that both have upnp on.

Add your plot drive locations. We need something to harvest :)

Verify that the Linux user can write to the Chia Plot drives

The following command will give the ubuntu user write access to the drive. Change the path to your drive.

sudo chmod ugo+wx /media/username/your_drive

Creating Plots

Create plots by specifying the Farmer Public Key and the Pool Public Key. You can get these from the Main Node. Plan on adding info on how to retrieve that info soon.

chia plots create -t /media/user/plotdrivetmp -d /media/user/plotdrive -f biglongublicfarmerkeyag934gh3bh3h4 -p biglongpoolpublickey129gmc2390243t-gg49

The following link has more information.

https://github.com/Chia-Network/chia-blockchain/wiki/Farming-on-many-machines


Install Chia Blockchain on Ubuntu

Chia is a new kinda of Crypto Currency that instead of using PoW (Proof of Work) it uses Proof of Space and Time which ends up using hard drive space to “mine” farm.

Install Chia Blockchain

You can copy and paste all of these commands in a terminal.

sudo apt update -y
sudo apt upgrade -y
sudo apt install -y git
git clone https://github.com/Chia-Network/chia-blockchain.git -b latest --recurse-submodules

cd chia-blockchain
sh install.sh
. ./activate
chia init

The . ./activate command is needed to be able to run the chia commands. I believe it sources into the current shell so the commands work correctly.

Install Chia Blockchain Gui

After you have run the above commands, do the following to install the Chia Gui

chmod +x ./install-gui.sh
./install-gui.sh
cd chia-blockchain-gui
npm run electron &

Launching Gui after it is installed

In the future for launching the Gui you should be able to copy and paste the following commands in.

cd chia-blockchain 
. ./activate
cd chia-blockchain-gui
npm run electron &

You can also put all of the above commands into a bash shell script and then just run the script instead of having to run the commands all over again every time you want to launch the gui.

Radeon RX 580 – Hashrate and Power Consumption

These are the average RX 580 hashrates I have been getting while mining Ethereum.

https://www.msi.com/Graphics-Card/Radeon-RX-5700-MECH-OC

RX 580 brand MSI Gaming and Armour

Cost

Cost Used (eBay)
February 2021: $300 – $400

Hasrate and Power Consumption

Ethereum Ethash
Hashrate: 30/Mhs

Power Consumption
The power consumption seems to vary a bit between cards, some of them end up doing really well considering how old they are.
Range: 75 – 92 W
Average = ~84 W

Settings
Core: 1100
V: 800
Mem : 2100


Average Mhs Per Watt : 0.36/Mhs
Average Watts Per Mhs: 2.8 W

Profitability is about $3.68/day as of February 9, 2021

https://whattomine.com/coins/151-eth-ethash?hr=30.0&p=84.0&fee=0.0&cost=0.1&hcost=0.0&commit=Calculate