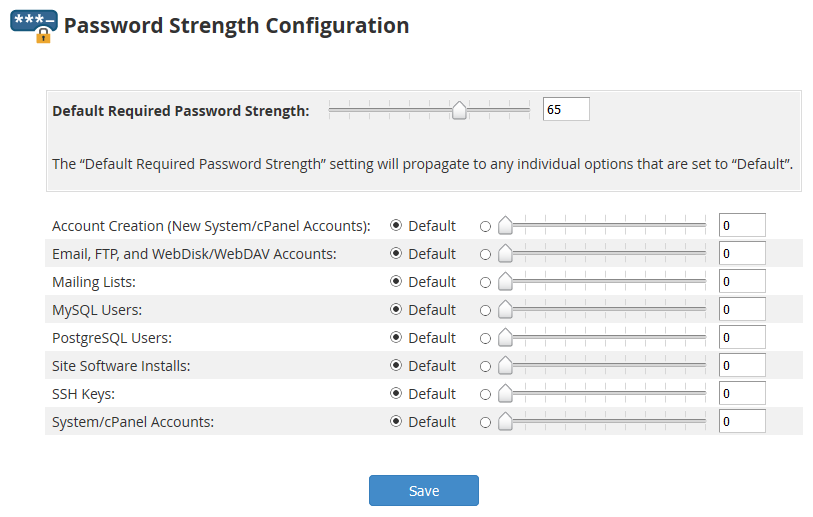
The default strength for new passwords created on cPanel and WHM looks to be 65.
Note that increasing the strength should not disable any passwords that are under the threshold.

The default strength for new passwords created on cPanel and WHM looks to be 65.
Note that increasing the strength should not disable any passwords that are under the threshold.
msg INBOX/4624 {75129} couldn't append (Subject:[Email message]) to folder INBOX: Error sending '55 APPEND INBOX (\Seen) "25-Aug-2017 09:12:05 -0600" {75129}': 55 NO [OVERQUOTA] Not enough disk quota (0.001 + 0.000 secs).
To resolve the above problem, check the following
The above problem was due to the fact that the cPanel User Quota was maxed out. Increasing the space allocated to the account resolved the problem.

Check and verify that DNS is not being blocked upstream by a firewall. Behavior is weird, the server can get out to the internet, access to the servers IP address is available, but can’t ping domains that are locally hosted. Are also unable to ping the domains from the internet in.
To resolve the issue either disable the DNS firewall rules, or better yet add some rules to allow access to the cPanel server.
Typically on a cPanel host your access logs are kept in
/usr/local/apache/domlogs/username/incredigeek.com
Where username is your cPanel username and incredigeek.com is your website.
To view the logs you can use tail -f to follow the log.
tail -f /usr/local/apache/domlogs/username/incredigeek.com
You can also use grep to search the logs.
grep "text to search" /usr/local/apache/domlogs/username/incredigeek.com
In cPanel under an email account you can Free up Email Storage. There is a Custom query field which allows you to specify a custom Dovecot query to run. Couple examples below.
Delete email from email address
from sent@email.com
Email that contains a specific string in the message body
body "string to match in message body"
Other useful info
https://wiki2.dovecot.org/Tools/Doveadm/SearchQuery
The domains are stored in the “~/.spamassassin/user_prefs” config file.
To blacklist a domain just add it to the config file.
blacklist_from *.domain_to_block.com
To whitelist, change blacklist to whitelist
whitelist_from *.incredigeek.com
Save and exit the file.
For some reason the hosts.allow and hosts.deny files don’t seem to work on cPanel. One of the alternative methods to limit ssh logins to specific addresses is to use iptables.
Allow access from specific IP addresses.
Replace 192.168.1.0/24 and 192.168.0.0/24 with your addresses. You can add more addresses using the “,”. Also if your ssh port is not the default port, be sure to change it.
iptables -A INPUT -s 192.168.1.0/24,192.168.0.0/24 -p tcp --dport 22 -j ACCEPT
Reject access from everywhere else
iptables -A INPUT -s 0.0.0.0/0 -p tcp --dport 22 -j REJECT
You can see your rules with
iptables -L --line-numbers
If you need to add another rule after the fact, you’ll need to make sure that it is above the REJECT rule. you can use the “-I” to insert it between rules.
Example: inserts rule as the second rule in the INPUT chain
iptables -I INPUT 2 -s 192.168.42.0/24 -p tcp --dport 22 -j ACCEPT
Add iptable rule
The following rule rejects access to port 22 on all devices except ones on the 192.168.1.0/24 network. Note the “!”. This command can be useful for a WHM/cPanel server to limit ssh access.
iptables -A INPUT ! -s 192.168.1.0/24 -p tcp --dport 22 -j REJECT
List iptable rules with line numbers
iptables -L --line-numbers
Example output
root@localhost [~]# iptables -L --line-numbers
Chain INPUT (policy ACCEPT)Chain OUTPUT (policy ACCEPT)
num target prot opt source destination
1 REJECT tcp -- !192.168.1.11 anywhere tcp dpt:ssh reject-with icmp-port-unreachable

Chain FORWARD (policy ACCEPT)
num target prot opt source destination

Chain OUTPUT (policy ACCEPT)
num target prot opt source destination
1 ACCEPT tcp -- anywhere anywhere multiport dports smtp,urd,submission owner GID match mailman
2 cpanel-dovecot-solr all -- anywhere anywhere

Chain cpanel-dovecot-solr (1 references)
num target prot opt source destination
1 ACCEPT tcp -- anywhere anywhere multiport sports 8984,7984 owner UID match cpanelsolr
Remove iptable rule
To delete a rule use the -D option with the Chain and the line number. So to delete the first rule in the example output above, we would specify the INPUT chain and the the line number 1
iptables -D INPUT 1
More info about imapsync here
Install imapsync
CentOS 7, Works on cPanel servers too
yum install epel-release && yum install imapsync
Once installed check and make sure it works.
imapsync --version
If it gives you the version number you should be good to go.
Move email account
imapsync --host1 mail.emaildomain.com --user1 username@emaildomain.com --password1 "password1" --host2 mail.exampledomain.com --user2 username@movetodomain.com --password2 "password2"
Example :
imapsync --host1 mail.myemail.com --user1 bob@myemail.com --password1 "password1" --host2 mail.incredigeek.com --user2 bob@incredigeek.com --password2 "password2"
Moving Multiple accounts
Best way to move multiple accounts is to use a script and and a list that contains all the usernames and passwords to the accounts you want to move.
example scripts can be found on the imapsync website here is a script example and here is the example file.txt
Example script.
#!/bin/sh
#
# $Id: sync_loop_unix.sh,v 1.6 2015/11/04 18:23:04 gilles Exp gilles $

# Example for imapsync massive migration on Unix systems.
# See also http://imapsync.lamiral.info/FAQ.d/FAQ.Massive.txt
#
# Data is supposed to be in file.txt in the following format:
# host001_1;user001_1;password001_1;host001_2;user001_2;password001_2;
# ...
# Separator is character semi-colon ";" it can be changed by any character changing IFS=';'
# in the while loop below.
# # Each line contains 6 columns, columns are parameter values for
# --host1 --user1 --password1 --host2 --user2 --password2
# and a trailing empty fake column to avaid CR LF part going
# in the 6th parameter password2. Don't forget the last semicolon.
#
# You can add extra options after the variable "$@"
# Use character backslash \ at the end of each suplementary line, except for the last one.
# You can also pass extra options via the parameters of this script since
# they will be in "$@"

# The credentials filename "file.txt" used for the loop can be renamed
# by changing "file.txt" below.


echo Looping on account credentials found in file.txt
echo

{ while IFS=';' read  h1 u1 p1 h2 u2 p2 fake
    do
        { echo "$h1" | egrep "^#" ; } > /dev/null && continue # this skip commented lines in file.txt
        echo "==== Starting imapsync from host1 $h1 user1 $u1 to host2 $h2 user2 $u2 ===="
        imapsync --host1 "$h1" --user1 "$u1" --password1 "$p1" \
                 --host2 "$h2" --user2 "$u2" --password2 "$p2" \
                 "$@"
        echo "==== Ended imapsync from host1 $h1 user1 $u1 to host2 $h2 user2 $u2 ===="
        echo
    done
} < file.txt
Example list of accounts to
mail.maildomain.com;user1@incredigeek.com;password1;mail.incredigeek.com;user2@incredigeek.com;password2;
You can run these command from a Linux computer
wget www.incredigeek.com/home/downloads/imapsync/imapsync_loop.sh
chmod +x imapsync_loop.sh
This file will contain the mail server to transfer from, username, and password, and then the mail server to transfer to, username and password. Add one line per account.
Example:
mail.servertotransferfrom.com;Username1;Password1;mail.servertomoveto.com;Username2;Password2;
mail.servertotransferfrom.com;testuser;123456;mail.servertomoveto.com;bob;123456;
./imapsync_loop.sh
In the username you may need to use the username@domainname.tld, so if the username is bob, and the mail domain is incredigeek.com, use bob@incredigeek.com for the username in the imapsync_list.txt.