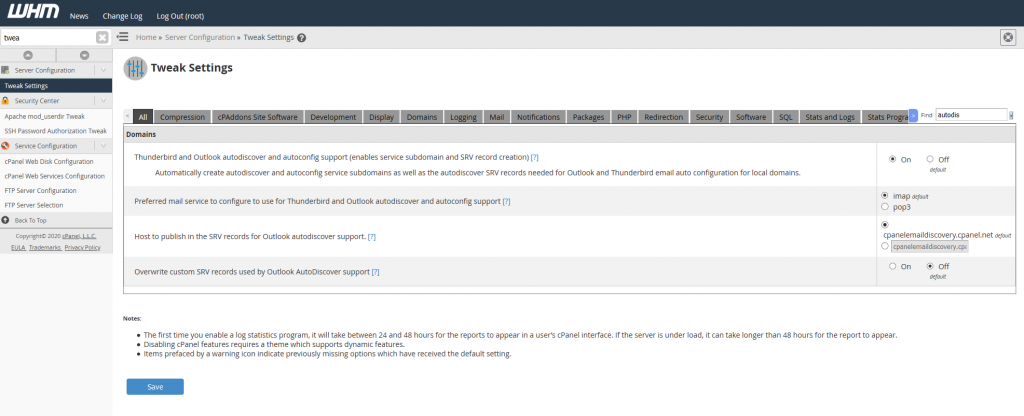
- Log into WHM
- Search for Tweak Settings
- Search for autodiscover
- Turn On
- Save Settings
Done! Your autodiscovery should now work.
Had a weird issue where a certain address was unable to access the cpanel server, but it was intermittent with it working some times, but failing at other times.
Ended up being the firewall on the WHM server blocking that particular IP address due to failed log in attempts.
Check the status of LFD (Login Failure Daemon)
systemctl status lfd
Check the logs, dmesg or tail /var/log/messages
[1122639.674605] Firewall: UDP_IN Blocked IN=eth0 OUT= MAC=8e:23:f5:16:a6:b1:cc:51:54:6a:2e:ea:14:00 SRC=72.211.105.113 DST=192.168.1.12 LEN=64 TOS=0x00 PREC=0x00 TTL=246 ID=40014 PROTO=UDP SPT=9307 DPT=161 LEN=44 [1122646.728510] Firewall: TCP_IN Blocked IN=eth0 OUT= MAC=8e:23:f5:16:a6:b1:cc:51:54:6a:2e:ea:14:00 SRC=198.199.98.83 DST=192.168.1.12 LEN=40 TOS=0x00 PREC=0x00 TTL=244 ID=54321 PROTO=TCP SPT=57522 DPT=15672 WINDOW=65535 RES=0x00 SYN URGP=0
CSF keeps a file with addresses to deny in “/etc/csf/csf.deny” Also nice that if gives you a little bit of info on why it was blocked.
# grep -r "192.168.1.21" /etc/csf/csf.deny 192.168.1.21 # lfd: (pop3d) Failed POP3 login from 192.168.1.21 (US/United States/-): 10 in the last 3600 secs - Tue Jun 20 11:36:15 2020
You can also dump all of the rule in iptables with
iptables --list | egrep "192.168.1.21"
Change 192.168.1.21 with the IP you are looking for
Open up /etc/csf/csf.allow with a text editor and add the IP to the bottom of the file.
or add the IP address to the end of the file with the following command. Replace 192.168.1.21 with the IP address you want to whitelist.
echo "192.168.1.21" >> /etc/csf/csf.allow
You can also do all of this from the WHM web interface “Plugins -> ConfigServer Security & Firewall”
Further reading
https://documentation.cpanel.net/display/CKB/How+to+Configure+Your+Firewall+for+cPanel+Services
exim -bp | grep "string" -A1 | awk {'print $3'}
Replace string with the email address, or domain you want to search for and delete.
Note that -A1 may not be needed. Grep will just search for string and 1 line after it. I had a problem with the string I was wanting to use was on the line below it
You can view an email message in Exim with the following command and options.
exim -Mvh email-id
Example output
# exim -Mvh 1jTAsw-0101m5-TH mailnull 47 12 <> 1591431138 0 -received_time_usec .007773 -ident mailnull -received_protocol local -body_linecount 109 -max_received_linelength 98 -allow_unqualified_recipient -allow_unqualified_sender -localerror XX 1 larry@incredigeek.com 155P Received: from mailnull by cpanel.server.co with local (Exim 4.93) id 1jTAsw-0101m5-TH for larry@incredigeek.com; Sat, 06 Jun 2020 03:12:18 -0500 045 X-Failed-Recipients: bob@incredigeek.com 029 Auto-Submitted: auto-replied 068F From: Mail Delivery System Mailer-Daemon@cpanel.server.co 025T To: larry@incredigeek.com 064 References: 0.0.7.15D.1D63BD03648840.0@slot0.cn-sinosure.com 098 Content-Type: multipart/report; report-type=delivery-status; boundary=1121689138-eximdsn-67139566 018 MIME-Version: 1.0 059 Subject: Mail delivery failed: returning message to sender 057I Message-Id: E3ghaTA-001qN5-Hn@cpanel.host.com 038 Date: Sat, 06 Jun 2020 03:12:18 -0500
You can view the message body with the -b option
exim -Mvb email-id
Example
exim -Mvb email-id 1jTAsw-0101m5-TH --1231463132-eximdsn-21535482 email message --1231463132-eximdsn-21535482--
Open up the following file, change eth0 to your primary ethernet adapter. More info here.
vi /etc/sysconfig/network-scripts/ifcfg-eth0
and under IPADDR set it to the new IP. Update netmask and gateway if needed.
Save file and restart network
systemctl restart network
You may need to run the following to update the license on the server.
/usr/local/cpanel/cpkeyclt
You may need to migrate IP’s to the new address.
If you are keeping the old address on the server, then you may need to readd it through the IP Functions.
Had a problem with a WHM/cPanel server where it was working fine from a couple different networks, but then would not work on others. The server itself seemed fine and fully operational.
Checked firewall rules on routers, server, checked IP routes, tried disabling cPHulk. Ended up being there were a couple addresses added with the incorrect subnet mask which was keeping it from working. Removed the IP’s with the wrong subnet and it started working on all networks.
[root@host ~]# ifconfig eth0: flags=4163 mtu 1500 inet 192.168.1.70 netmask 255.255.255.224 broadcast 192.168.1.95 inet6 7f80::4588:523f:a697:c311 prefixlen 64 scopeid 0x20 ether 4b:02:de:0d:cf:1a txqueuelen 1000 (Ethernet) RX packets 171071 bytes 83556877 (79.6 MiB) RX errors 0 dropped 0 overruns 0 frame 0 TX packets 163710 bytes 76482245 (72.9 MiB) TX errors 0 dropped 0 overruns 0 carrier 0 collisions 0 eth0:cp1: flags=4163 mtu 1500 inet 192.168.1.74 netmask 255.255.255.224 broadcast 192.168.1.95 ether 4b:02:de:0d:cf:1a txqueuelen 1000 (Ethernet) eth0:cp6: flags=4163 mtu 1500 inet 192.168.1.75 netmask 255.255.224.0 broadcast 23.145.159.255 ether 4b:02:de:0d:cf:1a txqueuelen 1000 (Ethernet) … [root@host ~]#
Under eth0:cp6 the IP has a 255.255.224.0 subnet which is incorrect. Should have been a 255.255.255.224 (/27) subnet.
Removed the IP out of WHM and then readded with the correct subnet mask and it now works.
Open up the my.cnf file
vi /etc/my.cnf
Add the following line so MySQL will only work from the server. Basically blocks all remote MySQL conenctions.
Configure bind-address=127.0.0.1
Restart the MySQL service
systemctl restart mysqld
SSH into WHM server
ssh root@cpanel.host.com
Edit the following config file. Replace “website.com” with the website your enabling the shell_exec for
vi /opt/cpanel/ea-php72/root/etc/php-fpm.d/website.com.conf
Locate the following line and remove shell_exec from the list of disabled_functions
php_admin_value[disable_functions] = exec,passthru,shell_exec,system
The line should look like the following
php_admin_value[disable_functions] = exec,passthru,system
Save the file and restart the apache_php_fpm service
/scripts/restartsrv_apache_php_fpm
Log into WHM -> Software -> Easy Apache 4
Under PHP Extensions search for zip and select Install for your version(s) of PHP
Hit next till you get to the end and then hit provision. Once the provision is complete, hit done.
The default strength for new passwords created on cPanel and WHM looks to be 65.
Note that increasing the strength should not disable any passwords that are under the threshold.