JavaScript – How To Execute a Function with Variables when Button is Clicked

If we take the following code, we call the Log function without the (). This calls the Log function every time the buttonObject is clicked.

// Find object id myButton
let buttonObject = document.getElementById('myButton')  

// Add an event listener, and run Log function when clicked.
buttonObject.addEventListener('click', Log) 
// If we call Log(), it will immediately trigger the function

function Log () {
  console.log("Hello World!")
}

But what if we want to pass in a variable to the Log function? We can’t run Log('some text') as the function will run before we click the object.

We can however wrap the Log function inside of an anonymous function like so

let buttonObject = document.getElementById('myButton')

// Now Log() function will be run with the variable getting passed.
buttonObject.addEventListener('click', () => {
  Log('Hello World!')
})

function Log (textVariable) {
  console.log(textVariable)
}

Our Log function gets triggered when the object is clicked, and the variable is passed properly. You can swap out thy arrow function with a nameless function ()

Add a Button/Change Menu Item Color to WordPress Menu Bar

The following article was helpful in getting started adding a button to the WordPress menu bar.

https://www.wpbeginner.com/wp-tutorials/how-to-add-a-button-in-your-wordpress-header-menu/

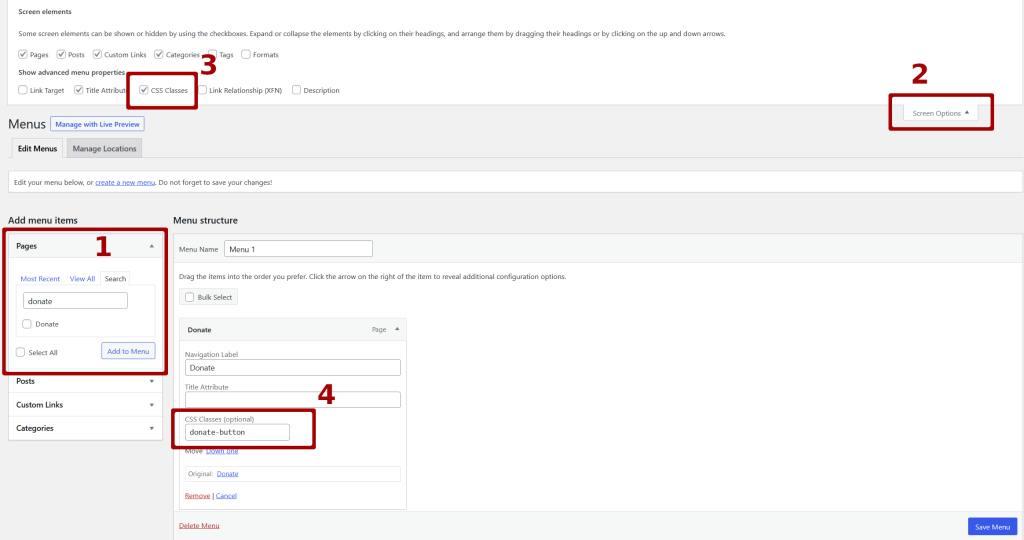
Modifying a Menu Item on a WordPress theme is not too difficult. The basic steps are

  1. Add Menu Item
  2. Add CSS Class to specific menu item
  3. Customize the new CSS class by using the Additional CSS Options

Add Menu Item

Add or customize a menu item by going to Appearance -> Menu

Add a CSS Class to Menu Item

You can add a CSS class to an existing menu item, or you can create a new menu item.

  1. Create Menu Item
  2. Select Screen Options
  3. Enable CSS Classes. (Needed for the next step)
  4. Under the Menu option, set a CSS class. (Name it something unique so it doesn’t interfere with other CSS classes. We’ll configure the CSS in the next step)

Customize CSS

Now we can setup and customize the CSS class by going to Appearance -> Customize

Now find where the “Additional CSS” setting is. If it is not under the main list, try looking under “Advanced”. The Additional CSS editor page should look like the following.

Once there, add all the CSS you want to change color, padding, etc.

You can make it look like a button by adding things like

border-radius: 5px;
padding: 0.5rem;
margin: 0.2rem;

Check out the following link for more info about buttons.

https://www.w3schools.com/csS/css3_buttons.asp

Android Button – Remove Shadow and Border from Button with Image on it

We can remove the border and shadows from a button by adding the following style code in your activity_main.xml file. Or what ever your XML file is.

style="?android:attr/borderlessButtonStyle"

Code for button. We are setting an image as the background.

  <Button
        android:id="@+id/button"
        style="?android:attr/borderlessButtonStyle"
        android:layout_width="48dp"
        android:layout_height="48dp"
        android:background="@drawable/gear"
        android:onClick="launchSettings"
        android:textSize="12sp"/>

Comparison of buttons. One on the left still has the shadow on it

Difference between border and borderless buttons

More info here

https://stackoverflow.com/questions/28756035/how-to-remove-button-shadow-android
https://stackoverflow.com/questions/27867284/remove-shadow-effect-on-android-button/30856094

Kotlin – Buttons and TextViews

Set Text for text view

val textBoxVar: TextView = findViewById(R.id.textBoxID)
textBoxVar.text = "Hello World!"

Button clicked – do something

val buttonVar: Button = findViewById(R.id.buttonID)
buttonVar.setOnClickListener {
    buttonVar.text = "Button Pushed..."  //Change text on button

}

Toast notification

val text = "Hello World! This is a toast message!"
val duration = Toast.LENGTH_SHORT
val toast = Toast.makeText(applicationContext, text, duration)
toast.show()

Unity Button can’t access script functions

When you have a button object there is the On Click () area that can execute different actions like a PlayMaker script or a function in a C# script.

Issue with the C# script. You can’t drag and drop the script from the Assets Panel. The script needs to be assigned to an object, then drag and drop that object on the On Click () object. Then select the script and then the function from the drop down there.

Example:

Code snippet below is the EnableDisableAudio function that gets executed by the On Click () function above. Note that the script has to be assigned to an object, in this case the button.

    public void EnableDisableAudio()
    {
        counter++;
        if (counter % 2 == 1)
        {
            Debug.Log("ButtonToggled - On");

        }
        else
        {
            Debug.Log("ButtonToggled - Off");
        }
    }

More info

https://gamedev.stackexchange.com/questions/100995/why-is-c-method-not-showing-up-for-buttons-on-click