Auto Reboot Ubiquiti Devices with ubntmod.sh

Most of the heavy lifting is done by the ubntmod.sh script. All you need is the IP addresses for the access points. The script will figure out the connected devices, reboot them first, then reboot the AP.

Here is a quick run down of the steps we need to perform.

  1. Create list of AP’s and put them into an ap.lst file
  2. Install ubntmod.sh script
  3. Configure usernames and passwords to use with ubntmod.sh
  4. Setup crontab to automatically run

Create list of AP’s and put them into an ap.lst file

This is really as simple as creating the ap.lst file and filling it with the access point IP addresses. One per line. The script uses wstalist to discover connected devices.

nano ap.lst

Install ubntmod.sh script

Installing the script is really hard. 2 lines to get setup.

wget http://incredigeek.com/home/downloads/ubntmod/ubntmod.sh
chmod +x ./ubntmod.sh

More information can be found here.

https://www.incredigeek.com/home/ubntmod/

Setup usernames and passwords to use with ubntmod.shd

When you first run ubntmod.sh without the -y option, it should prompt you to setup usernames and passwords to use. After this is setup, the script automatically reads from the config file for future use.

You can manually modify the ubntmod.conf file update any usernames or passwords.

Example contents of ubntmod.conf file.

unpw=( "ubnt,ubnt"
"ubnt,password"
"admin,password"
)

Setup crontab to automatically run

Open up crontab with

crontab -e 

Configure the time. Refer to here for crontab date syntax

10 1 * * * cd /home/bob/ && ./ubntmod.sh -A

That’s it. Should be good to go.

Enable Automatic Update for Ubuntu Server 22.04

These steps should work for multiple versions of Ubuntu Server.

Thankfully enabling automatic updates in Ubuntu is super easy.

First make sure that the “unattended-upgrades” package is installed

sudo apt install unattended-upgrades

It was already installed on my Ubuntu 20.04 server instance.
Next run dpkg to reconfigure and enable updates

sudo dpkg-reconfigure unattended-upgrades

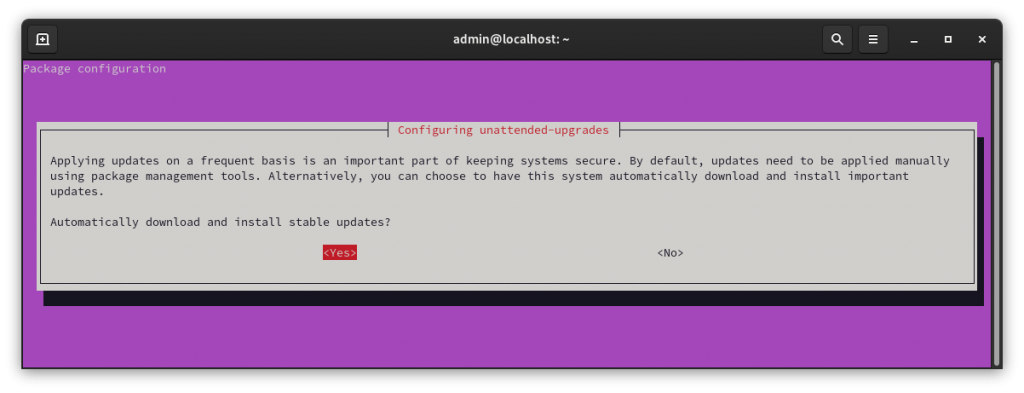
You should get the following prompt.

Configuring automatic updates

Hit “Yes” to enable.

Your system should now automatically install updates. however, if it needs to reboot it may not. You can configure the reboot options in

sudo vi /etc/apt/apt.conf.d/50unattended-upgrades

Scroll down to the Reboot lines and uncomment

// Automatically reboot *WITHOUT CONFIRMATION* if
//  the file /var/run/reboot-required is found after the upgrade
Unattended-Upgrade::Automatic-Reboot "true";  // <- Uncomment line

// If automatic reboot is enabled and needed, reboot at the specific
// time instead of immediately
// Default: "now"
Unattended-Upgrade::Automatic-Reboot-Time "02:00";  // <- Uncomment line

Save the file. Your system should now automatically install stable updates.

Disable automatic update

You can disable the automatic updates by running the dpkg command again.

sudo dpkg-reconfigure unattended-upgrades

and selecting “No”

Automatic updates should now be off.

More information can be found at the following link.

https://www.cyberciti.biz/faq/set-up-automatic-unattended-updates-for-ubuntu-20-04/

cnMaestro template for setting Username and Passwords for PMP gear

The following template can be used to set the user name and passwords for cambium pmp gear. Create a new template in cnMaestro, past in the following, change the passwordEncrypted to the hash of your password and run the config.

You can get the hashed password by pulling it out of a current radio config.

{
"userParameters": {
  "authenticationConfig": {
    "accounts": [ 
      { 
        "userName": "admin", 
        "level": 3, 
        "readOnly": false, 
        "passwordEncrypted": "188a934e0246ae248da19400fed83107a" 
      }, 
      { 
        "userName": "root", 
        "level": 3, 
        "readOnly": false, 
        "passwordEncrypted": "188a934e0246ae248da19400fed83107a" 
      } 
    ]
  }
 }
}

Upload ssh key to multiple servers automatically

Here is a quick script I created to automate copying a ssh key to multiple remote servers.

Basic command – the command uses sshpass to upload the ssh key to a remote server, this allows you to execute the command and not have to enter in a password to authenticate.

sshpass -p password ssh-copy-id -o StrictHostKeyChecking=no admin@remotehost

Script

#!/bin/bash

remotehosts="$1"
username="admin"
password="MyCoolPassword123"

for host in `cat ${remotehosts}`
do
sshpass -p${password} ssh-copy-id -o StrictHostKeyChecking=no ${username}@${host}
echo "Uploaded key to " ${host}
done

echo "Finished!"


Using the script

  1. Download here.
  2. Make it executable
    chmod +x sshcopy.sh
    
  3. Edit the script and change the username and password.
  4. Create a file that contains each host’s IP address or hostname.
  5. Run script (change hostlist.txt to your host list you created in step 3.)
    ./sshcopy.sh hostlist.txt
  6. Wait for the script to finish.

Example:

wget www.incredigeek.com/home/downloads/SSHCopy/sshcopy.sh
chmod +x sshcopy.sh
sed -i s/admin/bob/g sshcopy.sh                      <-- Change username - you can just manually edit the file,
sed -i s/MyCoolPassword123/password/g sshcopy.sh     <-- Change password - it might be easier than using sed
echo "192.168.1.100" >> host.txt                     <-- Add 192.168.1.100 to the host list
echo "Bob" >> host.txt                               <-- Add hostname bob to host list
./sshcopy.sh host.txt                                <-- Upload ssh key to all host's in the host file i.e. "bob" and "192.168.1.100"