Install Hashcat Utils

Hashcat - Kali Linux

Hashcat on Kali Linux

Here is a quick way to download and install the Hashcat utils.

Download the Hashcat utils

wget https://github.com/hashcat/hashcat-utils/archive/master.zip

Run the following commands to unzip and make the binaries

unzip master.zip
cd hashcat-utils-master/src
make

You can now convert an aircrack file by invoking the cap2hccapx binary

./cap2hccapx.bin /path/to/aircrack.cap /path/for/output

Check out the following article for more details on converting Aircrack files to Hashcat hccapx

Need to install Hashcat on Fedora?

How to convert an Aircrack capture file to a Hashcat hccapx

Using Aircrack

aircrack-ng input.cap -J hashcat_output

Unfortunately the above command doesn’t seem to work anymore.

If you try to run Hashcat with the outputted file you’ll get an error.

hashcat_output.hccap: Old hccap format detected! You need to update: https://hashcat.net/q/hccapx

Using Hashcat utils

Refer to this guide for installing the Hashcat utils.

Basic syntax is

./cap2hccapx.bin input.cap output.hccapx

Example

~/Downloads/hashcat-utils-master/src/cap2hccapx.bin aircrack-01.cap aircrack.hccapx

Allow KDE Connect through firewall

Firewalld

sudo firewall-cmd --zone=public --permanent --add-port=1714-1764/tcp
sudo firewall-cmd --zone=public --permanent --add-port=1714-1764/udp
sudo systemctl restart firewalld.service

UFW firewall

sudo ufw allow 1714:1764/udp
sudo ufw allow 1714:1764/tcp
sudo ufw reload

More information https://community.kde.org/KDEConnect

Install Hashcat on Fedora

Install nVidia drivers.  Guide here.

Download binary files from the hashcat website

https://hashcat.net/hashcat/

or use wget

wget https://hashcat.net/files/hashcat-4.1.0.7z

Extract with p7zip

7z x hashcat-4.1.0.7z

cd into the hashcat directory

cd hashcat-4.1.0

Run hashcat

./hashcat64.bin -t 32 -a 7 example0.hash ?a?a?a?a example.dict

Example script:

sudo dnf install p7zip
wget https://hashcat.net/files/hashcat-4.1.0.7z
7z x hashcat-4.1.0.7z
cd hashcat-4.1.0
./hashcat64.bin -t 32 -a 7 example0.hash ?a?a?a?a example.dict

Errors:
If you get the following error, try re-extracting the 7z file with the “x” option, not “e”.  “x : eXtract files with full paths” and ” e : Extract files from archive (without using directory names)”

inc_cipher_aes256.cl: No such file or directory

Install nVidia GeForce Drivers on Fedora 27

Install free and non-free rpmfusion

sudo dnf install https://download1.rpmfusion.org/free/fedora/rpmfusion-free-release-$(rpm -E %fedora).noarch.rpm https://download1.rpmfusion.org/nonfree/fedora/rpmfusion-nonfree-release-$(rpm -E %fedora).noarch.rpm

Install drivers

dnf install xorg-x11-drv-nvidia akmod-nvidia
dnf install xorg-x11-drv-nvidia-cuda 
dnf update -y

Reboot

reboot

You may need to set the DPI settings.  See here for more details.

Install Ubiquiti UNMS on Ubuntu

Ubiquiti UNMS installation instructions link

https://github.com/Ubiquiti-App/UNMS/wiki/Installation-%26-Update

Download and Install UNMS

curl -fsSL https://raw.githubusercontent.com/Ubiquiti-App/UNMS/master/install.sh > /tmp/unms_install.sh && sudo bash /tmp/unms_install.sh

Run the following commands as root.  Use sudo su if needed.

Set over commit to 1

echo "vm.overcommit_memory=1" >>/etc/sysctl.conf
sysctl -p

Disable Transparent HugePages

echo never > /sys/kernel/mm/transparent_hugepage/enabled

Add this to /etc/rc.local above the exit line

if test -f /sys/kernel/mm/transparent_hugepage/defrag; then
   echo never > /sys/kernel/mm/transparent_hugepage/defrag
fi

Finish the installation in your browser
https://unms_server_address

Unity 2D C# Script to Spawn Object on Screen at Touch Position

You’ll need a touch screen to test this out.  Easiest way is to use the Unity Remote 5 app.  It allows you to use your Android device as a touch screen input.

Start by creating a new empty C# script named “TouchScript” and paste in the following code.

using System.Collections;
using System.Collections.Generic;
using UnityEngine;

public class TouchScript : MonoBehaviour {

public GameObject bullet;

void Start () {

}

void Update () {
Touch myTouch = Input.GetTouch (0);
for(int i =0; i < Input.touchCount; i++)
if (myTouch.phase == TouchPhase.Began) {
{
Debug.Log ("Touch Position" + myTouch.position);
SpawnBullet (myTouch);
}
}
}

void SpawnBullet(Touch fireTouch) {
Vector3 touchPos = Camera.main.ScreenToWorldPoint (fireTouch.position);
touchPos.z = 1; // Puts the z coordinates at 1 so it is visible to the camera.
Debug.Log("Vector3 Pos" + touchPos);
Instantiate (bullet, touchPos, Quaternion.identity);
}
}

Now you’ll need to put your script on a game object.  You should be able to drag and drop it on any game object, in this case the Main Camera “green”.

Next drag and drop the game object prefab to the script “red”.  This tells the script which game object to spawn or instantiate when you touch the screen.

Run the scene.  It should now create a game object where you touch on the screen.


Increase Disk Size of Linux VM in VMware

This is for extending a regular Ubuntu Linux partition, if you need to resize, expand a LVM partition refer to this guide.  I am using Gparted as I ran into some issues using parted for moving the partitions around.

Shut the VM down,

sudo shutdown -h now

It is a good idea to take a snapshot of the VM before resizing the disk, so if you run into an issue you have something to revert back to.  In the vSphere Client, right click on the VM -> Snapshot -> Take Snapshot.

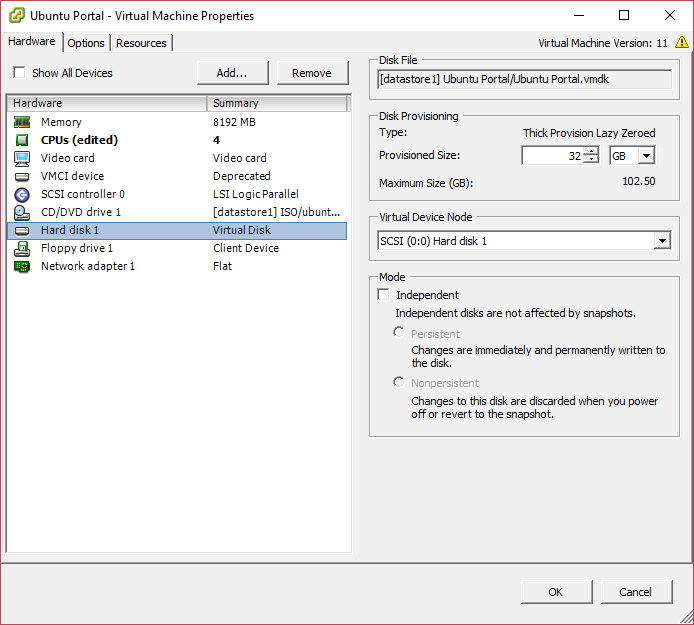
Change VM Disk size by right clicking on the VM and going to Edit Settings

You can now boot up the VM.  Fire up GParted and it should show some unallocated space at the end of your drive.

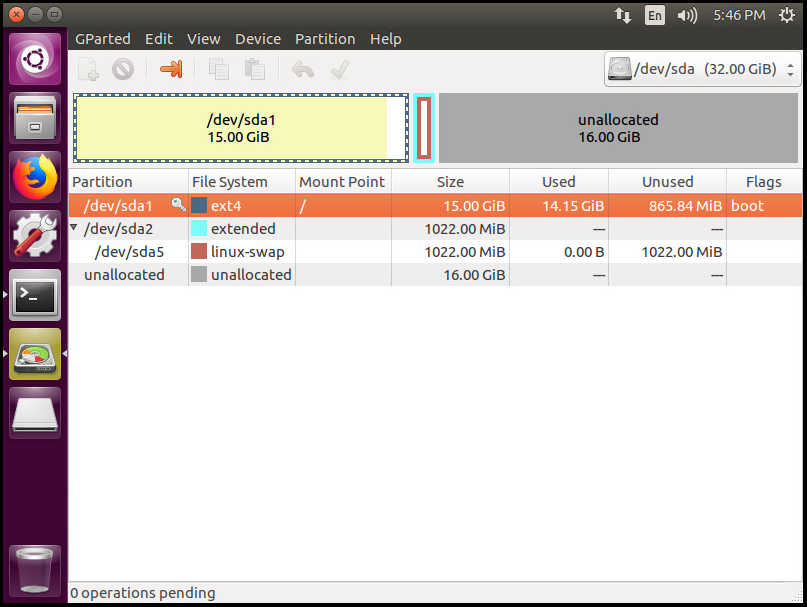
Now in the next two images we are moving the Extended partition, which contains the Swap Partition to the end of the drive, so the unallocated space is adjacent to our root partition.

  1. Turn off the swap space by right clicking on the swap partition and hit Swapoff.
  2. Right click on the extended partition and extend to the the end of the Drive
  3. Right click on linux-swap and move to the end of drive.
  4. You should now have something similar to this

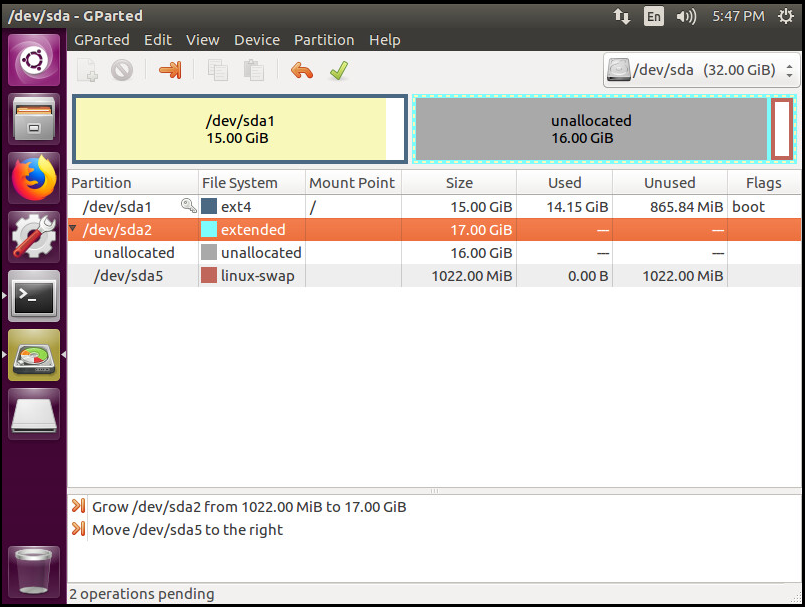
Hit Apply and write the changes to the disk then

  1. Right click on the extended partition and shrink to the end
  2. Right click on /dev/sda1 “Root partition” and extend to extended partition.

It should now look like this

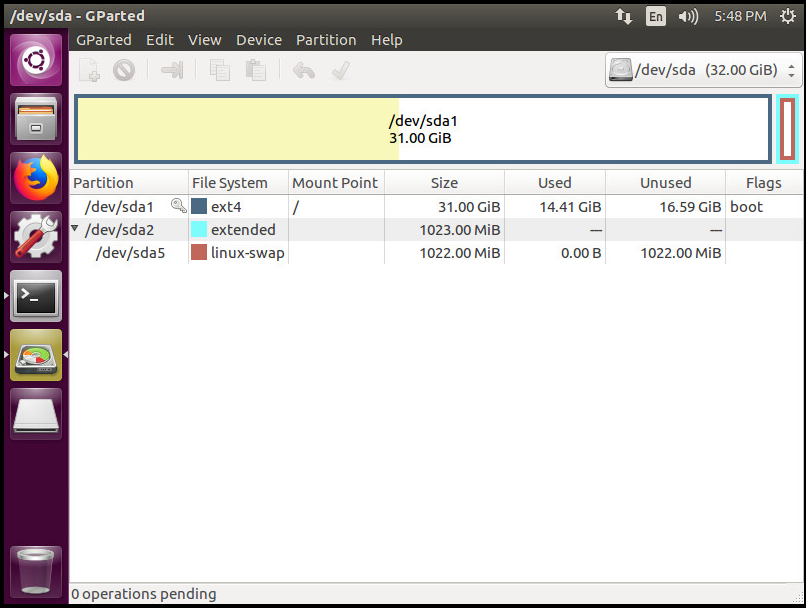
Hit apply, then right click on the linux-swap and turn Swapon.

Enjoy the extra space.