Ubuntu UniFi server running out of space on /run

Had an issue that /run was randomly running out of space which in turn would interfere with the unifi-video service causing it to run, but not record.

/run looks like a tmpfs or ramdisk that Ubuntu sets up.  So you can do a “temporary” fix by remounting the tmpfs with a larger size.  Example below.  If /run is a 2GB directory, you can remount changing the size from 2GB to 2.5GB.

sudo mount -t tmpsfs tmpfs /run -o remount,size=2500M

Note that it is a temporary fix and goes away after a reboot.

The issue ended up being that the WiFi UniFi controller was setup to auto backup everything once a week.  So as it was backing stuff up, it would eat up the available space in the tmpfs, think there may be an issue with the size of the UniFi data and maybe not being able to fit it all in RAM?

Running the following command

df -h --max=1 /var | sort

shows the following

1.1M /run/udev
2.5G /run/
2.5G /run/unifi   <-- UniFi controller
4.0K /run/initramfs
8.0K /run/network
12K /run/user
288K /run/samba
404K /run/systemd

Looking inside the unifi directory shows the following folders.  Looks like the they are temp files.

200M /run/unifi/ExpTmp351719567129045774
696M /run/unifi/ExpTmp3406220793759111216
1.6G /run/unifi/ExpTmp3368400690321364109
0 /run/unifi/work
2.5G /run/unifi

Running an ls inside the folder shows

-rw-r----- 1 unifi unifi 13971807 Jul 2 02:30 db.gz
-rw-r----- 1 unifi unifi 1665223462 Jul 2 02:56 db_stat.gz

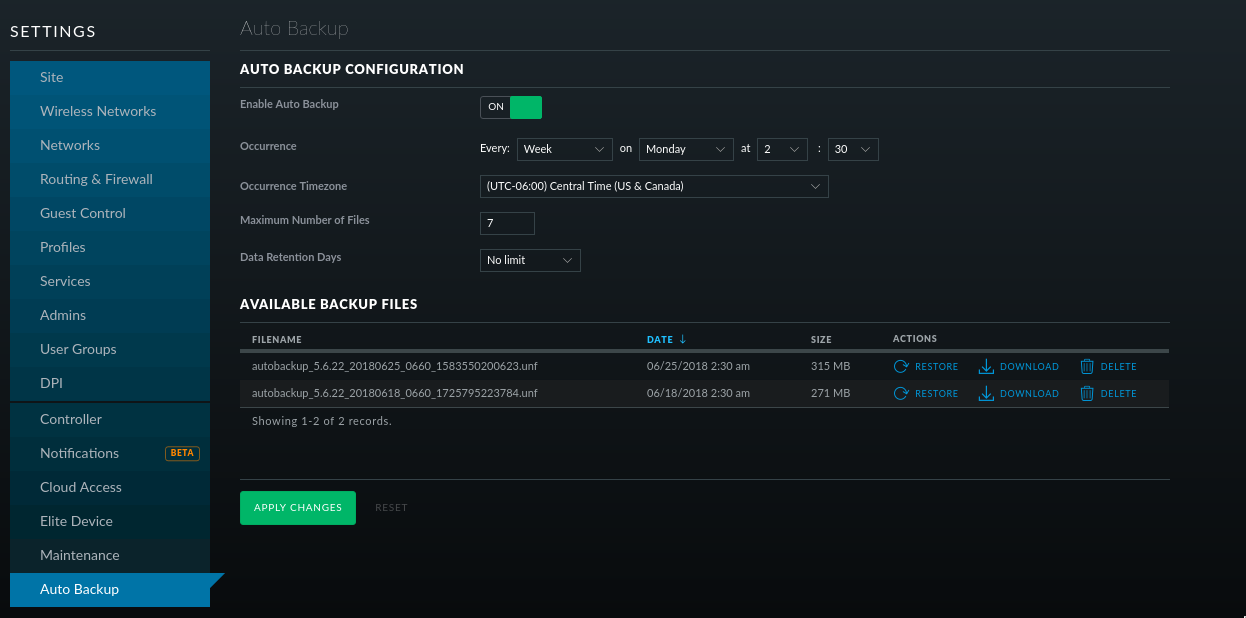
Looking inside the UniFi controller it is set to auto backup on Monday at 2:30AM

Looks like “/run/unifi” is used as a temporary folder to create the backups and when it is completed converts it to a .unf file and moves it to “/usr/lib/unifi/data/backup/autobackup/”  So the left over temp files were never completed or something caused them to stop working.  Maybe the backup was big enough to take up all the tmpfs space and cause the backup to fail.

Resolution.  To fix the problem I turned the data retention down to a week and deleted the temp files in /var/unifi.  Had to sudo su to root.  sudo wasn’t cutting it for some reason.

sudo su
rm -rf /var/unifi/Exp*
exit

Should be all good now.

Repairing Fedora grub from chroot

Notes from repairing a Fedora drive.

Mount system in chroot.

If the system is a raid drive and your not able to access it refer to this post.  May just need to install the raid utilities.

For mounting the chroot environment refer to this post

Repairing grub

yum install grub2-efi-*

Install grub.  Change /sda to your drive, may need to specify the efi partition.

grub2-install /dev/sda

If your boot and efi partitions are mounted.

grub2-mkconfig -o /boot/efi/EFI/fedora/grub.cfg

Reboot.

DNF/YUM not working in chroot environment

The reason is probably because the chrooted environment can’t resolve DNS.

Test it with

ping incredigeek.com

If it is not resolving, edit “/etc/resolv.conf” and change/add your nameserver.  Or just replace everything in it with

echo "nameserver 4.2.2.2" > /etc/resolv.conf

It should now be able to resolve and you should be able to use yum, or dnf.

yum update

RAID Volume not accessible in Linux

Typically your RAID volumes will show up as /dev/mdXXX

If it is not, it could be because the device mapper module is not loaded.  Load it by running the following command.

modprobe dm-mod

As a side note you can list the block devices using

dmraid -b

https://bbs.archlinux.org/viewtopic.php?id=42321

If your still having trouble you can try installing mdadm and dmraid

apt-get install -y dmraid mdadm


Unity 3D – Changing color on game object changes color on other objects in scene

Problem: When changing the shader color on a game object, the color on other game objects changes.

Reason: This happens because the other game objects are using the same Mesh Renderer as the game object your modifying.  So when your changing the shader, your actually modifying the Mesh Renderer, not the game object.

Fix: Change the Mesh Renderer for the game object.

In the example picture below, when you change the color on the cube (highlighted red) the color on the capsule changes, because they both are using the same Mesh Renderer (highlighted green).  To fix, change either the Cube or Capsule to a different Mesh Renderer (highlighted green)

Turn on Dell Poweredge PSU without server – A930P

Being able to turn a server power supply on without having it plugged into the server can be super beneficial.  You can use it to power electronics like GPU’s and they are usually really cheap.

The Instructions are for an A930P 930W server power supply.  More detailed information is available at the following couple of links.

http://pinoutguide.com/Power/dell_server_24_6_psu_pinout.shtml

http://static.rcgroups.net/forums/attachments/3/1/3/5/4/3/a4875719-98-pinout%202800%202850%20n%203.jpg

To power on the PSU, wire the pins highlighted with Blue and Green

The two pins highlighted Orange will slow the fan down.

Or by using the numbering from the picture below.

Wire pins A1 to B1 and Pins B6 to D6.

Fan is pin B2 and can be wired to B3 to decrees the fan speed to make it quieter.

http://static.rcgroups.net/forums/attachments/3/1/3/5/4/3/a4875719-98-pinout%202800%202850%20n%203.jpg

You can now run stuff off of the 12 volt output.

Delete SNMPv3 User on Linux

Don’t know if this is the recommended way to delete a user, but it seems to work.

sudo service snmpd stop

Open up the snmpd.conf file in /var/lib and find the line with the SNMP user and delete the line

sudo vi /var/lib/snmp/snmpd.conf

The above file may be in the following location on RPM based systems.

sudo vi /var/lib/net-snmp/snmpd.conf

Save, exit, and start snmpd

sudo service snmpd start

These steps work for Ubuntu, but should work for any Debain based distro as well as CentOS, Fedora, RedHat etc.

Setting up Proxy over SSH with Putty on Windows

What we are going to do is create a proxy using ssh so we can tunnel our web traffic in Firefox through it.

First, launch putty and setup a SSH connection like you normally would.

Next, in Putty, go to the Connection, SSH, Tunnels.  Set source port, change to Dynamic, and add.  In this example we are using port 1880.

After you have it set, Open the connection and log in.

Now go to the Proxy settings in Firefox.  You can open new tab, type about:preferences, hit enter, search proxy.

Set to Manual proxy configuration, then under SOCKS Host put localhost and the port number from Putty above, 1880 in our case.

You should now be running over the proxy, can test by running a whats my ip address.

This can be particularly useful in cases where you need to access a local IP address range on something like a Ubiquiti radio or router.  Or you need to check something from a different IP address.