Open “System Setting” then Preferences -> General -> Desktop Scaling
Set to the desired scaling (Auto, Normal, or Double Hi-DPI)

Open “System Setting” then Preferences -> General -> Desktop Scaling
Set to the desired scaling (Auto, Normal, or Double Hi-DPI)
The following picture shows the basics for create a loop that runs every second. You’ll need to create a float variable (Named oneSecond in the screen shot) that has a value of 1 for one second. Changed if desired.
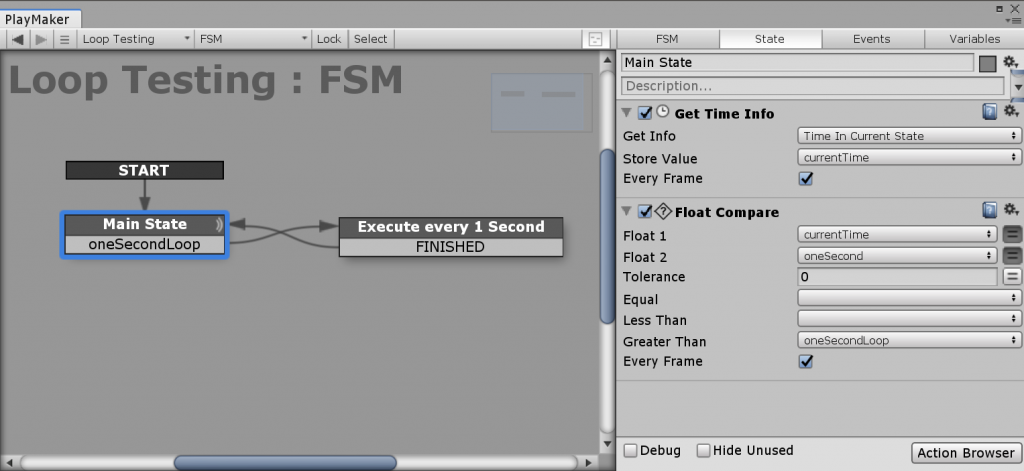
Put your actions in the “Execute every 1 Second” state
For more info on Get Time Info, visit https://hutonggames.fogbugz.com/default.asp?W496
List, unplug, or destroy PBD storage repository
xe pbd-list
xe pbd-unplug uuid=[UUID for VM]
xe sr-destroy uuid=[UUID for VM]
List, unplug, or destroy storage repository.
xe sr-list
xe sr-unplug uuid=[UUID for VM]
xe sr-destroy uuid=[UUID for VM]
List VM’s
xe vm-list
Shutdown VM
xe vm-shutdown uuid=[UUID for VM]
Force shutdown VM
xe vm-shutdown -–force uuid=[UUID for VM]
List Task
xe task-list
Cancel Task
xe task-cancel uuid=[task uuid]
External Links
http://www.queryadmin.com/801/useful-storage-repository-commands-xenserver/
https://www.serveroperations.net/citrix/shutdown-a-hung-vm-on-xenserver
https://linuxconfig.org/how-to-take-and-restore-vm-snapshot-using-command-line-on-xenserver
Windows Sticky Notes are stored in a SQlite database in
%LocalAppData%\Packages\Microsoft.MicrosoftStickyNotes_8wekyb3d8bbwe\LocalState
In the plum.sqlite file.
You can use sqlitebrowser to open up the sqlite file and export if needed.
https://sqlitebrowser.org/
Problem: Can’t set default program for .blend files to Windows store version of Blender
Usually is not a problem as you’ll get asked if you want to set a default program. When you hit yes, blender does not show up in the list of apps. That wouldn’t be a problem, except Blender is from the Windows Store, so there is no launcher in the ordinary places.
Resolution: Install regular Windows installer from Blenders website.
Other Info
Not sure if the issue is with the Store or Blender. The .blend file type does not show up in the Windows Settings under “Apps -> Default apps -> Choose default apps by file type” and Blender doesn’t show up under “Apps -> Default apps -> Set defaults by app”
The following script was taken from here
Added unifi-video support. Script uses letsencrypt to get the cert and automatically updates the UniFi and UniFi-Video Keystores.
Would be a good idea to check and make sure the the UniFi-Video cameras reconnect and still work after running script.
Install Let’s Encrypt with the following
sudo apt install letsencrypt
And generate a cert for your domain with
sudo certbot certonly -d unifi.domain.com
Copy the script at the bottom of this post and put it in a file called gen-unifi-cert.sh
Run the script to insert the cert into the UniFi and UniFi-Video services.
sudo ./gen-unifi-cert.sh -e email@domain.com -d unifi.domain.com
You can run it with no or the -h argument to show the options and arguments to use.
./gen-unifi-cert.sh -h
You should be able to add the following to a cronjob to auto renew the certificate. Replace path to script and domain name.
30 2 * * * /root/gen-unifi-cert.sh -r -d unifi.domain.com
#!/usr/bin/env bash
# Added support to do UniFi and UniFi controllers at the same time using the same cert.
# Original script from https://git.sosdg.org/brielle/lets-encrypt-scripts/raw/branch/master/gen-unifi-cert.sh
# More info here https://www.reddit.com/r/Ubiquiti/comments/43v23u/using_letsencrypt_with_the_unifi_controller/
# And here https://www.reddit.com/r/Ubiquiti/comments/43v23u/using_letsencrypt_with_the_unifi_controller/
# Modified script from here: https://github.com/FarsetLabs/letsencrypt-helper-scripts/blob/master/letsencrypt-unifi.sh
# Modified by: Brielle Bruns <bruns@2mbit.com>
# Download URL: https://source.sosdg.org/brielle/lets-encrypt-scripts
# Version: 1.7
# Last Changed: 09/26/2018
# 02/02/2016: Fixed some errors with key export/import, removed lame docker requirements
# 02/27/2016: More verbose progress report
# 03/08/2016: Add renew option, reformat code, command line options
# 03/24/2016: More sanity checking, embedding cert
# 10/23/2017: Apparently don't need the ace.jar parts, so disable them
# 02/04/2018: LE disabled tls-sni-01, so switch to just tls-sni, as certbot 0.22 and later automatically fall back to http/80 for auth
# 05/29/2018: Integrate patch from Donald Webster <fryfrog[at]gmail.com> to cleanup and improve tests
# 09/26/2018: Change from TLS to HTTP authenticator

# Location of LetsEncrypt binary we use.  Leave unset if you want to let it find automatically
#LEBINARY="/usr/src/letsencrypt/certbot-auto"

PATH="/usr/local/sbin:/usr/local/bin:/usr/sbin:/usr/bin:/sbin:/bin"

function usage() {
  echo "Usage: $0 -d <domain> [-e <email>] [-r] [-i]"
  echo "  -d <domain>: The domain name to use."
  echo "  -e <email>: Email address to use for certificate."
  echo "  -r: Renew domain."
  echo "  -i: Insert only, use to force insertion of certificate."
}

while getopts "hird:e:" opt; do
  case $opt in
    i) onlyinsert="yes";;
    r) renew="yes";;
    d) domains+=("$OPTARG");;
    e) email="$OPTARG";;
    h) usage
       exit;;
  esac
done

DEFAULTLEBINARY="/usr/bin/certbot /usr/bin/letsencrypt /usr/sbin/certbot
  /usr/sbin/letsencrypt /usr/local/bin/certbot /usr/local/sbin/certbot
  /usr/local/bin/letsencrypt /usr/local/sbin/letsencrypt
  /usr/src/letsencrypt/certbot-auto /usr/src/letsencrypt/letsencrypt-auto
  /usr/src/certbot/certbot-auto /usr/src/certbot/letsencrypt-auto
  /usr/src/certbot-master/certbot-auto /usr/src/certbot-master/letsencrypt-auto"

if [[ ! -v LEBINARY ]]; then
  for i in ${DEFAULTLEBINARY}; do
    if [[ -x ${i} ]]; then
      LEBINARY=${i}
      echo "Found LetsEncrypt/Certbot binary at ${LEBINARY}"
      break
    fi
  done
fi

# Command line options depending on New or Renew.
NEWCERT="--renew-by-default certonly"
RENEWCERT="-n renew"

# Check for required binaries
if [[ ! -x ${LEBINARY} ]]; then
  echo "Error: LetsEncrypt binary not found in ${LEBINARY} !"
  echo "You'll need to do one of the following:"
  echo "1) Change LEBINARY variable in this script"
  echo "2) Install LE manually or via your package manager and do #1"
  echo "3) Use the included get-letsencrypt.sh script to install it"
  exit 1
fi

if [[ ! -x $( which keytool ) ]]; then
  echo "Error: Java keytool binary not found."
  exit 1
fi

if [[ ! -x $( which openssl ) ]]; then
  echo "Error: OpenSSL binary not found."
  exit 1
fi

if [[ ! -z ${email} ]]; then
  email="--email ${email}"
else
  email=""
fi

shift $((OPTIND -1))
for val in "${domains[@]}"; do
        DOMAINS="${DOMAINS} -d ${val} "
done

MAINDOMAIN=${domains[0]}

if [[ -z ${MAINDOMAIN} ]]; then
  echo "Error: At least one -d argument is required"
  usage
  exit 1
fi

if [[ ${renew} == "yes" ]]; then
  LEOPTIONS="${RENEWCERT}"
else
  LEOPTIONS="${email} ${DOMAINS} ${NEWCERT}"
fi

#if [[ ${onlyinsert} != "yes" ]]; then
if [[ ${onlyinsert} == "yes" ]]; then
  echo "Firing up standalone authenticator on TCP port 80 and requesting cert..."
  ${LEBINARY} --server https://acme-v01.api.letsencrypt.org/directory \
              --agree-tos --standalone --preferred-challenges http ${LEOPTIONS}
fi

#if [[ ${onlyinsert} != "yes" ]] && md5sum -c "/etc/letsencrypt/live/${MAINDOMAIN}/cert.pem.md5" &>/dev/null; then
if [[ ${onlyinsert} == "yes" ]] && md5sum -c "/etc/letsencrypt/live/${MAINDOMAIN}/cert.pem.md5" &>/dev/null; then
  echo "Cert has not changed, not updating controller."
  exit 0
else
  echo "Cert has changed or -i option was used, updating controller..."
  TEMPFILE=$(mktemp)
  CATEMPFILE=$(mktemp)

  # Identrust cross-signed CA cert needed by the java keystore for import.
  # Can get original here: https://www.identrust.com/certificates/trustid/root-download-x3.html
  cat > "${CATEMPFILE}" <<'_EOF'
-----BEGIN CERTIFICATE-----
MIIDSjCCAjKgAwIBAgIQRK+wgNajJ7qJMDmGLvhAazANBgkqhkiG9w0BAQUFADA/
MSQwIgYDVQQKExtEaWdpdGFsIFNpZ25hdHVyZSBUcnVzdCBDby4xFzAVBgNVBAMT
DkRTVCBSb290IENBIFgzMB4XDTAwMDkzMDIxMTIxOVoXDTIxMDkzMDE0MDExNVow
PzEkMCIGA1UEChMbRGlnaXRhbCBTaWduYXR1cmUgVHJ1c3QgQ28uMRcwFQYDVQQD
Ew5EU1QgUm9vdCBDQSBYMzCCASIwDQYJKoZIhvcNAQEBBQADggEPADCCAQoCggEB
AN+v6ZdQCINXtMxiZfaQguzH0yxrMMpb7NnDfcdAwRgUi+DoM3ZJKuM/IUmTrE4O
rz5Iy2Xu/NMhD2XSKtkyj4zl93ewEnu1lcCJo6m67XMuegwGMoOifooUMM0RoOEq
OLl5CjH9UL2AZd+3UWODyOKIYepLYYHsUmu5ouJLGiifSKOeDNoJjj4XLh7dIN9b
xiqKqy69cK3FCxolkHRyxXtqqzTWMIn/5WgTe1QLyNau7Fqckh49ZLOMxt+/yUFw
7BZy1SbsOFU5Q9D8/RhcQPGX69Wam40dutolucbY38EVAjqr2m7xPi71XAicPNaD
aeQQmxkqtilX4+U9m5/wAl0CAwEAAaNCMEAwDwYDVR0TAQH/BAUwAwEB/zAOBgNV
HQ8BAf8EBAMCAQYwHQYDVR0OBBYEFMSnsaR7LHH62+FLkHX/xBVghYkQMA0GCSqG
SIb3DQEBBQUAA4IBAQCjGiybFwBcqR7uKGY3Or+Dxz9LwwmglSBd49lZRNI+DT69
ikugdB/OEIKcdBodfpga3csTS7MgROSR6cz8faXbauX+5v3gTt23ADq1cEmv8uXr
AvHRAosZy5Q6XkjEGB5YGV8eAlrwDPGxrancWYaLbumR9YbK+rlmM6pZW87ipxZz
R8srzJmwN0jP41ZL9c8PDHIyh8bwRLtTcm1D9SZImlJnt1ir/md2cXjbDaJWFBM5
JDGFoqgCWjBH4d1QB7wCCZAA62RjYJsWvIjJEubSfZGL+T0yjWW06XyxV3bqxbYo
Ob8VZRzI9neWagqNdwvYkQsEjgfbKbYK7p2CNTUQ
-----END CERTIFICATE-----
_EOF

  md5sum "/etc/letsencrypt/live/${MAINDOMAIN}/cert.pem" > "/etc/letsencrypt/live/${MAINDOMAIN}/cert.pem.md5"
  echo "Using openssl to prepare certificate..."
  cat "/etc/letsencrypt/live/${MAINDOMAIN}/chain.pem" >> "${CATEMPFILE}"
  openssl pkcs12 -export  -passout pass:aircontrolenterprise \
          -in "/etc/letsencrypt/live/${MAINDOMAIN}/cert.pem" \
          -inkey "/etc/letsencrypt/live/${MAINDOMAIN}/privkey.pem" \
          -out "${TEMPFILE}" -name unifi \
          -CAfile "${CATEMPFILE}" -caname root

  echo "Stopping Unifi and UniFi-Video controllers..."
  systemctl stop unifi unifi-video

  echo "Removing existing certificate from Unifi protected keystore..."
  keytool -delete -alias unifi -keystore /usr/lib/unifi/data/keystore -deststorepass aircontrolenterprise
  echo "Removing existing certificate from Unifi-Video protected keystore..."
  keytool -delete -alias unifi -keystore /usr/lib/unifi-video/data/keystore -deststorepass ubiquiti
  # following lines are needed for unifi-video

  echo "Inserting certificate into Unifi keystore..."
  keytool -trustcacerts -importkeystore \
          -deststorepass aircontrolenterprise \
          -destkeypass aircontrolenterprise \
          -destkeystore /usr/lib/unifi/data/keystore \
          -srckeystore "${TEMPFILE}" -srcstoretype PKCS12 \
          -srcstorepass aircontrolenterprise \
          -alias unifi

  echo "Inserting certificate into Unifi-Video keystore..."
  keytool -trustcacerts -importkeystore \
          -deststorepass ubiquiti \
          -destkeypass ubiquiti \
          -destkeystore /usr/lib/unifi-video/data/keystore \
          -srckeystore "${TEMPFILE}" -srcstoretype PKCS12 \
          -srcstorepass aircontrolenterprise \

          rm -f "${TEMPFILE}" "${CATEMPFILE}"

  mv /usr/lib/unifi-video/data/ufv-truststore{,.old} # Delete old unifi-video keystore
  sleep 5
  echo "Starting Unifi and UniFi-Video controllers..."
  systemctl start unifi unifi-video

  echo "Done!"
fiLog into MySQL from command line
mysql -u root -p
Select the correct database
USE wordpress_db;
Print current users
SELECT * FROM wp_users;
Should get something similar to the following
mysql> SELECT * FROM wp_users
     -> ;
 +----+------------+------------------------------------+---------------+---------------------------+----------+---------------------+------------------------------------+-------------+--------------+
 | ID | user_login | user_pass                          | user_nicename | user_email                | user_url | user_registered     | user_activation_key                | user_status | display_name |
 +----+------------+------------------------------------+---------------+---------------------------+----------+---------------------+------------------------------------+-------------+--------------+
 |  1 | admin    | 5f4dcc3b5aa765d61d8327deb882cf99 | admin       | bob@incredigeek.com       |          | 2018-08-09 10:10:42 |                                    |           0 | admin        |
 |  2 | bob      | 210805fb52a13251f4bedc7e725e575a | bob         | bob@incredigeek.com       |          | 2019-11-01 11:31:23 |                                    |           0 | bob smith    |
 +----+------------+------------------------------------+---------------+---------------------------+----------+---------------------+------------------------------------+-------------+--------------+
 3 rows in set (0.00 sec)
 mysql>
To update the password use
UPDATE wp_users SET user_pass = MD5('NewPass') WHERE ID=1;
The MD5 hashes the NewPass and adds it to the database. You can print the users again to verify the hash changed.
You should now be able to login using the new password you configure.
Install Oxidized
Install Instructions from here
Install prerequisites
For CentOS, RockyLinux, and Alma Linux.
sudo yum -y install make cmake which sqlite-devel openssl-devel libssh2-devel ruby gcc ruby-devel libicu-devel gcc-c++
Install Ruby Gems
If you run into issues with installing the oxidized-web gem because of a ruby version, try installing ruby 2.6.1 via rvm the docs say install 2.1.2, but was having issues with it. 2.6.1 seems fine.
Install Oxidized
Note: If you run into issues with oxidized not being able to ssh into devices, and showing “OpenSSL::PKey::PKeyError with msg “dh#set_pqg= is incompatible with OpenSSL 3.0″” in the log, try installing from git.
gem install oxidized
gem install oxidized-script
gem install oxidized-web
Run Oxidized twice to generate the config
oxidized
If you have issues running oxidized due to an invalid or self signed ssl cert, you can either fix the cert or ignore it in the oxidized config. https://github.com/ytti/oxidized/pull/618/files
Modify the Oxidized config file in “/root/.config/oxidized/config” to look like this.
Modify the http portion of the config file to look like the following.
http:

    url: https://localhost/api/v0/oxidized

    scheme: https

    secure: false
Setup Config
Put the config file in the users home directory.
vi .config/oxidized/config
Setup the config, Basic config below, edit as needed
---
username: admin
password: password
model: airos
resolve_dns: true
interval: 3600
use_syslog: false
debug: false
threads: 30
timeout: 20
retries: 3
prompt: !ruby/regexp /^([\w.@-]+[#>]\s?)$/
rest: 127.0.0.1:8888
next_adds_job: false
vars: {}
groups:
   airos:
     username: ubnt
     password: ubnt
   routeros:
     username: admin
     password:
     vars:
       ssh_port: 2222
 models: {}
 pid: /home/incredigeek/.config/oxidized/pid
 crash:
   directory: /home/incredigeek/.config/oxidized/crashes
   hostnames: false
 stats:
   history_size: 10
 input:
   default: ssh, telnet
   debug: false
   ssh:
     secure: false
   ftp:
     passive: true
   utf8_encoded: true
 output:
   default: file
   file:
     directory: /home/incredigeek/.config/oxidized/configs
 source:
   default: http
   debug: false
   http:
     secure: false
     scheme: https
     url: https://localhost/api/v0/oxidized
     map:
       name: hostname
       model: os
       group: group
     headers:
       X-Auth-Token: '3wq2b87fj4e6fb5987b5812t6ej9709g'
 model_map:
   cisco: ios
   juniper: junos
   mikrotik: routeros
Setup as system service
Find the “oxidized.service” file, should be in
/usr/local/rvm/gems/ruby-2.6.1/gems/oxidized-0.25.1/extra/oxidized.service
or
/usr/local/share/gems/gems/oxidized-0.28.0/extra/oxidized.service
and copy it to
/usr/lib/systemd/system/
Edit it and change the user and try to launch it
systemctl start oxidized
If it fails, you may need to substitute the ExecStart= variable to the following more info
ExecStart=/usr/local/rvm/gems/ruby-2.6.1/wrappers/oxidize
Change the ruby number if yours is different.
Enable the service on system boot up and start
systemctl enable --now oxidized
Check that oxidized is running
systemctl status oxidized
LibreNMS config
Add the following to your /opt/librenms/config.php config file.
# Oxidized configuration
 $config['oxidized']['enabled']                  = TRUE;
 $config['oxidized']['url']                      = 'http://127.0.0.1:8888';
 $config['oxidized']['features']['versioning']   = true;
 $config['oxidized']['group_support']            = true;
 $config['oxidized']['default_group']            = 'default';
 $config['oxidized']['reload_nodes']             = true;
 $config['oxidized']['ignore_os'] = array('linux','windows');
 $config['oxidized']['ignore_types'] = array('server','power');
LibreNMS should now feed Oxidized the devices.
You can check in the LibreNMS interface to see if it is getting the configs. https://librenms/oxidized
Where librenms is your LibreNMS servers ip/hostname.
Install Prerequisites
yum install -y curl gcc-c++ patch readline readline-devel zlib zlib-devel libyaml-devel libffi-devel openssl-devel make cmake bzip2 autoconf automake libtool bison libssh2-devel libicu-devel
Install RVM
curl -L get.rvm.io | bash -s stable
Setup RVM, install Ruby 2.6.1 and set to default.
source /etc/profile.d/rvm.sh
rvm install 2.6.1
rvm use --default 2.6.1
You may need to add root or the user your using to the rvm group
sudo usermod -G rvm username
Pulled some of the info from here https://github.com/ytti/oxidized#installing-ruby-212-using-rvm
As a side note there is a lot of good bash info out here. https://www.gnu.org/software/bash/manual/bashref.html
3.1.2.4 ANSI-C Quoting
Words of the form $'string' are treated specially. The
word expands to string, with backslash-escaped characters replaced
as specified by the ANSI C standard. Backslash escape sequences, if
present, are decoded as follows:
\a
alert (bell)
\b
backspace
\e\E
an escape character (not ANSI C)
\f
form feed
\n
newline
\r
carriage return
\t
horizontal tab
\v
vertical tab
\\
backslash
\'
single quote
\"
double quote
\?
question mark \nnn
Some examples
echo Hello $'\t' World
Returns “Hello World” with a tab space between both words.
echo Hello $'\n' World
Returns Hello on one line and World on the second
echo "\"Hello World\""
Returns “Hello World” inside double quotes