The website below has a bunch of useful explanations for the different types of easing that can be used for moving an object.
PlayMaker camera fade in/out blinks after fade is complete – Unity
Looks that the issue has something to do with the fade event not being on the camera directly. Work around is to create a FSM on the main camera to fade in when the scene starts, have a bool that gets turned to true when the scene ends. Then the FSM on the camera fades out.
Example FSM on the main player camera
Unity script for enemy to follow player
The following script will let an object follow a player when it is within a certain range and will stop following it once it is out of a certain range
The following variables can be adjusted from the Inspector.
Attack Speed = How fast the game object moves
Attack Distance = How close does the player need to be to start moving
Buffer Distance = How far away from the player should the game object stop
Player = Game player to target
To use script, create a new C# script named FollowPlayer and paste in the following.
using System.Collections;
using System.Collections.Generic;
using UnityEngine;
public class FollowPlayer : MonoBehaviour
{
public float attackSpeed = 4;
public float attackDistance;
public float bufferDistance;
public GameObject player;
Transform playerTransform;
void GetPlayerTransform()
{
if (player != null)
{
playerTransform = player.transform;
}
else
{
Debug.Log("Player not specified in Inspector");
}
}
// Start is called before the first frame update
void Start()
{
GetPlayerTransform();
}
// Update is called once per frame
void Update()
{
var distance = Vector3.Distance(playerTransform.position, transform.position);
// Debug.Log("Distance to Player" + distance);
if (distance <= attackDistance)
{
if (distance >= bufferDistance)
{
transform.position += transform.forward * attackSpeed * Time.deltaTime;
}
}
}
}
Helpful Links
https://forum.unity.com/threads/c-get-transform-of-another-gameobject.177216/
https://docs.unity3d.com/ScriptReference/Vector3.Distance.html
Configure AirOS SNMP settings over ssh
In this post we’ll see how we can configure AirOS SNMP settings from the command line.
ubntmod command with save without rebooting.
./ubntmod.sh -i 192.168.1.20 -s "private;monitor@incredigeek.com;[30.69636, -88.04811]" -X '/usr/etc/rc.d/rc.softrestart save'
Alternative manual method.
ssh ubnt@192.168.1.20
Open config file
vi /tmp/system.cfg
Find the SNMP settings and modify as needed. Example below
snmp.community=private
snmp.contact=monitor@incredigeek.com
snmp.location=[30.69636, -88.04811]
Save and exit file with :x
Apply settings
/usr/etc/rc.d/rc.softrestart save
Setting up Proxy over SSH on Linux
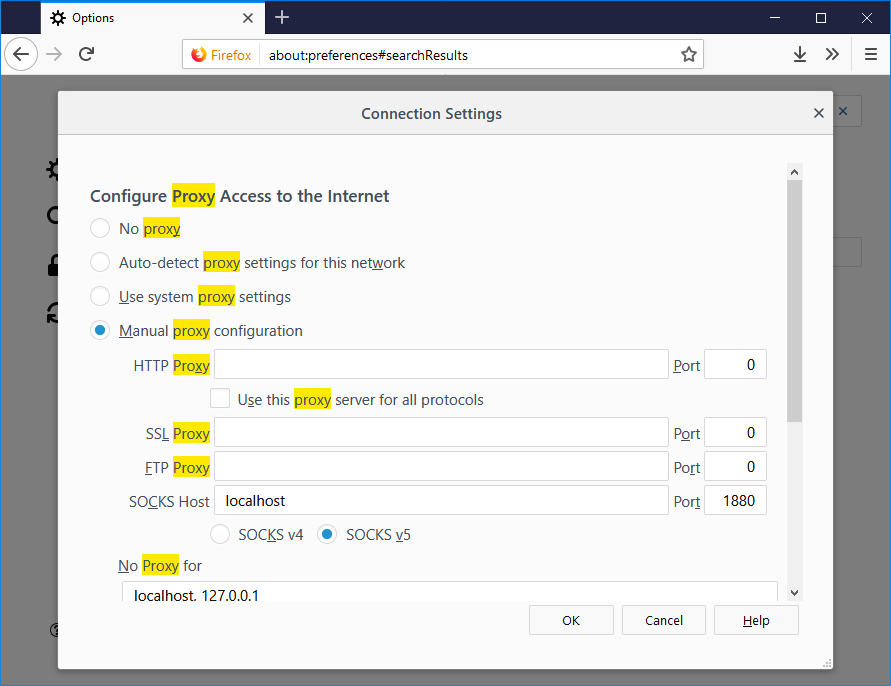
Initiate a ssh connection to the server or device you want to use as a proxy. You can change the port to something else if so desired.
ssh username@ipaddress -D 1880
Log in and leave the session running
You can now setup your computer or browser to use the Proxy.
Specify SOCKS Host, hostname is either localhost or 127.0.0.1, the port is 1880.
Firefox example below.
cnMaestro template for setting Username and Passwords for PMP gear
The following template can be used to set the user name and passwords for cambium pmp gear. Create a new template in cnMaestro, past in the following, change the passwordEncrypted to the hash of your password and run the config.
You can get the hashed password by pulling it out of a current radio config.
{ "userParameters": { "authenticationConfig": { "accounts": [ { "userName": "admin", "level": 3, "readOnly": false, "passwordEncrypted": "188a934e0246ae248da19400fed83107a" }, { "userName": "root", "level": 3, "readOnly": false, "passwordEncrypted": "188a934e0246ae248da19400fed83107a" } ] } } }
Alienware 13 R3 change screen brightness – Linux
Find the screens output
xrandr | grep " connected"
The internal display should be eDP-1-1
Set screen brightness halfway. Change .5 as needed.
xrandr --output eDP-1-1 --brightness .5
cnMaestro configuration for SNMPv3
The following works for setting the snmpv3 configuration on cambium 450i 900’s. Once applied it’ll run change the SNMP settings and reboot the radio.
You’ll need to find the hashed password which can be found in a config backup.
Change the SNMP username/community as needed.
{
"userParameters": {
"snmpConfig": {
"user2Group": 0,
"snmpv3EngineId": "007000a9840a003e464e7a",
"rwAuthPasswordEncrypted": "3e5h24a694a515e81abb6b25986cea91",
"commStringROnly": "rocommunitystring2",
"user2PrivPassword": "",
"user1AuthPassword": "",
"snmpv3AuthProt": 0,
"snmpv3TrapEnable": 0,
"snmpv3PrivProt": 0,
"snmpMibPerm": 1,
"roAuthPasswordEncrypted": "3e5h24a694a515e81abb6b25986cea91",
"commStringRW": "communitystring",
"userGroup1": 0,
"user1Enable": 0,
"snmpv3SecLvl": 2,
"user2Enable": 0,
"rwUserName": "Canopy",
"roUserName": "snmpv3user",
"roPrivPasswordEncrypted": "3e5h24a694a515e81abb6b25986cea91",
"userName1": "",
"snmpPort": 161,
"rwUserEnable": 0,
"trapDomainNameAppend": 0,
"rwPrivPasswordEncrypted": "3e5h24a694a515e81abb6b25986cea91",
"user1PrivPassword": "",
"userName2": "",
"user3PrivPassword": "",
"user2AuthPassword": "",
"userName3": "",
"user3Enable": 0,
"snmpTrapPort": 162,
"user3AuthPassword": "",
"user3Group": 0,
"trapDelayAfterBootup": 5,
"snmpIpAccessFilter": [
{
"address": "192.168.0.0",
"netmask": 24
},
{
"address": "10.0.1.0",
"netmask": 24
},
{
"address": "0.0.0.0",
"netmask": 0
},
{
"address": "0.0.0.0",
"netmask": 0
},
{
"address": "0.0.0.0",
"netmask": 0
},
{
"address": "0.0.0.0",
"netmask": 0
},
{
"address": "0.0.0.0",
"netmask": 0
},
{
"address": "0.0.0.0",
"netmask": 0
},
{
"address": "0.0.0.0",
"netmask": 0
},
{
"address": "0.0.0.0",
"netmask": 0
}
],
"snmpTrapAddresses": [
"0.0.0.0",
"0.0.0.0",
"0.0.0.0",
"0.0.0.0",
"0.0.0.0",
"0.0.0.0",
"0.0.0.0",
"0.0.0.0",
"0.0.0.0",
"0.0.0.0"
]
},
}
Unlock bootloader on Google Pixel (Sailfish)
Enable developer options By going to
Settings > System > About Phone > Developer options (Tap 7 times)
Enable OEM unlock in Developer settings
Reboot into recovery
If your one Verizon you may need to go through a couple extra steps to get the oem unlock to show up in the developer settings. More info here
Boot into twrp
fastboot img twrp.iso
Select the option in TWRP to sideload and sideload the Lineage iso
adb sideload lineage
Reboot install GAPPS
adb sideload gapps.zip