Run sudo Command over SSH. Single line.

When running an SSH command that uses sudo, something like

ssh admin@192.168.1.20 "sudo apt -y update && sudo apt -y upgrade"

You may receive the following error.

sudo: a terminal is required to read the password; either use the -S option to read from standard input or configure an askpass helper
sudo: a password is required

To work around this, you can use the -t option. -q is not needed, but makes thing quieter.

ssh -qt admin@192.168.1.20 "sudo apt -y update && sudo apt -y upgrade "

The sudo password will also be hidden.

https://unix.stackexchange.com/questions/134155/how-do-you-keep-the-password-hidden-when-invoked-during-the-su-command

https://stackoverflow.com/questions/233217/how-to-pass-the-password-to-su-sudo-ssh-without-overriding-the-tty

LibreNMS Error “.sock: rrd_fetch_r failed:”

The following error showed up after adding a new device to LibreNMS.

.sock:rrd_fetch_r failed: 

It was not displaying any graph data, but the device was up and connected.

Looks like the error is SELinux related. You can fix the error by resetting the security context with the following command.

sudo restorecon -RFv /opt/librenms

If that does not work, try running all the following

Running the following commands will fix the issue most of the time:

sudo chown -R librenms:librenms '/opt/librenms'

sudo setfacl -d -m g::rwx /opt/librenms/bootstrap/cache /opt/librenms/storage /opt/librenms/logs /opt/librenms/rrd

sudo chmod -R ug=rwX /opt/librenms/bootstrap/cache /opt/librenms/storage /opt/librenms/logs /opt/librenms/rrd

sudo semanage fcontext -a -t httpd_sys_rw_content_t '/opt/librenms/bootstrap/cache(/.*)?'

sudo semanage fcontext -a -t httpd_sys_rw_content_t '/opt/librenms/storage(/.*)?'

sudo semanage fcontext -a -t httpd_sys_rw_content_t '/opt/librenms/logs(/.*)?'

sudo semanage fcontext -a -t httpd_sys_rw_content_t '/opt/librenms/rrd(/.*)?'

sudo restorecon -RFv /opt/librenms

Install and Setup Tailscale on Ubuntu

Add the Tailscale package

curl -fsSL https://pkgs.tailscale.com/stable/ubuntu/lunar.noarmor.gpg | sudo tee /usr/share/keyrings/tailscale-archive-keyring.gpg >/dev/null
curl -fsSL https://pkgs.tailscale.com/stable/ubuntu/lunar.tailscale-keyring.list | sudo tee /etc/apt/sources.list.d/tailscale.list

Update and install Tailscale

sudo apt update && sudo apt upgrade
sudo apt install tailscale
sudo tailscale up

You’ll be given a link to visit to authenticate the device.

You can check the Tailscale IP address with

tailscale ip -4

https://tailscale.com/kb/1275/install-ubuntu-2304

Can’t log into NixOS after Install!

You thought everything went well with your NixOS install, you reboot, enter your username and password, and bam! Login incorrect.

Okay, try it again.

Login incorrect

Hmm…

Let’s try root. Nope, same thing…

If you don’t enter the password in correctly for root at the end of an installation, there will not be a root password, hence you can not log in.

Best way to keep this from happening is to make sure the password is set up before rebooting.

If you are one of those unfortunate souls who entered the wrong root password and missed the warning at the end of the installation

Try the following.

nixos-enter --root '/mnt'

Note: If you already rebooted, boot up on the minimum USB drive, mount the root partition, then run the nixos-enter command.

mount /dev/disk/by-label/nixos /mnt
nixos-enter --root '/mnt'

passwd to set the root password. You can also set your user password with

passwd username

Change username to your username.

Reboot and login!

How To Install NixOS Minimum from USB drive

You can make the USB drive by downloading the image off of nixos.org and then use Etcher, dd, or your favorite iso to USB drive utility.

The minimum version of NixOS does not come with a GUI installer.

https://nixos.org/manual/nixos/stable/#ch-installation

The manual contains all the info needed. For a minimum install, there are a couple of steps that you need to perform, before you can install.

  1. Format hard disk
  2. Create config file
  3. Install

Format Hard Disk

We’ll assume that /dev/sda is our target disk. This will overwrite the disk. Make sure you don’t need anything on it.

parted /dev/sda -- mklabel gpt
parted /dev/sda -- mkpart root ext4 512MB -8GB
parted /dev/sda -- mkpart swap linux-swap -8GB 100%
parted /dev/sda -- mkpart ESP fat32 1MB 512MB
parted /dev/sda -- set 3 esp on

Format the partitions

mkfs.ext4 -L nixos /dev/sda1
mkswap -L swap /dev/sda2
mkfs.fat -F 32 -n boot /dev/sda3
mount /dev/disk/by-label/nixos /mnt
mkdir -p /mnt/boot
mount /dev/disk/by-label/boot /mnt/boot
swapon /dev/sda2

Create a basic config file

nixos-generate-config --root /mnt

You can edit the config to make any changes you need. You may want to uncomment the user lines to setup a new user.

nano /mnt/etc/nixos/configuration.nix

Install NixOS

nixos-install

Last step is to setup the root and user password.

passwd

Reboot the machine once the password is set.

After you log in, set the user password.

passwd username

Simple method to Encrypt/Decrypt Zip files on Windows

Unfortunately, encrypting a file on Windows with a simple password is not super simple. While Windows does now support other compression formats (RAR, 7-Zip) it does not support encryption for them.

Currently, Windows natively supports the ZipCrypto algorithm. No AES. Note that the ZipCrypto algorithm is not considered secure, and shouldn’t be used for highly confidential data.

The following method, you will need 7-Zip to create the archive, but you won’t need it for decryption as Windows has built in support for ZipCrypto decryption.

To create the archive, you will need 7-Zip installed. Right click on your file/folder -> 7-Zip -> Add to Archive.

You should be presented with a similar window.

Change Archive format to zip
Enter the password
Ensure that the Encryption method is ZipCrypto
Hit OK to create the Archive.

You can now transfer the password protected archive to a new machine. You’ll be prompted for the password when you extract the archive.

How to Fix OpenVAS “ERROR: The default PostgreSQL version (14) is not 16 that is required libgvmd”

Currently OpenVAS needs PostgreSQL 16 on port 5432. If you have multiple versions of PostgreSQL, the lowest version will typically run on port 5432, and then they’ll increment from there. For example, if you have PostgreSQL 14, 15, and 16, 14 will run on port 5432, 15 on 5433, and 16 on 5434.

The quick fix is to edit the PostgreSQL config files, change the port numbers, restart PostgreSQL, and rerun gvm-setup.

vi /etc/postgresql/16/main/postgresql.conf

Change port number from 5434 to 5432

You will need to remove/disable/change the port for PostgreSQL 14

sudo apt remove postgresql-14
sudo systemctl restart postgresql@16-main.service

We can verify that PostgreSQL is running with netstat.

netstat -tulpn

We can see that the ports 5432 (PostgreSQL 16) and 5433 (PostgreSQL 15) are both running.

Rerun gvm-setup

sudo gvm-setup

Install and Setup OpenVAS on Kali Linux 2023/2024

Notes on installing OpenVAS on Kali Linux in 2023/2024

sudo apt install openvas

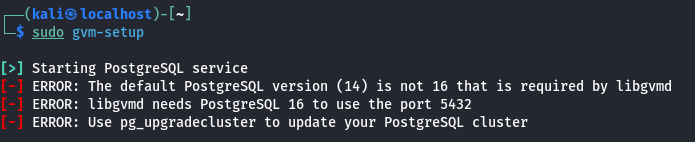
Run the setup script. This used to be called openvas-setup, now it is gvm-setup. Note that the script can take a long time to run.

gvm-setup

At the end of the script, it will give you a password. Use this password to log into the web interface. You can reset the password if needed.

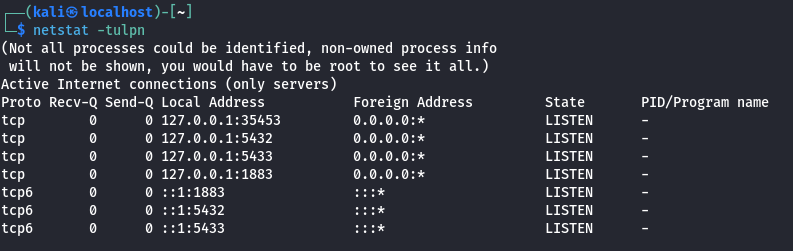
If you run into issues with PostgreSQL, check out this post

Log into the web interface at

https://127.0.0.1:9392

Troubleshooting

On Kali Linux, you need to run commands as the _gvm user. You can do this by prepending the commands with

sudo runuser -u _gvm -- COMMAND

There are two — dashes, between the _gvm user and the COMMAND. Replace COMMAND with the GVM/OpenVAS command you want to execute.

Example, to list the current users do

sudo runuser -u _gvm -- gvmd --get-users

To create a new user run

sudo runuser -u _gvm -- gvmd --user=newadmin --new-password=longsecurepassword

Failed to find config ‘daba56c8-73ec-11df-a475-002264764cea’

If you receive a `Failed to find config ‘daba56c8-73ec-11df-a475-002264764cea'”` error,

try running the following command

sudo runuser -u _gvm -- greenbone-nvt-sync

This can take awhile, but it should sync all the files needed. Check the following link for more information.

https://forum.greenbone.net/t/cant-create-a-scan-config-failed-to-find-config/5509

The following link is also helpful for installing OpenVAS

https://stafwag.github.io/blog/blog/2021/02/28/howto-install-opevas-on-kali/

Common Power Issue Terminology

Here is a list of terms associated with power issues.

NameDefinition
FaultMomentary loss of power
BlackoutProlonged power outage
SagMomentary low voltage
BrownoutProlonged Low voltage
SpikeMomentary spike in voltage
SurgeExtended spike in voltage
InrushInitial voltage “surge” when a device is plugged in

Here is a visual image.

Extract part of a tar archive

You can use tar -tvf to show the contents of a tar file.

tar -tvf  filename.tgz

You can extract a portion of the archive with

tar -zxvf filename.tgz path/inside/file -C destination/path

For instance, if I have a tar backup of my /home directory, and I need to extract a file out of the tarred Downloads to my current Downloads directory, I can do

tar -zxvf home.tgz home/incredigeek/Downloads/slack.deb ~/Downloads

https://www.cyberciti.biz/faq/list-the-contents-of-a-tar-or-targz-file/

https://stackoverflow.com/questions/24057301/bash-extract-only-part-of-tar-gz-archive