LibreOffice Calc – Turn page breaks on and off

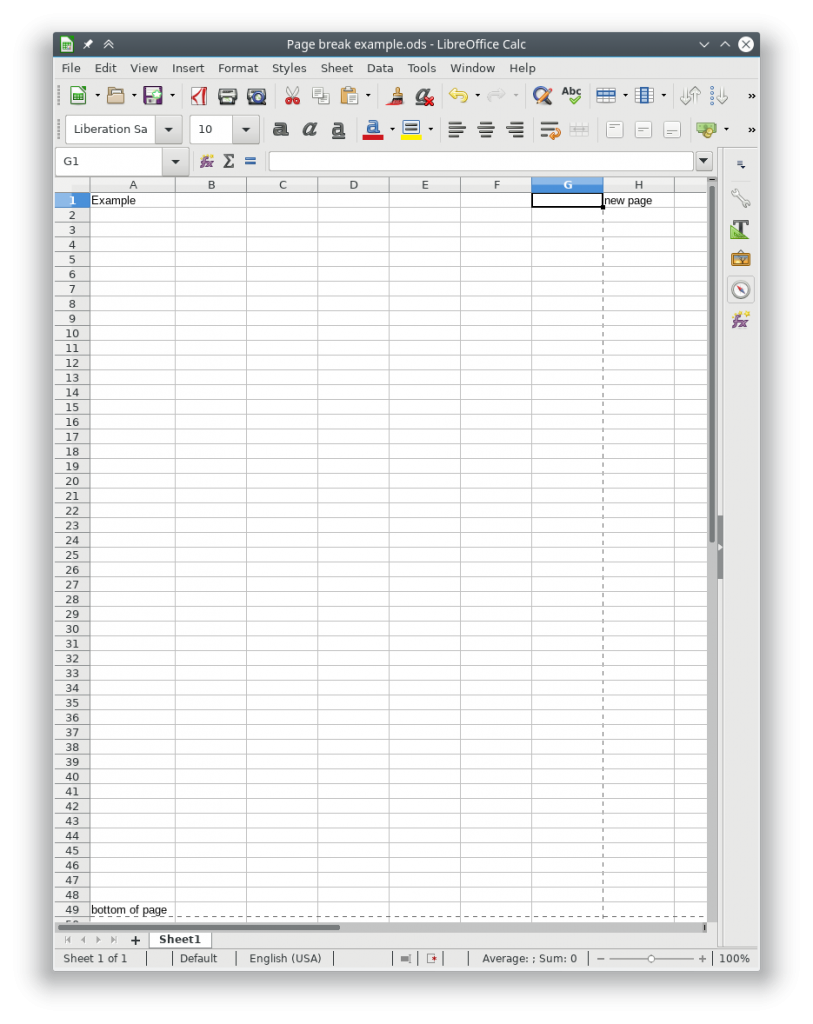
Turning the Page break option on in LibreOffice Calc will show a dotted line in your Calc spreadsheet to show you if you printed it out where the boundaries would be.

Example showing page breaks in LibeOffice Calc. The dotted lines are the page outline

You can turn this behavior on or off by going to
Tools -> Options -> LibreOffice Calc -> View -> Visual Aids -> Page breaks
And turning the check box on or off

Example of Page breaks being on.

UNMS – Set user as Super Admin from command line

The following commands can be run from a ssh session to your UNMS instance.

Show Current Users

sudo ~unms/app/unms-cli set-superadmin

Should get something like the following

            UNMS Users
 ┌─────────┬───────────┬───────────────────────────┬──────────────┬────────────┐
 │ (index) │ username  │           email           │     role     │ two-factor │
 ├─────────┼───────────┼───────────────────────────┼──────────────┼────────────┤
 │    0    │  'larry'  │  'larry@incredigeek.com'  │   'admin'    │   false    │
 │    1    │   'bob'   │   'bob@incredigeek.com'   │   'admin'    │   false    │
 └─────────┴───────────┴───────────────────────────┴──────────────┴────────────┘

Change User to Super Admin

To change a user to a Super Admin, add “–username username” to the above command.

Example:

sudo ~unms/app/unms-cli set-superadmin --username bob
            UNMS Users
 ┌─────────┬───────────┬───────────────────────────┬──────────────┬────────────┐
 │ (index) │ username  │           email           │     role     │ two-factor │
 ├─────────┼───────────┼───────────────────────────┼──────────────┼────────────┤
 │    0    │  'larry'  │  'larry@incredigeek.com'  │   'admin'    │   false    │
 │    1    │   'bob'   │   'bob@incredigeek.com'   │ 'superadmin' │   false    │
 └─────────┴───────────┴───────────────────────────┴──────────────┴────────────┘

Note that there does not appear to be a way to

UniFi Cameras – configure static IP or DHCP from command line

The UniFi cameras are different then the AirMax line in how the configuration works. There is a “/tmp/system.cfg” file, but it does not contain most of the configuration option. In the default directory there are some files which appear to handle the device configuration.

The network configuration file is “ubnt_networkd.conf”

Edit the file by opening it up in vi or a different text editor.

Static IP config

{
     "cfgver": 2,
     "dhcp": {
         "fallbackIP": "192.168.1.20",
         "fallbackNetmask": "255.255.255.0",
         "status": 0  <-- 0=Static 1=DHCP
     },
     "dns": {
         "ns1": {
             "ip": "8.8.8.8",
             "status": 1
         },
         "ns2": {
             "ip": "4.2.2.2",
             "status": 1
         }
     },
     "routes": {
         "gateway": "192.168.5.1"
     },
     "statik": {
         "ip": "192.168.5.11",
         "netmask": "255.255.255.0"
     }
}

If you want to set the static address, you should be able to edit the settings in this config and leave DHCP status disabled.

DHCP config

To set the Camera to use DHCP, under dhcp change “”status”: 0″ to “”status”: 1″

{
     "cfgver": 2,
     "dhcp": {
         "fallbackIP": "192.168.1.20",
         "fallbackNetmask": "255.255.255.0",
         "status": 1
     },
     "dns": {
         "ns1": {
             "ip": "8.8.8.8",
             "status": 1
         },
         "ns2": {
             "ip": "4.2.2.2",
             "status": 1
         }
     },
     "routes": {
         "gateway": "192.168.5.1"
     },
     "statik": {
         "ip": "192.168.5.11",
         "netmask": "255.255.255.0"
     }
}

After the settings are applied the camera will use use DHCP regardless of the statik ip settings.

Save changes

Use the following command to write the changes to persistent storage

ubnt_cmd_persist.sh

And reboot the camera.

reboot

Camera should pull a DHCP address when it boots up

Ubiquiti set DHCP from command line

Edit the “/tmp/system.cfg”

Change the line that contains “dhcpc.status=disabled” to

dhcpc.status=enabled

add the following lines

dhcpc.1.devname=br0         
dhcpc.1.fallback=192.168.1.20
dhcpc.1.fallback_netmask=255.255.255.0
dhcpc.1.status=enabled

Save and exit and save changes

/usr/etc/rc.d/rc.softrestart save

Log into the GUI and verify everything looks correct. Under the network tab it was still showing that it had a static address, although it pulled a DHCP IP.

Change Channel Width on Ubiquiti AC CPE Over SSH

SSH into CPE

ssh ubnt@192.168.1.20

open up the “/tmp/system.cfg” file

vi /tmp/system.cfg

Find the “radio.1.chanbw=” line and change to the following

radio.1.chanbw=10

Note: it may say “radio.1.chanbw=0” that looks to be the default and works for 20mhz

exit file with

esc + :wq + Return or Enter

Save settings with

/usr/etc/rc.d/rc.softrestart save 

Change AP to 10Mhz and the CPE should reconnect.

UBNTMOD check range of IP addresses and see if they resolve DNS

The following uses the ubntmod.sh script to check a device then report if it is resolving DNS or not. ip=”192.168.1.” specifies the first part of the ip, the “for ((i=1; i<=254;i++))” tells it to go from 192.168.1.1 – 192.168.1.254, change the beginning and ending number if you want to change the ip range.

ip="192.168.1." && for ((i=10; i<=30;i++)); do if ( fping ${ip}$i -r1 | grep alive); then ./ubntmod.sh -i ${ip}${i} -e ; else echo ${ip}$i not alive; fi ; done 

Broken out for easier reading.

ip="192.168.1." 
for ((i=10; i<=30;i++))
do
if ( fping ${ip}$i -r1 | grep alive); then
./ubntmod.sh -i ${ip}${i} -e
else echo ${ip}$i not alive
fi
done

If the script is able to log into the device and resolve DNS you should get

192.168.1.1 Resolves DNS

Installing LineageOS 17 Android 10 on Pixel

https://forum.xda-developers.com/pixel-xl/development/rom-lineage-17-0-pixels-marlin-sailfish-t3971039

Download twrp from here
Download LineageOS 17 from here

Boot phone to boot menu then fastboot twrp

sudo fastboot boot Downloads/twrp-3.3.0-0-sailfish.img

Wipe to factory defaults

Side load LineageOS Android 10 from the Advanced page on TWRP

adb sideload Downloads/lineage-17.0-withMTG-20191217-UNOFFICIAL-sailfish.zip 

Reboot and setup.