How to Restore Pixel to Factory Image

Restoring a Pixel to the factory image is a pretty straight forward operation if you are familiar with fastboot and adb. This guide assumes you have fastboot already installed and setup in your user path. If not you can refer to the following link for more information.

WARNING – THESE STEPS WILL DELETE ALL USER DATA OFF THE DEVICE.

https://developers.google.com/android/images#instructions

1. Download OTA Image

Go to the following link and download the Factory Image for your device

https://developers.google.com/android/images

Extract the file and then open a terminal or command prompt in that directory.

2. Boot up Pixel in recovery

You can do this with “adb reboot recovery” or with the volume key to boot into the Android boot menu.

3. Flash Image

On Windows you can flash the firmware with

flash-all.bat

Or on Linux

./flash-all.sh

Should take it a couple of minutes to complete.

Next we can lock bootloader with

fastboot flashing lock

You will need to confirm the lock on your phone.

Unable to Remove Authorized SSH Keys from AirOS

For some reason I ran into an issue where I can not remove authorized SSH Keys in AirOS version 6.3. It redirects to a 404 page and then to the main page.

Attempting to remove SSH keys in AirOS
404 Error while attempting to remove SSH keys

Thankfully, we can still remove the authorized keys from the command line. For more information on making changes over SSH, refer to the following post.

SSH into radio. Replace username and IP address with your radios user and IP.

ssh ubnt@192.168.1.20

Open up config file

vi /tmp/system.cfg

Search for the lines that contain

the sshd.auth.key and remove them

Remove the sshd.auth.key lines

Save the file and write the configuration with

/usr/etc/rc.d/rc.softrestart save

Once the command completes, you should be good to go.

How To Setup Samba/CIFS Share on Fedora Server

We are going to setup a Samba/CIFS share on Fedora Server that we will then access from Windows 10.

  1. Install Samba/CIFS server packages
  2. Create user to access share
  3. Configure SELinux and firewall
  4. Connect to erver from Windows

1. Install Samba/CIFS Fedora Server Packages

First we need to install the samba package.

sudo dnf install samba
Installing SMB on Fedora
Samba Dependencies

Next, lets enable the Samba service so it automatically starts when the server boots up.

systemctl enable smb nmb
systemctl start smb

nmb is a “NetBIOS name server that provides NetBIOS over IP naming service to clients”
https://www.samba.org/samba/docs/current/man-html/nmbd.8.html

2. Setup Samba/CIFS User

We now need a user to connect to the Samba share with. You can use the commands below to to create a new user.

pdbedit only configures a current Linux system user for Samba. You can skip creating a new Linux user, but only if there is one already created that you can use.

sudo useradd -m sambaUser
sudo passwd sambaUser
sudo pdbedit -a sambaUser

3. Configure Server SELinux and Firewall Permissions

Configure SELinux permissions with the following command.

sudo setsebool -P samba_enable_home_dirs on

You can also just disable SELinux. Although it is not necessarily recommended.
How To Enable/Disable SELinux

sudo setsebool -P samba_enable_home_dirs on
sudo firewall-cmd --add-service=samba --permanent
sudo firewall-cmd --reload

4. Test Samba/CIFS Share from Windows

You can now test to see if the share works. Open up Windows Explorer. Type in the IP address of the server and connect.

\\ip-address\sambaUser

It should prompt you for a login. Enter the user and password you set up.

Connecting to Fedora Samba/CIFS server

If it loads, then congratulations! You have successfully setup a Samba/CIFS Share on Fedora Server. Create new directories or files or whatever else you need.

Successfully Connected to Fedora Samba/CIFS Server

Check out the following links for more information about setting up Samba.

https://fedoramagazine.org/fedora-32-simple-local-file-sharing-with-samba/
https://jewelhuq.wordpress.com/2017/12/08/how-to-install-samba-server-in-fedora/

https://fedoramagazine.org/fedora-32-simple-local-file-sharing-with-samba/

Earning Microsoft Rewards With PowerShell

Earn Microsoft Rewards with PowerShell Script

You can earn Microsoft rewards by using Bing for searching. What if you could automate Bing searches to automatically get rewards? Oh wait. PowerShell can launch Edge with a Bing search! So we can acquire Microsoft Rewards with PowerShell!

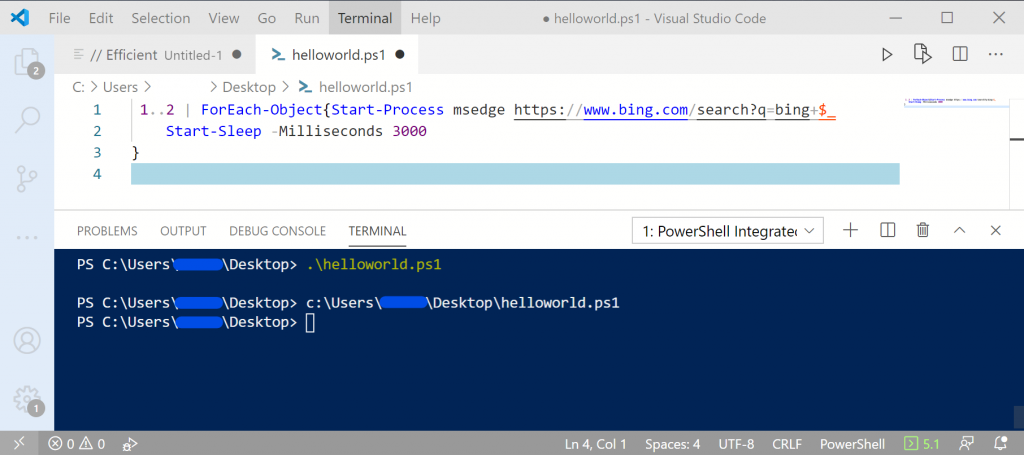
Create a new PowerShell file and past the following in.

1..30 | ForEach-Object{Start-Process msedge https://www.bing.com/search?q=bing+$_ 
    Start-Sleep -Milliseconds 3000
}

The script will launch 30 Edge tabs with a Bing search of “Bing 1” next tab will be “Bing 2” etc. You could definitely be more creative with what and how you search for things, but this works as a proof of concept.

I created and ran this script from Visual Studio Code. But you should be able to create it with a normal text file and launch it in PowerShell.

The person at the following link did an excellent job at creating a system for this. Looks really cool.

https://medium.com/@prateekrm/earn-500-daily-microsoft-rewards-points-automatically-with-a-simple-python-program-38fe648ff2a9

Where is my software RAID?!

There are a few different ways to view RAID information on Fedora. Here are two commands that can help.

1. Print Mdadm config

You can copy and past the following command to print the mdadm configuration.

cat /etc/mdadm.conf

It should return something similar to the following.

$ cat /etc/mdadm.conf
# mdadm.conf written out by anacondaMAILADDR root
AUTO +imsm +1.x -all
ARRAY /dev/md/Boot level=raid0 num-devices=6 UUID=21ce258a:015d0dd4:90d5b80e:ab04b7f7
ARRAY /dev/md/Root level=raid0 num-devices=6 UUID=4be32ad0:f3aa77bd:139d749d:4a6aab60 

We see from the above output that we have two raid arrays. Both RAID 0 over 6 drives.

2. Print mdstats

You can show the mdstats by running

cat /proc/mdstat

Should get output similar to the following.

$ cat /proc/mdstat
 Personalities : [raid0]
 md126 : active raid0 sdc2[0] sdf2[5] sde2[4] sdd2[1] sda2[2] sdb2[3]
       5856552960 blocks super 1.2 512k chunks
 md127 : active raid0 sdc1[0] sdf1[5] sde1[4] sdd1[1] sdb1[3] sda1[2]
       3133440 blocks super 1.2 512k chunks
 unused devices: 

This shows us the RAID size. About 5TB on one and 3GB on the other. The 3GB is used for the boot partition.

Other Notes

Apparently there is a difference between “mdadm” and “dm-raid”
Mdadm is for managing and creating software raids, while dm-raid interacts if a device like a laptop has a “fake RAID”

https://superuser.com/questions/721795/how-fake-raid-communicates-with-operating-systemlinux/721796#721796
https://stackoverflow.com/questions/23164384/what-is-the-difference-between-dm-and-md-in-linux-kernel

For more information on managing RAID with Mdadm, you can refer here.

Install RX 580 Mining Drivers on Debian Based Distributions

Use wget to download AMD drivers.

wget https://drivers.amd.com/drivers/linux/amdgpu-pro-20.45-1164792-ubuntu-20.04.tar.xz --referer https://support.amd.com

Extract archive.

tar xf amdgpu-pro-20.45-1164792-ubuntu-20.04.tar.xz

Change directory

cd amdgpu-pro-20.45-1164792-ubuntu-20.04

Install AMD Drivers

./amdgpu-pro-install -y --opencl=legacy,rocm --headless

If you run into issues with it saying “Unsupported DEB based OS” Refer to the following article.

Unsupported DEB-based OS: /etc/os-release ID ‘kali’

Unsupported DEB-based OS: /etc/os-release ID ‘kali’

Unsupported DEB-based OS: /etc/os-release ID ‘kali’. You can get the above error if you try to install AMD drivers on Kali Linux. Looks like by default they are looking for a system that is Ubuntu, LinuxMint or Debian.

You can resolve the issue by opening up the “amdgpu-pro-install” file and adding more OS’s that it can check for.

vi ./amdgpu-pro-install

Scroll down to line 147 where is says

ubuntu|linuxmint|debian) 

and change it to

ubuntu|linuxmint|debian|kali)

The code function should look like the following.

142 function os_release() {
143         if [[ -r  /etc/os-release ]]; then
144                 . /etc/os-release
145
146                 case "$ID" in
147                 ubuntu|linuxmint|debian|kali)
148                         :
149                         ;;
150                 *)
151                         echo "Unsupported DEB-based OS: `
152                                 `/etc/os-release ID '$ID'" | stderr
153                         exit 1
154                         ;;
155                 esac
156         else
157                 echo "Unsupported OS" | stderr
158                 exit 1
159         fi
160 }

Save a close the file and install the AMD drivers

./amdgpu-pro-install -y --opencl=legacy,rocm --headless

Looking at trying to install AMD drivers for mining? Check out the following link
Install RX 580 Mining Drivers on Debian Based Distributions

More info on Stack Exchange
https://elementaryos.stackexchange.com/questions/24282/cant-install-amd-drivers-on-elementaryos-hera-unsupported-deb-based-os

An upgrade from ‘disco’ (19.04) to ‘focal’ (20.04) is not supported with this tool.

Unfortunately once a version of Ubuntu becomes unsupported you can run into problems upgrading to the latest version. As is the case when you try to upgrade disco to focal. Ubunut 19.04 to 20.04.

A work around is to update the apt sources and then run an update

Update Apt Sources with.

sudo sed -i 's/disco/focal/g' /etc/apt/sources.list

Now Upgrade with the following two commands.

sudo apt update
sudo apt -y dist-upgrade

More info at the following link.

https://www.knowledgepublisher.com/article/1452/solution-an-upgrade-from-disco-to-focal-is-not-supported-with-this-tool.html

Troubleshooting DNS CPU Usage on Mikrotik Router

Problem : Lots of CPU utilization. Profile shows a good bit of it is DNS related.

DNS eating CPU on Router

The router is setup to allow DNS to pass through to web servers so rDNS and other records can be looked up and resolved. This is a specific IP block that gets it’s addresses from the router. The firewall rules explicitly allow this address range. We’ll say 192.168.88.0/24, and blocks everything else. This works for the web servers. But why are we still getting a bunch of CPU utilization with DNS?

As it turns out, the firewall rule that allows the server address range also includes routers own address! So we have unintentionally whitelisted DNS access to our router.

To resolve the issue we can add another firewall rule that explicitly blocks DNS traffic to the routers IP address. We are using two rules, one to block TCP and the other UDP.

ip firewall filter add chain=input dst-address=192.168.88.1 protocol=6 dst-port=53 in-interface-list=WAN action=drop
ip firewall filter add chain=input dst-address=192.168.88.1 protocol=17 dst-port=53 in-interface-list=WAN action=drop

Rules 6 & 7 are the two new rules we just applied. 14 & 15 block input to the router, however rules 8 & 9 inadvertently allowed access to the router’s public IP.

Firewall Rules for Router

The Result? Our CPU usage dropped!

CPU Usage dropped after adding DNS firewall rules.

Quite dramatically too as the following LibreNMS screenshot shows.

LibreNMS CPU graph showing the overall CPU utilization improvement

For more information about DNS Amplification attacks, refer to the following links.

https://ask.wireshark.org/question/6865/dns-amplification-attack/
https://security.stackexchange.com/questions/237127/why-would-hackers-attack-a-dns-server-with-a-dos