Unity Android Build – Required API Level 30

Android SDK missing required platform API

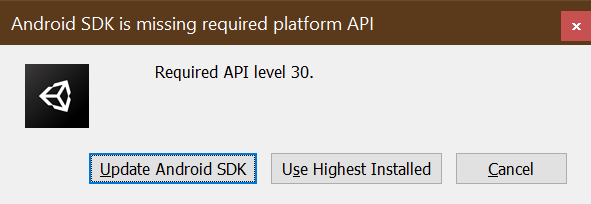
Ran into the above issue while trying to build a Unity project. Android studio had the correct version installed, why was it not able to use API level 30?

Ok So hit Update Android SDK. Unity Launches a PowerShell window and tries to upgrade the Android SDK level, but fails with

“Unable to install additional SDK platform. Please run the SDK Manager manually to make sure you have the latest set of tools and the required platforms installed.”

Looks like there was a bug with the space in the path to the command Unity was running.

https://forum.unity.com/threads/android-sdk-29-unable-to-install-additional-sdk-platform-issue-workaround.963626/

Looks like there are a couple of work arounds for this. I had Android Studio installed so I opened up that folder and copied that platform version to my unity folder.

Copy Android platform from Android Studio to Unity Folder

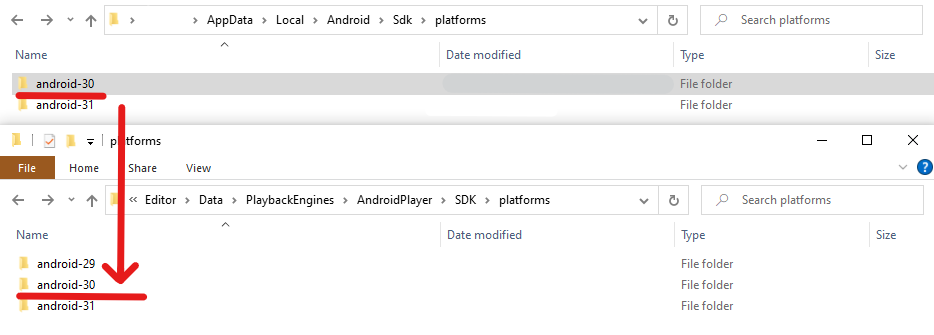
Android Studio folder should be in AppData\Local\Android\Sdk\platforms

Unity Project folder should be “C:\Program Files\Unity\Hub\Editor\2020.3.19f1\Editor\Data\PlaybackEngines\AndroidPlayer\SDK\platforms”

You should now be able to build the project in Unity now with the appropriate API version.

Enable Logging for firewalld

Enabling logging on firewall rules can be beneficial for tracking why a certain rule is not behaving as you intended.

Enabling logging is relatively straight forward.

  • Enable Firewall Logging
  • Check Logs
  • Disable Firewall Logging (Optional)

Enable Firewall Logging

Quickest way to enable logging is to run

sudo firewall-cmd --set-log-denied=all

This changes the options in the /etc/firewalld/firewalld.conf config file. Options include all, unicast, broadcast, multicast, and off

Enable Log option for firewalld

The command also reloads the firewall so manually restarting the firewall is necessary.

Checking Logs

You can use dmesg to view the failed attempts or you can follow the messages log and filter to just show the rejects

sudo tail -f /var/log/messages | grep -i REJECT

You can now try to access the server or run a test to trigger a log event. In my case I tried initiating a SSH connection.

Oct  1 16:32:10 localhost kernel: FINAL_REJECT: IN=eno1 OUT= MAC=f8:ab:98:12:fe:11:a1:ec:a6:00:67:3e:97:00 SRC=192.168.1.1 DST=192.168.88.2 LEN=60 TOS=0x08 PREC=0x40 TTL=59 ID=43080 DF PROTO=TCP SPT=38192 DPT=22 WINDOW=52240 RES=0x00 SYN URGP=0

Interesting bits are bolded. Our destination port it 22 “ssh” and our source address is 192.168.1.1. If I want this IP to access the server, I’ll need to add the 192.168.1.1 IP range in the allowed IP ranges.

Disable Logging (Optional)

After you have finished troubleshooting your problem, you may want to turn the logging feature off so you don’t fill up the logs with failed entries.

You can turn it off with

sudo firewall-cmd --set-log-denied=off

We can verify that logging is off by running

sudo firewall-cmd --get-log-denied 

If the firewall logging option is off it will return “off”

The following site has some more information and alternative ways

https://www.cyberciti.biz/faq/enable-firewalld-logging-for-denied-packets-on-linux/

Change IP Address for VMware ESXI Host from Command Line

We can use the the built in esxcli command to change the IP address for a server

First we need to get the interface name. We can get the info with the following command.

esxcli network ip interface ipv4 get
Name  IPv4 Address   IPv4 Netmas   IPv4 Broadcast  Address Type  DHCP DNS 
----  ------------  -------------  --------------  ------------  -------- 
vmk0  192.168.0.4   255.255.255.0  192.168.0.0     STATIC           false

The text in bold is our interface name.

Set the interface to pull DHCP

The following command will set the interface to use DHCP. If your interface name is different, then you will want to change that.

esxcli network ip interface ipv4 set -i vmk0 -t dhcp

Set a static IP

We can set a static IP address with the following command. Change the IP and Subnet for the appropriate IP address and Subnet.

esxcli network ip interface ipv4 set -i -I IP -N Subnet vmk0 -t static

Changes take affect immediately so you’ll need to re ssh into the server.

http://virtuallystable.com/2019/08/14/how-to-change-the-ip-address-of-an-esxi-host-via-esx-cli/

Troubleshooting Backup Errors on WHM / cPanel

Below are some helpful locations of files, logs etc for troubleshooting backup errors on WHM

WHM backup logs
Change date to the correct date. Should be one log per day or I guess every time a backup runs.

/usr/local/cpanel/logs/cpbackup/{date}.log

View WHM backup config

cat /var/cpanel/backups/config

View WHM remote destination config(s)
Replace *** with the appropriate name.

cat /var/cpanel/backups/***.backup_destination

Rysnc.pm file

May need to modify this file to increase time out limits if you are having issues with time out errors for backups.

/usr/local/cpanel/Cpanel/Transport/Files/Rsync.pm

This link has some more info https://forums.cpanel.net/threads/what-commands-does-cpanel-run-over-ssh-to-do-rsync-backups.671777/

Unable to prune transport Rsync Incremental Backup – WHM/cPanel

For some reason I keep getting an alert about the transport failing to prune the incremental backups. Shows “ssh slave failed: timed out”

Going to the backup server shows that the directories have been pruned. This makes the alert a bit confusing.

It appears that others are experiencing the same problem.

https://forums.cpanel.net/threads/remote-incremental-backups-timeouts.606911/page-3

https://forums.cpanel.net/threads/error-pruning-ssh-slave-failed-timed-out.627691/

You can check the backup log to see if it gives you any errors or ideas on what the problem is. Replace {currentdate} with the date of the log file you want.

/usr/local/cpanel/logs/cpbackup/{currentdate}.log

One thing to try is to increase the time out on the

In WHM, go to Backup -> Backup Configuration -> Additional Destinations -> Your Destination
Scroll down to the bottom and enter a higher timeout value

Setting cPanel remote transport timeout

One user said they patched the rsync.pm file. Looks like there may be a 30 second timeout for rsync, so maybe increasing that would help.

/usr/local/cpanel/Cpanel/Transport/Files/Rsync.pm

Set coolbits value on Fedora Linux

You sometimes need to set the coolbits value to overclock your GPU on Linux

You’ll need to install nvidia-xconfig

sudo dnf install nvidia-xconfig

Then you can set the cool bits value with the following command. Change 24 to the appropriate cool bits value. Refer to the link below.

sudo nvidia-xconfig --cool-bits=28

It’ll create a new xorg config file. Reboot to take advantage of cool bits being enabled.

Multiple GPUs

If you have multiple GPUs, you will need to do the following to enable cool bits on each GPU.

sudo nvidia-xconfig -a --cool-bits=28 --allow-empty-initial-configuration

https://wiki.archlinux.org/title/NVIDIA/Tips_and_tricks#Enabling_overclocking

How to setup a Chia Harvester on Windows

The following instructions are for setting up a Windows computer as a Chia Harvester.

Prerequisites

Before we get started you will need the following

  1. Have a current Chia farmer
  2. You will need the \ca folder from your main farmer.
  3. IP address of your Chia farmer

The ca folder should be located in

%homepath%\.chia\mainnet\config\ssl\

You should be able to copy and paste the above in File Explorer. Copy the ca folder to a USB drive or share it via a network share.

Setting up harvester

  1. Copy the ca folder to an easily accessible place on your harvester
  2. Install Chia from https://www.chia.net/download/
  3. Close chia
  4. Open PowerShell and paste the cfollowing commands in. Change the sections in bold to reflect your settings/options
cd $env:APPDATA..\local\chia-blockchain\app-1.2.5\resources\app.asar.unpacked\daemon
.\chia.exe init -c D:\ca\
.\chia.exe stop all
.\chia.exe configure --set-farmer-peer 192.168.188.2:8447
.\chia.exe configure --enable-upnp false
.\chia.exe plots add -d D:\   
.\chia.exe start harvester -r

Check the main Farmer to verify the Harvester connected.

LibreNMS Error Running ./validate.php – Database: incorrect column…

LibreNMS error while running ./validate.php

Recently I started getting the following error while running ./validate.php.

$ sudo -u librenms ./validate.php
====================================
Component | Version
--------- | -------
LibreNMS  | 21.8.0-41-g0a76ca4
DB Schema | 2021_08_26_093522_config_value_to_medium_text (217)
PHP       | 7.4.20
Python    | 3.6.8
MySQL     | 10.5.10-MariaDB
RRDTool   | 1.4.8
SNMP      | NET-SNMP 5.7.2
====================================

[OK]    Composer Version: 2.1.6
[OK]    Dependencies up-to-date.
[OK]    Database connection successful
[FAIL]  Database: incorrect column (notifications/datetime)
[FAIL]  Database: incorrect column (users/created_at)
[FAIL]  We have detected that your database schema may be wrong, please report the following to us on Discord (https://t.libren.ms/discord) or the community site (https://t.libren.ms/5gscd):
        [FIX]:
        Run the following SQL statements to fix.
        SQL Statements:
         SET TIME_ZONE='+00:00';
         ALTER TABLE `notifications` CHANGE `datetime` `datetime` timestamp NOT NULL DEFAULT '1970-01-02 00:00:00' ;
         ALTER TABLE `users` CHANGE `created_at` `created_at` timestamp NOT NULL DEFAULT '1970-01-02 00:00:01' ;

Reading online it sounds like some of the recent changes are causing the issue. Looks fairly easy to resolve though.

First we’ll need to get a MySQL prompt. We’ll do that by running

mysql -u librenms -p librenms

It’ll ask use for the librenms user’s mysql password.

Once we have the MySQL prompt we can just copy and paste the commands in.

SET TIME_ZONE='+00:00';
ALTER TABLE `notifications` CHANGE `datetime` `datetime` timestamp NOT NULL DEFAULT '1970-01-02 00:00:00' ;
ALTER TABLE `users` CHANGE `created_at` `created_at` timestamp NOT NULL DEFAULT '1970-01-02 00:00:01' ;

Type ‘quit’ to exit MySQL and lets run the validate script again.

sudo -u librenms ./validate.php

Everything should check out OK.

Unity – Rotate Player by Dragging Finger on Screen

C# Code for rotating a player in Unity by swiping on the screen.

This is actually really simple to do. Create a script called PlayerRotation or something, then put in the following code.

 
 public float speed;
 void Update()
    {
        // Touch controls for rotation
        if (Input.touchCount > 0 && Input.GetTouch(0).phase == TouchPhase.Moved)
        {
            Vector2 touchDeltaPosition = Input.GetTouch(0).deltaPosition;
            // Rotate Player.  Could change Rotate to Translate to move the player.
            transform.Rotate(0, touchDeltaPosition.x * speed, 0);
   

    }

Assign the Script to the player and specify the speed in the Unity Inspector. The public float speed variable will increase or decrease how fast you rotate around. You can also set it to a negative number to rotate the opposite direction you drag with your finger.

Unity speed of rotation for player.