Created a little web interface to use Whisper, technically using whisper-ctranslate2 which is built on faster-whisper.
This is not currently ready to be run on the public web. It doesn’t have any sort of TLS for encrypting communications from client to server and all the files are stored on server. Only use in a trusted environment.
Now create an index.html file and paste the following in
<!DOCTYPE html>
<html lang="en">
<head>
<meta charset="UTF-8" />
<meta http-equiv="X-UA-Compatible" content="IE=edge" />
<meta name="viewport" content="width=device-width, initial-scale=1.0" />
<title>Voice Transcribing Using Whisper</title>
<link type="text/css" rel="stylesheet" href="style.css" />
</head>
<style>
body {
background-color: #b9dbe7;
align-items: center;
}
.box {
border-radius: 25px;
padding: 25px;
width: 80%;
background-color: azure;
margin: auto;
border-bottom: 25px;
margin-bottom: 25px;
}
.button {
border-radius: 25px;
margin: auto;
width: 50%;
height: 50px;
display: flex;
justify-content: center;
border-style: solid;
background-color: #e8d2ba;
}
h1 {
text-align: center;
padding: 0%;
margin: 0%;
}
p {
font-size: larger;
}
.headings {
font-size: large;
font-weight: bold;
}
input {
font-size: medium;
}
select {
font-size: medium;
}
.results {
white-space: pre-wrap;
border-radius: 25px;
padding: 25px;
width: 80%;
align-self: center;
background-color: azure;
margin: auto;
}
.note {
font-style: italic;
font-size: small;
font-weight: normal;
}
</style>
<body>
<script></script>
<div class="box">
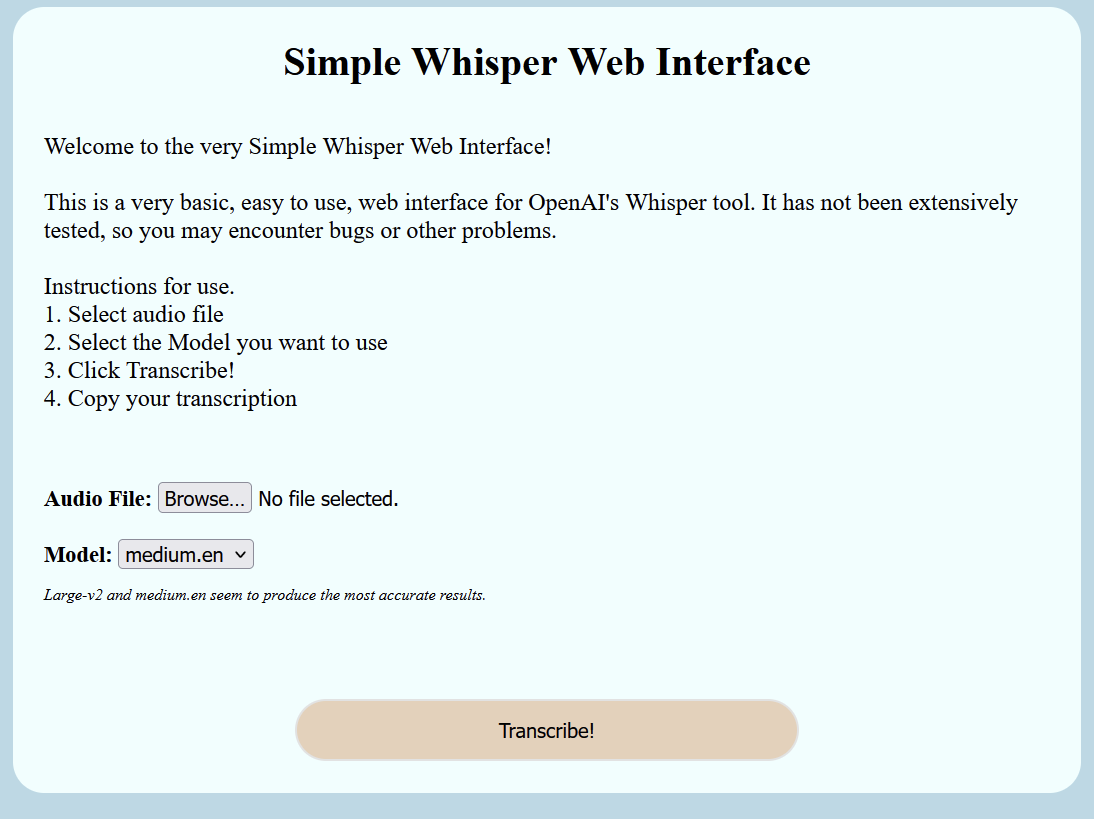
<h1>Simple Whisper Web Interface</h1>
<br />
<p>
Welcome to the very Simple Whisper Web Interface!<br /><br />
This is a very basic, easy to use, web interface for OpenAI's Whisper
tool. It has not been extensively tested, so you may encounter bugs or
other problems.
<br /><br />
Instructions for use. <br />1. Select audio file <br />2. Select the
Model you want to use <br />
3. Click Transcribe! <br />4. Copy your transcription
</p>
<br />
<br />
<div class="headings">
<form action="fileupload" method="post" enctype="multipart/form-data">
Audio File: <input type="file" name="filetoupload" /><br />
<br />
Model:
<select name="modeltouse" id="modeltouse">
<option value="medium.en">medium.en</option>
<option value="tiny">tiny</option>
<option value="tiny.en">tiny.en</option>
<option value="base">base</option>
<option value="base.en">base.en</option>
<option value="small">small</option>
<option value="small.en">small.en</option>
<option value="medium">medium</option>
<option value="medium.en">medium.en</option>
<option value="large-v1">large-v1</option>
<option value="large-v2">large-v2</option>
</select>
<p class="note">
Large-v2 and medium.en seem to produce the most accurate results.
</p>
<br />
<br />
<br />
<input class="button" type="submit" value="Transcribe!" />
</form>
</div>
</div>
</body>
</html>
Now we should be set to go.
Fire the web server up with
node ./main.js
If we want to start it in the background, run
node ./main.js &
Known Limitations or Bugs
If you hit Transcribe with no file selected, the server crashes.
We are calling whisper-ctranslate2 directly, if it is not in the path, then it won’t work.
We are currently using the medium.en model, if the model is not downloaded, then the first transcription may take awhile while it downloads. Would like to add a menu for selecting which model to use. We fixed this by adding a drop down that let’s you select a model.
Would be nice to have an option for getting rid of the timestamps.
We can use prompts to improve our Whisper transcriptions.
We can add “–initial_prompt” to our command like the following.
--initial_prompt "Computer Historical etc"
We can also look into suppressing Tokens to eliminate words that we won’t use. Believe we need to find the tokens for words, and then we can use the token ID to ignore those words. More links below.
We will setup a simple systemd service to automatically run a bash script on system boot.
Create systemd file
Create the service file with
vi /etc/systemd/system/multi-user.target.wants/bashscript.service
Now fill out the file. Change the Description and ExecStart. After= means only start this unit after the other units have finished. This is needed if we need to make a network connection. If our script runs before the network is up, the connection will fail.
[Unit]
Description=systemd Unit File to Launch Bash Script on System Boot
After=network.target
After=syslog.target

[Install]
WantedBy=multi-user.target

[Service]
ExecStart=/home/user/script.sh
Change the ExecStart to your bash script and save the file
Enable systemd file
Now that the file is created, we need to enable the service so it starts on system boot
systemctl enable bashscript.service
You should get the following output.
Created symlink /etc/systemd/system/multi-user.target.wants/bash.service → /etc/systemd/system/bash.service.
Now to test, reboot your system, or start the service with
What do you do when your email server has been blacklisted and you are unable to send emails to certain domains? It’s best to be proactive and not get on the blacklists in the first place, but in the unfortunate event you do get blacklisted, here are some notes.
Checking Blacklists
First thing is we need to see which lists we are on. There are a couple of services that check multiple blacklists
Send an email to “abuse_rbl@abuse-att.net” with your Mail Server IP address, the domain and ask to be delisted. You should get an auto-reply and then they usually will do something about it in 24-48 hours
These are all fairly straight forward to check out. Some of them you will need to enter in an email, or maybe set up an account, others are as simple as requesting the IP to be delisted.
For some reason initially the quality was worse then vanilla Whisper. Adding the “–compute_type float32” option improved the quality to where there was not any difference between them.
It appears that NVIDIA has limited the number of NVEncoding streams on consumer GPUs. Guess it is so people have to buy the more expensive professional cards.
Fortunately, the limit is only applied to the driver, and there is a patch available that let’s us bypass the limiter.
In this post, we will be using Node.JS and the nodemailer library to send email. We need to have an email account with an email provider to send email. Gmail or some other email provider should work.
Prerequisites
First lets install some tools
sudo apt install nodejs npm
Now lets install nodemailer
npm install nodemailer
Writing the Code to Send Email
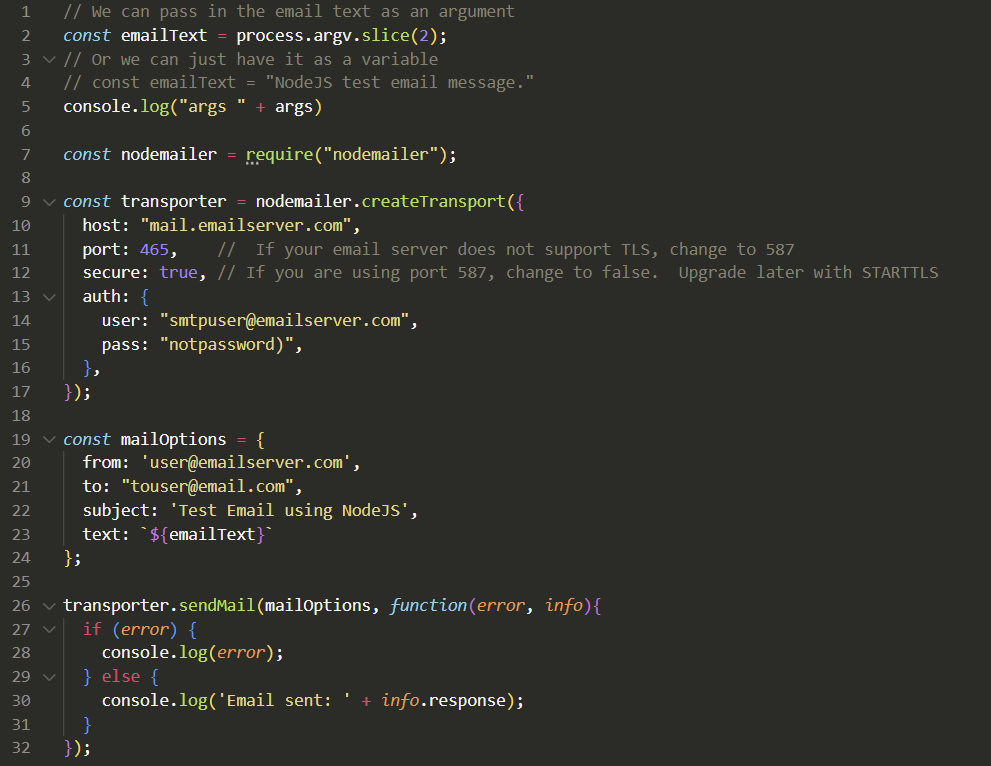
Now that we have nodemailer installed, we can write or copy our code. Create a file called maill.js and make it look similar to the following.
// We can pass in the email text as an argument
const emailText = process.argv.slice(2);
// Or we can just have it as a variable
// const emailText = "NodeJS test email message."
console.log("args " + args)

const nodemailer = require("nodemailer");

const transporter = nodemailer.createTransport({
  host: "mail.emailserver.com",
  port: 465,    //  If your email server does not support TLS, change to 587
  secure: true, // If you are using port 587, change to false.  Upgrade later with STARTTLS
  auth: {
    user: "smtpuser@emailserver.com",
    pass: "notpassword)",
  },
});

const mailOptions = {
  from: 'user@emailserver.com',
  to: "touser@email.com",
  subject: 'Test Email using NodeJS',
  text: `${emailText}`
};

transporter.sendMail(mailOptions, function(error, info){
  if (error) {
    console.log(error);
  } else {
    console.log('Email sent: ' + info.response);
  }
});
Update the following variables
host: to your host email server
user: to the email user that is sending email. It should have an account on the email server
pass: password for your email user that is sending the email
from: email address that is sending the email
to: email account(s) you are sending email to
subject: subject of your email
Now we can proceed to send email
Sending Email
We can now run the code by saving our file and running it directly with NodeJS
nodejs ./mail.js "This is the body text for the email"
Hit Return and look for the email. If something went wrong, it should throw an error.
You can change the emailText variable if you would rather have the message body inside the code.
Code Explanation and Notes
A little explanation on the code.
The second line “const emailText = process.argv.slice(2);” is used to pass in a command line argument to use as the text for the body of the email. You can delete the line and uncomment line 4 if you would rather use a variable inside the code.
Your email server should support using SSL/TLS on port 465. If it does not, you may need to use STARTTLS which uses port 587, and then set secure to false. STARTTLS should upgrade the connection to be encrypted. But it’s opportunistic. You can read more about STARTTLS, SSL/TLS here https://mailtrap.io/blog/starttls-ssl-tls/
You can change the “to: ” in the mailOptions object to an array of email addresses to send the email to multiple people at once.
to: ["email1@email.com", "email2@email.com", "etc"],
In the following code we will be checking a string and check if any of the words in the string match some or any elements in an array.
We can imagine that our “stringToCheck” variable is an email or message response. We want to know if it contains a mention to afternoon, tomorrow, or evening. Presumably so we can automate something. Note that the matches are case sensitive.
// Check if any text in a string matches an element in an array

const stringToCheck = "Let's grab lunch tomorrow";
const arrayToCompareTo =["afternoon", "tomorrow", "evening"];

// We are checking to see if our string "stringToCheck"
// Has any of the words in "arrayToCompareTo".
// If it does, then the result is true.  Otherwise false.
const resultsOfCompare = arrayToCompareTo.some(checkVariable => stringToCheck.includes(checkVariable));

if (resultsOfCompare == true){
    console.log(stringToCheck + " Contains a value in our Array " + arrayToCompareTo);
} else {
    console.log(stringToCheck + " Does NOT contain a value in our Array " + arrayToCompareTo);
}
More examples and ways to do it are available at the following link.
This is a quick guide for getting Dolly running on an Ubuntu machine with Nvidia GPUs.
You’ll need a good internet connection and around 35GB of hard drive space for the Nvidia driver, Dolly (12b model) and extras. You can use the smaller models to take up less space. The 8 billion parameter model uses about ~14GB of space while the 3 billion parameter one is around 6GB
Run a python console. If you run it as administrator, it should be faster.
python3
Run the following commands to set up Dolly.
import torch
from transformers import pipeline

generate_text = pipeline(model="databricks/dolly-v2-12b", torch_dtype=torch.bfloat16, trust_remote_code=True, device_map="auto")

# Alternatively, If you want to use a smaller model run

generate_text = pipeline(model="databricks/dolly-v2-3b", torch_dtype=torch.bfloat16, trust_remote_code=True, device_map="auto")
Notes:
If you have issues, you may want/need to specify an offload folder with offload_folder=”.\offloadfolder”. An SSD is preferable.
If you have lots of RAM, you can take out the “torch_dtype=torch.bfloat16”
If you do NOT have lots of ram (>32GB), then you may only be able to run the smallest model
Alternatively, if we don’t want to trust_remote_code, we can download this file, and run the following
from instruct_pipeline import InstructionTextGenerationPipeline
from transformers import AutoModelForCausalLM, AutoTokenizer

tokenizer = AutoTokenizer.from_pretrained("databricks/dolly-v2-12b", padding_side="left")
model = AutoModelForCausalLM.from_pretrained("databricks/dolly-v2-12b", device_map="auto")

generate_text = InstructionTextGenerationPipeline(model=model, tokenizer=tokenizer)
Now we can ask Dolly a question.
generate_text("Your question?")
Example:
>>> generate_text("Tell me about Databricks dolly-v2-3b?")
'Dolly is the fully managed open-source engine that allows you to rapidly build, test, and deploy machine learning models, all on your own infrastructure.'
Further information is available at the following two links.