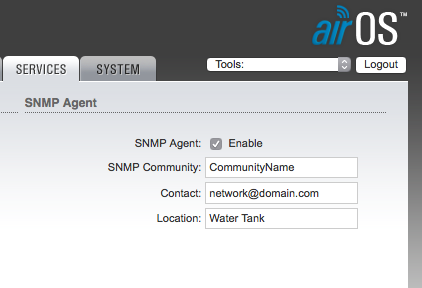
First lets install SNMP.
On Red Hat type systems such as Fedora and CentOS do the following
yum install -y net-snmp net-snmp-utils
If you are using a Debian based distro the you can use apt.
apt-get install snmp
You will need to make sure that SNMP is turned on in the radio under the Services tab.

Be sure to remember the SNMP Community string as that is needed in the next step.
Now try to connect to the device with the following command.
snmpwalk -v1 -c comunityname 192.168.1.20
You should receive something like the following.
...
IF-MIB::ifSpecific.5 = OID: SNMPv2-SMI::zeroDotZero
SNMPv2-MIB::snmpInPkts.0 = Counter32: 484
SNMPv2-MIB::snmpOutPkts.0 = Counter32: 471
SNMPv2-MIB::snmpInBadVersions.0 = Counter32: 0
SNMPv2-MIB::snmpInBadCommunityNames.0 = Counter32: 12
SNMPv2-MIB::snmpInBadCommunityUses.0 = Counter32: 0
...
If you received
Timeout: No Response from 192.168.1.20
Then either the SNMP Community name is wrong or the ip address is unreachable.
The following command will list all the interfaces on the device.
snmpwalk -v1 -c comunityname 192.168.1.20 ifDescr
IF-MIB::ifDescr.1 = STRING: lo
IF-MIB::ifDescr.2 = STRING: eth0
IF-MIB::ifDescr.3 = STRING: eth1
IF-MIB::ifDescr.4 = STRING: wifi0
IF-MIB::ifDescr.5 = STRING: ath0
IF-MIB::ifDescr.6 = STRING: br0
Notice the number at the end of the ifDescr, That number identifies the interface. You will need that for the next command.
Now lets check the signal. Note that the last number of the OID(the OID is the last string of numbers) is the interface number of ath0. Yours could be different depending on how you have the radio setup.
snmpwalk -v1 -c communityname 192.168.1.20 1.3.6.1.4.1.14988.1.1.1.1.1.4.5
Here is a short list of OID’s. To use them just run the above command but replace the OID with the one you want.
RxRate of 5'th interface (ath0) of the device (bps): 1.3.6.1.4.1.14988.1.1.1.1.1.3.5
TxRate of 5'th interface (ath0) of the device (bps): 1.3.6.1.4.1.14988.1.1.1.1.1.2.5
Channel: 1.3.6.1.4.1.14988.1.1.1.1.1.7.5
Firmware Version: 1.2.840.10036.3.1.2.1.4
Hostname: 1.3.6.1.4.1.14988.1.1.1.1.1.5
AP MAC: 1.3.6.1.4.1.14988.1.1.1.1.1.6
Station MAC: 1.2.840.10036.1.1.1.1
Signal 1.3.6.1.4.1.41112.1.4.5.1.5.1 (OID seems to vary a little bit, from nanoBeam to nanoStation)

