If you have installed the hardened Linux Kernel on Fedora, you may have encountered the following error when trying to launch Flatpak applications.
bwrap: No permissions to creating new namespace, likely because the kernel does not allow non-privileged user namespaces. On e.g. debian this can be enabled with 'sysctl kernel.unprivileged_userns_clone=1'.
error: Failed to sync with dbus proxy
The issue looks to arise from the fact that the hardened Linux Kernel disables unprivileged name space and Fedora does not have setuid on by default on the bubblewrap executable.
Enabling setuid on bubblewrap
You can set the setuid permission on the bubblewrap executable with
sudo chmod u+s /usr/bin/bwrap
Allow Unprivileged Name Space (Alternative work around)
You could also allow unprivileged name space by running
sysctl kernel.unprivileged_userns_clone=1
Note that setting the setuid seems the safer/recommended option.
It looks like using the setuid binary for bubblewrap would be better to use then enabling unprivileged user space.
Acropalypse is a vulnerability in Google’s markup editor (and Windows Snipping Tool). It allows an attacker to recover parts of a cropped or marked up image.
There are a couple specific steps you have to follow for the bug to happen.
Take a screenshot
Save screenshot
Crop or markup screenshot in Google Markup or the Windows Snipping Tool
Save screenshot with the same name as original screenshot
The bug is when you save the cropped screenshot with the same name, it overwrites the original file, but the markup tools are not resizing or truncating the file. Meaning that there is extra data in the screenshot.
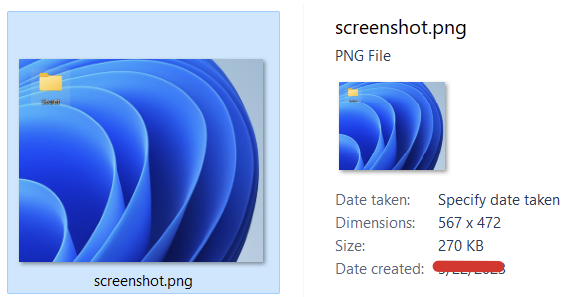
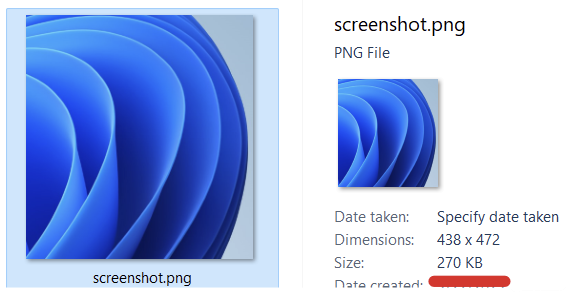
For example in the following two screenshots, notice the size and dimensions
Here is the first screenshot
The second screenshot shows smaller dimensions because it was cropped, but the size is still the same.
Am I affected?
Potentially. Most images are reprocessed if they are being uploaded to a web service. Discord only started doing that in January. So if you have images on Discord before then, you may want to look into that.
You also have to specifically overwrite the original screenshot image. If you don’t normally save the image first you may be fine. Never hurts to check though.
macOS and so presumably iOS, appear to properly resize the image after cropping has taken place. That would lead me to suspect that iOS and macOS devices are not vulnerable to a variant of apocalypse.
Twitter Post about acropalypse.
Introducing acropalypse: a serious privacy vulnerability in the Google Pixel's inbuilt screenshot editing tool, Markup, enabling partial recovery of the original, unedited image data of a cropped and/or redacted screenshot. Huge thanks to @David3141593 for his help throughout! pic.twitter.com/BXNQomnHbr
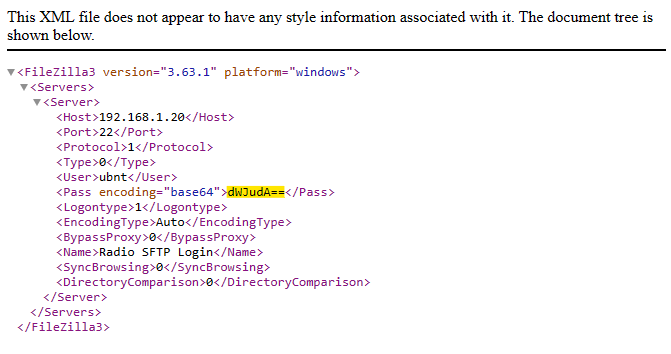
Open up FileZilla, for to the Site Manager, right click on the entry you want, and export it. This will export all the settings for the site(s).
Once exported, open the XML file. Look for the Pass encoding field. Copy the base64 encoded password. Its the text highlighted in yellow. Yours should be longer.
FileZilla Base64 Encoded Password
Decode base64 encoded password. We can do this using the built in linux base64 utility. You can use also use python.
Here are the commands you’ll need to harden SSH on your Mikrotik Routers. It looks like it still can use SSH-RSA, but it does get rid of most of the weaker crytpo algorithms.
Note that “mymodule.pp” will replace any previous “mymodule.pp”. If your needing to create multiple modules/allow multiple exceptions, you can change the name of each module.
You can also add the rules together then manually compile it. Refer to the first link for more details.
Authentication, Authorization, and Accounting or AAA is an framework that allows access to a computer network/resource,
Authentication
Authentication identifies the user. It’s from the Greek authentikos “real, genuine”. We can think of it as proving the identity of the user. Bob sits down at the computer and types in his password (Something he knows) and confirms that he is in fact Bob.
Authorization
Authorization is the privileges that the user has to the system. For instance, Bob is now authenticated to the computer, but he may only be authorized to access email and a web browser.
Authorization and Authentication can get confusing. In simple terms
Authentication – Who are you?
Authorization – What you have access to.
Accounting
Accounting is the auditing or logging arm of AAA. It is for answering the 5 Ws Who did what, when, where, and how. For instance, accounting could log that Bob checked his email at 9:30AM, Improved his mind by reading posts on incredigeek.com for a couple hours, then checked email again before shutting the computer down.
Hopefully that is a short helpful explanation of AAA. For more information, check out the following links.
The Network Miner tool is a handy little utility that works great on Windows. It sorta works on Linux. Doesn’t appear to be able to read the traffic coming off the interface, but you can drag and drop a pcap file on it. You can export a pcap file from wireshark, but it needs to be a pcap, not the newer default pcap Wireshark defaults to. Can change it in the “Save as:”
WARNING: META-INF/xxx.version not protected by signature...
Sounds like this can be expected and is a common thing. The certificate is stored in META-INF which means that other files stored in META-INF are not protected. Most of the files in that directory are only version numbers of libraries the app depends on. There shouldn’t be anything important so shouldn’t be a security concern.
Getting around applications that strip directory traversal sequences
Using a null byte
Directory Traversal
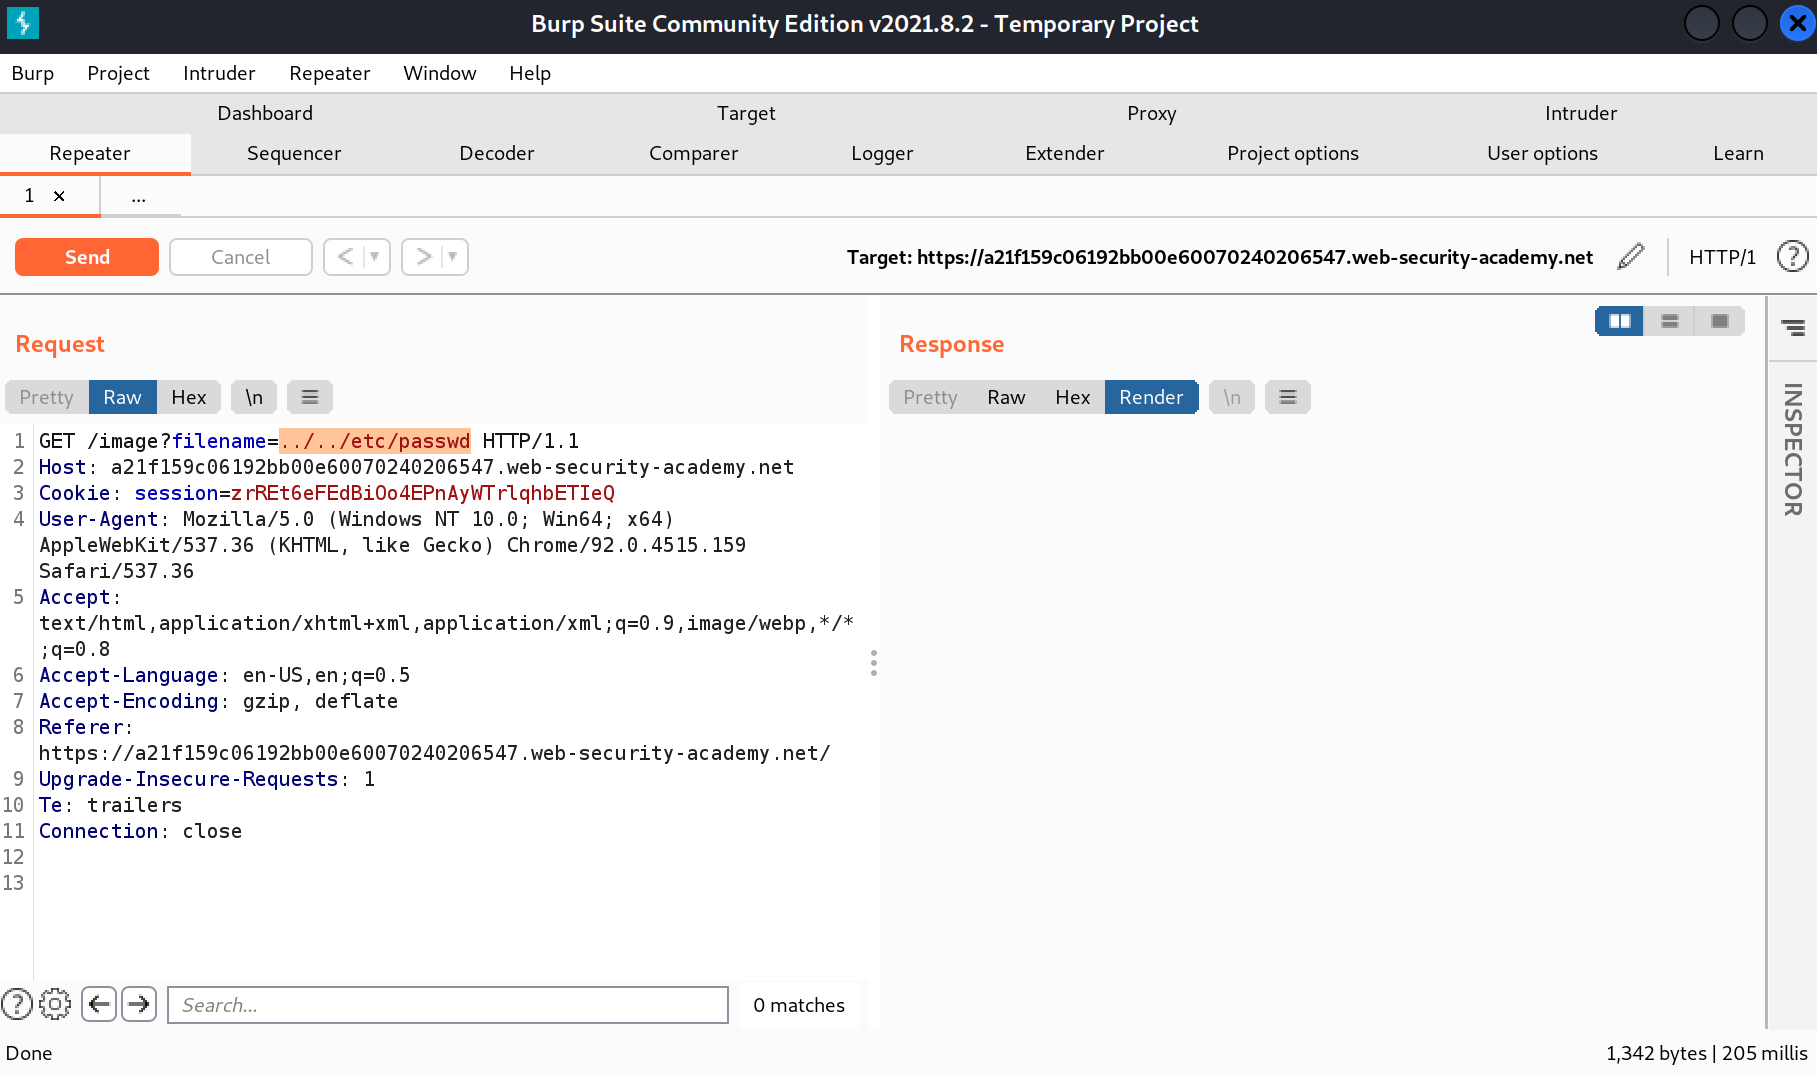
What exactly is directory traversal anyway? Well, it is pretty much exactly what it sounds like. We traverse directories by manipulate the file path, for something like an image, to get something more valuable like the passwd file.
In it’s most basic form, we can add ../../../../../etc/passwd to a file path and instead of pulling an image, we get the passwd file.
For instance, if we load an image on a website, it’s file path on the server may be something like /var/www/html/image.png. If we right click on an image and open in a new tab and inspect the URL, we can see this path. “Note: Web servers have a root directory for all the website files. Generally web files’ root starts there not / root of the machine.”
Now if we remove image.png and replace it with ../ (../ on Linux/macOS or ..\ on Windows) we’ll go backwards one directory. String them together and we can go back to the root of the drive. Then we can add /etc/passwd (Or replace with whatever file we want) and load the contents of that file.
Most web applications should have some sort of protections in place to guard against directory traversal. Let’s go over a few ways to get around it.
URL Encoding
URL encoding sometimes can work and is simple to do. In Burp, select the file path, right click, Convert selection -> URL -> URL-encode all characters.
You can also try double encoding. Encode once, select the encoded text and encode again.
In the above screenshots, ../../etc/passwd becomes “%25%32%65%25%32%65%25%32%66%25%32%65%25%32%65%25%32%66%25%36%35%25%37%34%25%36%33%25%32%66%25%37%30%25%36%31%25%37%33%25%37%33%25%37%37%25%36%34”
Getting around applications that strip directory traversal sequences
Sometimes the web app can strip out text that it knows is directory traversal characters/sequences. For instance, it sees ../ in the requested url and just strips it out.
We can do something like the following sequence to get around it.
....//....//etc/passwd
That is 4 periods, followed by 2 slashes. What happens is the web app reads the URL, goes hey ../ is not allowed, bye bye! Removes the two instances of ../ and forwards the URL on. Which ends up being
../../etc/passwd
Which is just perfect for our use case.
Using a Null Byte
If the application is using the file extension to validate that an image or other file is loaded, instead of say passwd, we can try using a null byte. A null byte is used to terminate a string.
../../etc/passwd%00.png
What can end up happening is the web application sees the .png or .jpg at the end and goes “oh that is a valid extension, carry on” and then the system reads the line and sees the null byte and says “Oh null byte! end of file path, here is your file.”