Go to “Kibana/app/fleet/agents”
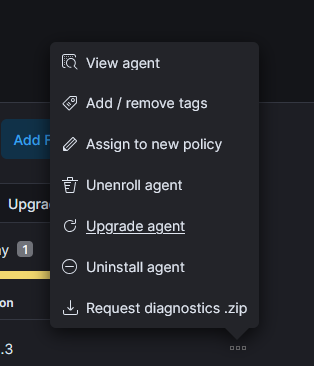
Click the 3 dots on the host and select uninstall agent.
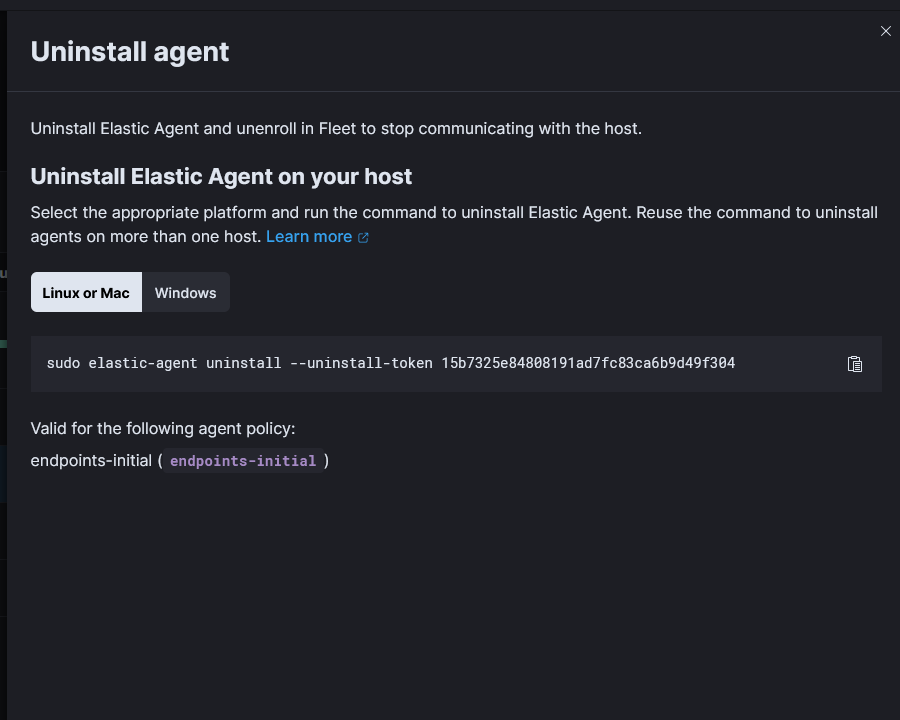
Select the command to uninstall and run it on the host.
Finally hit the three dots and unenroll agent.

Go to “Kibana/app/fleet/agents”
Click the 3 dots on the host and select uninstall agent.
Select the command to uninstall and run it on the host.
Finally hit the three dots and unenroll agent.
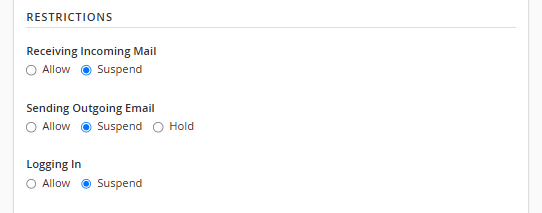
When you suspend an account in cPanel, the users password, in “/home/ACCOUNT/etc/DOMAIN.com/shadow”, gets two exclamation marks prepended to the password hash. This means that the hash of a password from a user trying to login will not match what is in the shadow file effectively blocking the login.
However, there is an option that allows an admin to sign into all email accounts for a domain. The option is in WHM and called “Mail authentication via domain owner password”. It is under “Tweak Settings -> Mail”.

If this option is enabled, then the admin, or an attacker that has compromised the admin password, can continue to login and send mail as a user.
A lot of email spam attacks appear to be automated. So if the admin password was weak and some hacker is using it to send spam, there is a good chance they don’t know it is the admin password. They just want to send out emails. Update the admin password, check and make sure the system is secure and monitor.
Here is a quick overview of the differences between, RTO, RPO, MTBF, and MTFF.
| Name | Meaning |
| RTO (Recovery Time Objective) | Time it takes to recover from a disruption, system failure, data loss etc. |
| RPO (Recovery Point Objective) | How much data can you afford to loose? If RPO is 24 hours, then backups need to be performed daily. |
| MTBF (Mean Time Between Failures) | Time between failures. Use for repairable systems |
| MTTF (Mean Time to Failure) | Time before system fails. Use for nor repairable systems. |
http://techtarget.com/whatis/definition/recovery-point-objective-RPO
We can use srm to securely delete files on Linux.
Install srm with
sudo apt install secure-delete
We can now securely delete files by running
srm filetodelete.txt
# srm --help
srm v3.1 (c) 1997-2003 by van Hauser / THC <vh@thc.org>

Syntax: srm [-dflrvz] file1 file2 etc.

Options:
        -d  ignore the two dot special files "." and "..".
        -f  fast (and insecure mode): no /dev/urandom, no synchronize mode.
        -l  lessens the security (use twice for total insecure mode).
        -r  recursive mode, deletes all subdirectories.
        -v  is verbose mode.
        -z  last wipe writes zeros instead of random data.

srm does a secure overwrite/rename/delete of the target file(s).
Default is secure mode (38 writes).
You can find updates at http://www.thc.org
Other links for securely erasing drives.
https://www.tomshardware.com/how-to/secure-erase-ssd-or-hard-drive
SAML stands for Security Assertion Markup Language. It allows for Single Sign On or SSO to a service.
There are three entities or roles involved when using SAML to sign into a service.
As an example, let’s say you want to log into a new website utilizing your email SSO credentials. You click the SSO login button, you are redirected to the IdP to login. Once authenticated, your device will receive a token which is then passed back to the Service Provider and allows you access to the new website.
This is a very simplified version of what happens when you login using SAML. It may be helpful to know that the Service Provider and the Identify Provider will have needed to be configured to work together before the user attempts to log in.
On Ubuntu, by default, the hosts in .ssh/known_hosts are hashed. This can theoretically help with security. If an attacker compromises a host, they will not be able to tell the IP addresses of other hosts in the known_hosts file.
https://security.stackexchange.com/questions/56268/ssh-benefits-of-using-hashed-known-hosts
Here is an example of a hashed entry in the known_hosts file.
|1|ma8KL2XrNYkNnknf68N4IuZ+c+I=|PmR+n2i0/epUGZZh2S+LB6OaowQ= ssh-ed25519 AAAAC3NzaC1lZDI1NTE5AAAAIEjqG8/el8c669FxcvEw5mMfDRTDxsjgLiz44dCTtchsThere are three main parts.
The first part ma8KL2XrNYkNnknf68N4IuZ+c+I= is the salt to use.
PmR+n2i0/epUGZZh2S+LB6OaowQ= This is our hashed IP address/hostname
ssh-ed25519 is the key type
AAAAC3NzaC1lZDI1NTE5AAAAIEjqG8/el8c669FxcvEw5mMfDRTDxsjgLiz44dCTtchs Is the public SSH key of the remote host.
We can use ssh-keyscan to check the keys of hosts. The -t ssh-ed25519 option only shows ed25519 keys. Remove or change to show all key types e.g. RSA/DSA
For example:
┌──(kali㉿localhost)-[~]
└─$ ssh-keyscan -t ssh-ed25519 localhost
# localhost:22 SSH-2.0-OpenSSH_9.6p1 Debian-3
localhost ssh-ed25519 AAAAC3NzaC1lZDI1NTE5AAAAIEjqG8/el8c669FxcvEw5mMfDRTDxsjgLiz44dCTtchs
We can compare the SSH public key with the one in our known_hosts file to verify we have the correct host.
As a side note, we can also use the -H option to show us a hashed version. The salt changes each time it is run, so it is not useful for comparing the hashed IP address.
Example:
┌──(kali㉿localhost)-[~]
└─$ ssh-keyscan -H -t ssh-ed25519 localhost
# localhost:22 SSH-2.0-OpenSSH_9.6p1 Debian-3
|1|j2j9iv/GkPfnG9Yv4WzJsy/L1pc=|wethKgsGBH0Mi+rFW3zSNSWiGso= ssh-ed25519 AAAAC3NzaC1lZDI1NTE5AAAAIEjqG8/el8c669FxcvEw5mMfDRTDxsjgLiz44dCTtchsThere are a few different techniques that can be used to identify known hosts IP addresses even if they are hashed.
history | egrep '([0-9]{1,3}\.){3}[0-9]{1,3}'Example output
┌──(kali㉿localhost)-[~]
└─$ history | egrep '([0-9]{1,3}\.){3}[0-9]{1,3}' | head -n2
1 ssh kali@127.0.0.1Since the SSH public key is um, well, public, we can search for it on Shodan to see if it’s a known public server. https://www.shodan.io
Copy the public ssh key from the known_hosts file. It is the last portion of the line i.e.AAAAC3NzaC1lZDI1NTE5AAAAIEjqG8/el8c669FxcvEw5mMfDRTDxsjgLiz44dCTtchs
|1|ma8KL2XrNYkNnknf68N4IuZ+c+I=|PmR+n2i0/epUGZZh2S+LB6OaowQ= ssh-ed25519 AAAAC3NzaC1lZDI1NTE5AAAAIEjqG8/el8c669FxcvEw5mMfDRTDxsjgLiz44dCTtchsSince the address space for IPv4 is fairly small, and the private IP address space even smaller, brute forcing all the addresses is perfectly feasible.
Here is a quick example on how you would hash an IP address. Commands are taken from the above Stack Exchange link.
Take the salt and put it into a variable
key=`echo j2j9iv/GkPfnG9Yv4WzJsy/L1pc= | base64 -d | xxd -p`Next we can run the following command to hash the result. The IP (127.0.0.1) is where we would want to enumerate the IP address.
echo -n "127.0.0.1" | openssl sha1 -mac HMAC -macopt hexkey:$key|awk '{print $2}' | xxd -r -p | base64The output is PmR+n2i0/epUGZZh2S+LB6OaowQ= which is the correct hash.
Automating should be fairly simple.
A note on SSH ports. If the host is using a non standard ssh port, you will need to update the above command with the port, but the address needs to be wrapped in square brackets []
echo -n "[127.0.0.1]:2222" | openssl sha1 -mac HMAC -macopt hexkey:$key|awk '{print $2}' | xxd -r -p | base64A final way we can discover known-hosts, is by using ssh-keyscan. The man page says the following
ssh-keyscan is a utility for gathering the public SSH host keys of a number of hosts. It was designed to aid in building and verifying ssh_known_hosts files

ssh-keyscan  uses  non-blocking  socket  I/O to contact as many hosts as possible in parallel, so it is very efficient.  The keys from a domain of 1,000 hosts can be collected in tens of seconds, even when some of those hosts are down or do not run sshd(8).  For scanning, one does not need login access to the machines that are being scanned, nor does  the scanning process involve any encryption.

Hosts  to  be scanned may be specified by hostname, address or by CIDR network range (e.g. 192.168.16/28).  If a network range is specified, then all addresses in that range will be scanned.
This makes it super convenient to do a network scan using ssh-keyscan and then compare the public ssh keys with those in the known_hosts file.
Example:
ssh-keyscan 192.168.0.0/16To scan all private IP ranges (RFC1912), we just run the scan with all three IP ranges
ssh-keyscan 192.168.0.0/16
ssh-keyscan 172.12.0.0/12
ssh-keyscan 10.0.0.0/8Info on the xc backdoor
https://www.openwall.com/lists/oss-security/2024/03/29/4
https://tukaani.org/xz-backdoor/
Kostas on Twitter posted a helpful one-liner to check the xz version without running the actual command.
https://twitter.com/kostastsale/status/1773890846250926445
Regarding the xz backdoored binary, see the one-liner below to check the version you have installed.
— Kostas (@Kostastsale) March 30, 2024
**I wouldn’t suggest folks running the malicious binary with -v option
for xz_p in $(type -a xz | awk '{print $NF}' | uniq); do strings "$xz_p" | grep "xz (XZ Utils)" ||… https://t.co/0X10jqLKPR
Versions 5.6.0 and 5.6.1 are backdoored.
The following Bash commands were taken and modified from the above Twitter link
Here is a one liner that will check the version of xz binaries and return if they are safe or vulnerable. You’ll need to run this in a Bash shell. May have issues in sh.
for xz_p in $(type -a xz | awk '{print $NF}' ); do if ( strings "$xz_p" | grep "xz (XZ Utils)" | grep '5.6.0\|5.6.1' ); then echo $xz_p Vulnerable; else echo $xz_p Safe ; fi ; done Here are two different Ansible Playbooks to check if the xz package(s) are backdoored.
This one uses the above Bash commands to check the xz binaries.
Ansible Playbook to Check xz Backdoor---
- name: Check if XZ tools are compromised
# https://twitter.com/kostastsale/status/1773890846250926445
  hosts: all

  tasks:
    - name: Run Bash command
      shell :
        for xz_p in $(type -a xz | awk '{print $NF}' ); do
          if ( strings "$xz_p" | grep "xz (XZ Utils)" | grep '5.6.0\|5.6.1' );
            then echo $xz_p Vulnerable!;
          else
            echo $xz_p Safe ;
          fi ;
        done
      args:
        executable: /bin/bash
      register: result

    - name: Show output
      ansible.builtin.debug:
        msg: "{{ result.stdout_lines }}"
The following playbook uses the package manager to check the xz version. On RHEL/Fedora this is the xc package. On Debian/Ubuntu, it is part of the liblzma5 package.
Ansible Playbook to Check xz Backdoor using package manager---
- name: Check if XZ tools are compromised
  hosts: all

  tasks:
    - name: Collect package info
      ansible.builtin.package_facts:
        manager: auto

    - name: Check if liblzma5 is vulnerable (Ubuntu/Debian)
      ansible.builtin.debug:
        msg: "Installed version of liblzma5/xz: {{ ansible_facts.packages['liblzma5'] | map(attribute='version') | join(', ') }} Vulnerable!"
      when: ('liblzma5' in ansible_facts.packages) and (ansible_facts.packages['liblzma5'][0].version.split('-')[0] is version('5.6.0', '==') or ansible_facts.packages['liblzma5'][0].version.split('-')[0] is version('5.6.1', '=='))

    - name: Check if xz is vulnerable (RHEL/Fedora/Rocky/Alma)
      ansible.builtin.debug:
        msg: "Installed version of xz: {{ ansible_facts.packages['xz'] | map(attribute='version') | join(', ') }} is vulnerable"
      when: ('xz' in ansible_facts.packages) and (ansible_facts.packages['xz'][0].version is version('5.6.0', '==') or ansible_facts.packages['xz'][0].version is version('5.6.1', '=='))
These steps are taken from the following link. They have other guides for hardening Ubuntu, Debian etc.
https://www.sshaudit.com/hardening_guides.html#rocky9
You will need to become the root user, use either su – or sudo -i
First we need to regenerate the RSA and ED25519 keys
rm /etc/ssh/ssh_host_*
ssh-keygen -t rsa -b 4096 -f /etc/ssh/ssh_host_rsa_key -N ""
ssh-keygen -t ed25519 -f /etc/ssh/ssh_host_rsa_key -N ""
Next, remove the small Diffie-Hellman moduli. The moduli file contains prime numbers and generators. Removing the smaller numbers should help increase security as it makes attempting to factor the private keys harder.
awk '$5 >= 3071' /etc/ssh/moduli > /etc/ssh/moduli.safe
mv /etc/ssh/moduli.safe /etc/ssh/moduli
We can now specify which key exchange, ciphers, and algorithms to use.
Add the following to “/etc/crypto-policies/back-ends/opensshserver.config”
# Restrict key exchange, cipher, and MAC algorithms, as per sshaudit.com
# hardening guide.
KexAlgorithms sntrup761x25519-sha512@openssh.com,curve25519-sha256,curve25519-sha256@libssh.org,gss-curve25519-sha256-,diffie-hellman-group16-sha512,gss-group16-sha512-,diffie-hellman-group18-sha512,diffie-hellman-group-exchange-sha256

Ciphers chacha20-poly1305@openssh.com,aes256-gcm@openssh.com,aes128-gcm@openssh.com,aes256-ctr,aes192-ctr,aes128-ctr

MACs hmac-sha2-256-etm@openssh.com,hmac-sha2-512-etm@openssh.com,umac-128-etm@openssh.com

HostKeyAlgorithms sk-ssh-ed25519-cert-v01@openssh.com,ssh-ed25519-cert-v01@openssh.com,rsa-sha2-512-cert-v01@openssh.com,rsa-sha2-256-cert-v01@openssh.com,sk-ssh-ed25519@openssh.com,ssh-ed25519,rsa-sha2-512,rsa-sha2-256

RequiredRSASize 3072

CASignatureAlgorithms sk-ssh-ed25519@openssh.com,ssh-ed25519,rsa-sha2-512,rsa-sha2-256

GSSAPIKexAlgorithms gss-curve25519-sha256-,gss-group16-sha512-

HostbasedAcceptedAlgorithms sk-ssh-ed25519-cert-v01@openssh.com,ssh-ed25519-cert-v01@openssh.com,sk-ssh-ed25519@openssh.com,ssh-ed25519,rsa-sha2-512-cert-v01@openssh.com,rsa-sha2-512,rsa-sha2-256-cert-v01@openssh.com,rsa-sha2-256

PubkeyAcceptedAlgorithms sk-ssh-ed25519-cert-v01@openssh.com,ssh-ed25519-cert-v01@openssh.com,rsa-sha2-512-cert-v01@openssh.com,rsa-sha2-256-cert-v01@openssh.com,sk-ssh-ed25519@openssh.com,ssh-ed25519,rsa-sha2-512,rsa-sha2-256
Finally, restart the ssh server
systemctl restart sshd
Other helpful links
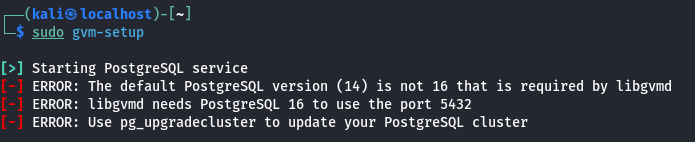
Currently OpenVAS needs PostgreSQL 16 on port 5432. If you have multiple versions of PostgreSQL, the lowest version will typically run on port 5432, and then they’ll increment from there. For example, if you have PostgreSQL 14, 15, and 16, 14 will run on port 5432, 15 on 5433, and 16 on 5434.
The quick fix is to edit the PostgreSQL config files, change the port numbers, restart PostgreSQL, and rerun gvm-setup.
vi /etc/postgresql/16/main/postgresql.conf
Change port number from 5434 to 5432
You will need to remove/disable/change the port for PostgreSQL 14
sudo apt remove postgresql-14
sudo systemctl restart postgresql@16-main.service
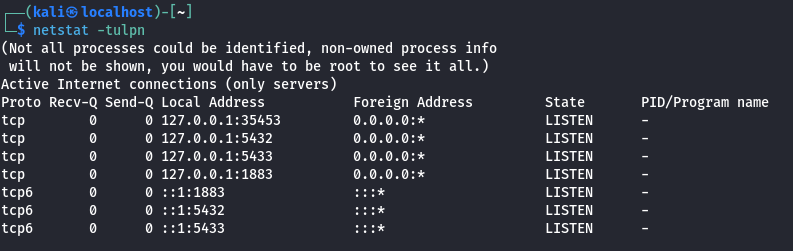
We can verify that PostgreSQL is running with netstat.
netstat -tulpn
We can see that the ports 5432 (PostgreSQL 16) and 5433 (PostgreSQL 15) are both running.
Rerun gvm-setup
sudo gvm-setup
Notes on installing OpenVAS on Kali Linux in 2023/2024
sudo apt install openvas
Run the setup script. This used to be called openvas-setup, now it is gvm-setup. Note that the script can take a long time to run.
gvm-setup
At the end of the script, it will give you a password. Use this password to log into the web interface. You can reset the password if needed.
If you run into issues with PostgreSQL, check out this post
Log into the web interface at
On Kali Linux, you need to run commands as the _gvm user. You can do this by prepending the commands with
sudo runuser -u _gvm -- COMMAND
There are two — dashes, between the _gvm user and the COMMAND. Replace COMMAND with the GVM/OpenVAS command you want to execute.
Example, to list the current users do
sudo runuser -u _gvm -- gvmd --get-users
To create a new user run
sudo runuser -u _gvm -- gvmd --user=newadmin --new-password=longsecurepassword
Failed to find config ‘daba56c8-73ec-11df-a475-002264764cea’
If you receive a `Failed to find config ‘daba56c8-73ec-11df-a475-002264764cea'”` error,
try running the following command
sudo runuser -u _gvm -- greenbone-nvt-sync
This can take awhile, but it should sync all the files needed. Check the following link for more information.
https://forum.greenbone.net/t/cant-create-a-scan-config-failed-to-find-config/5509
The following link is also helpful for installing OpenVAS
https://stafwag.github.io/blog/blog/2021/02/28/howto-install-opevas-on-kali/

