How to determine if Ubuntu Needs a Reboot after an update

Typically after a Linux Kernel update, you will want to reboot your machine to take advantage of the new kernel. But how do you know if you need to reboot?

Fortunately, there is a simple way to check.

cat /var/run/reboot-required

If it returns

*** System restart required ***

Then we should reboot the machine.

https://www.cyberciti.biz/faq/how-to-find-out-if-my-ubuntudebian-linux-server-needs-a-reboot/

Give Ubuntu User Access to Run Docker?

By default on Debian based systems, Docker needs the sudo command to run. We can add a normal user to the Docker group so we don’t have to.

sudo usermod -aG docker username

Change out the username to your Ubuntu username.

The -a option means append the group to the username. It does not remove the user from current groups.
the -G option means add the specified group.

Fresh Install of Ubuntu Server Doesn’t use all Disk Space

For some reason Ubuntu server didn’t use all the available disk space while installing. Thankfully this is an easy fix.

sudo lvextend –resizefs -l +100%FREE ubuntu-vg/ubuntu-lv

If the Volume Group or LVM Volume is different, you will need to change the name in the above command. You can use the “sudo pvdisplay” and “sudo lvdisplay” to show you details about your volumes.

https://unix.stackexchange.com/questions/664486/lvm-root-partition-only-uses-half-the-volume-size

Installing a specific package version on Ubuntu

On Ubuntu and potentially other Debian based distributions, you can check the available versions of a package with the apt show command

apt show -a

Example showing firefox versions

~$ apt show -a firefox
Package: firefox
Version: 87.0+build3-0ubuntu0.20.04.2
Priority: optional
Section: web
Origin: Ubuntu
Maintainer: Ubuntu Mozilla Team <ubuntu-mozillateam@lists.ubuntu.com>
..................
 More information
..................

Package: firefox
Version: 75.0+build3-0ubuntu1
Priority: optional
Section: web
Origin: Ubuntu
Maintainer: Ubuntu Mozilla Team <ubuntu-mozillateam@lists.ubuntu.com>
Bugs: https://bugs.launchpad.net/ubuntu/+filebug
..................

To install a specific version, use the version number

sudo apt install firefox=75.0+build3-0ubuntu1

Configure rsnapshot on Ubuntu Server

rsnapshot is a utility that uses rsync to backup files locally or it can backup files from a remote server.

While trying to figure out a good solution for backing up an Ubuntu Server I decided to try rsnapshot, however since it can either create a local backup or pull a remote backup it needs to be configured to do that on the backup server side. It does not “push” a backup to a backup server.

Some helpful snippits from the man file.

rsnapshot will typically be invoked as root by a cron job, or series of cron jobs. It is possible, however, to run as any    arbitrary user with an alternate configuration file.
...
USAGE
        rsnapshot can be used by any user, but for system-wide backups you will probably want to run it as root.
...
NOTES
        Make sure your /etc/rsnapshot.conf file has all elements separated by tabs.  See
        /usr/share/doc/rsnapshot/examples/rsnapshot.conf.default.gz for a working example file.
    Make sure you put a trailing slash on the end of all directory references.  If you don't, you may have extra directories    created in your snapshots.  For more information on how the trailing slash is handled, see the rsync(1) manpage.

Overview

Scenario

Host A runs xyz application and host B is the backup server. We create a backup user on host A, host B then uses that user to ssh and rsync backups to itself.

  1. Create backup user
  2. Configure rysnc to be used without a password
  3. Setup SSH Key, aka Passwordless authentication (On backup server)
  4. Setup rsnapshot config (On backup server)
  5. Configure rsnapshot in crontab (On backup server)
  6. Final Testing

Create backup user

The following commands are fairly straight forward. Change backupuser to whatever you want to call your backup user.

sudo useradd -m backupuser
passwd backupuser
sudo usermod -a -G sudo backupuser

Configure rysnc to be used without a password

We need to setup the backup user to be able to use “sudo rsync” without having to input the user password. If we don’t use sudo we can’t access system files for backups. And if we have to manually input the password every time rsync runs, then the backups would not be automatic. The following link was helpful.

https://unix.stackexchange.com/questions/325100/proper-way-to-set-up-rsnapshot-over-ssh

All we need to do is create a file in /etc/sudoers.d/username and then tell it we don’t need to enter a password when “sudo rsync” is run.

sudo tee /etc/sudoers.d/backupuser <<<'backupuser ALL = (root) NOPASSWD: /usr/bin/rsync'

Setup SSH Key, aka Passwordless authentication (On backup server)

Log into the backup server

Create SSH keys. Note that since rsnapshot wants to run as root, we create the key and copy it as the root user.

sudo ssh-keygen

Accept all the defaults so we can login from the backup server without having to enter in a password.

Copy ssh key to the server we are wanting to back up

sudo ssh-copy-id backupuser@ip

enter in the password and the the key should get copied it over. Once complete, verify that you can login without having to enter in a password.

Setup rsnapshot config (On backup server)

Open up the rsnapshot config file and modify where appropriate. /etc/rsnapshot.conf

Change the path to where the snapshots are stored. By default it stores them under /.snapshots. I moved it under a local user as I am not needing to use rsnapshot to backup the local backup server files.


# SNAPSHOT ROOT DIRECTORY
snapshot_root /home/user/rsnapshot/snapshots/

Add a daily backup option under Backup levels

# BACKUP LEVELS / INTERVAL #
retain daily 6

Setup remote server to get a backup from. Replace ipaddress and directories as needed. hostname is the sever name. You can change to whatever you want.

### BACKUP POINTS / SCRIPTS ###
# LOCALHOST
# Comment or delete entries unless you want to backup those as well
# EXAMPLE.COM
backup  backupuser@ipaddress:/home/     hostname/       +rsync_long_args=--rsync-path="sudo rsync"

If you would like to back up multiple locations you can create multiple entries with different remote paths. Example locations to add

backup  backupuser@ipaddress:/etc/     hostname/       +rsync_long_args=--rsync-path="sudo rsync"
backup  backupuser@ipaddress:/usr/local/     hostname/       +rsync_long_args=--rsync-path="sudo rsync"

Verify that the config is good with

sudo rsnapshot configtest

It should return Syntax OK

Setup Crontab

sudo crontab -e

Add the following line to run rsnapshot at 3AM every day. More information about crontab can be found here.

0 3 * * * /usr/bin/rsnapshot daily

Final Testing

Manually run a backup to verify everything is set up correctly.

sudo rsnapshot daily

After it runs you can check the directory you specified in the config file to verify that the files did get copied.

Enable Automatic Update for Ubuntu Server 22.04

These steps should work for multiple versions of Ubuntu Server.

Thankfully enabling automatic updates in Ubuntu is super easy.

First make sure that the “unattended-upgrades” package is installed

sudo apt install unattended-upgrades

It was already installed on my Ubuntu 20.04 server instance.
Next run dpkg to reconfigure and enable updates

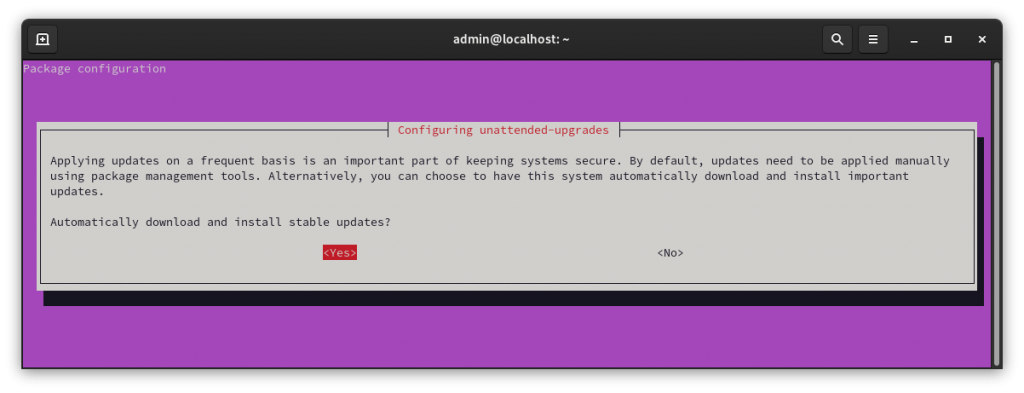
sudo dpkg-reconfigure unattended-upgrades

You should get the following prompt.

Configuring automatic updates

Hit “Yes” to enable.

Your system should now automatically install updates. however, if it needs to reboot it may not. You can configure the reboot options in

sudo vi /etc/apt/apt.conf.d/50unattended-upgrades

Scroll down to the Reboot lines and uncomment

// Automatically reboot *WITHOUT CONFIRMATION* if
//  the file /var/run/reboot-required is found after the upgrade
Unattended-Upgrade::Automatic-Reboot "true";  // <- Uncomment line

// If automatic reboot is enabled and needed, reboot at the specific
// time instead of immediately
// Default: "now"
Unattended-Upgrade::Automatic-Reboot-Time "02:00";  // <- Uncomment line

Save the file. Your system should now automatically install stable updates.

Disable automatic update

You can disable the automatic updates by running the dpkg command again.

sudo dpkg-reconfigure unattended-upgrades

and selecting “No”

Automatic updates should now be off.

More information can be found at the following link.

https://www.cyberciti.biz/faq/set-up-automatic-unattended-updates-for-ubuntu-20-04/

An upgrade from ‘disco’ (19.04) to ‘focal’ (20.04) is not supported with this tool.

Unfortunately once a version of Ubuntu becomes unsupported you can run into problems upgrading to the latest version. As is the case when you try to upgrade disco to focal. Ubunut 19.04 to 20.04.

A work around is to update the apt sources and then run an update

Update Apt Sources with.

sudo sed -i 's/disco/focal/g' /etc/apt/sources.list

Now Upgrade with the following two commands.

sudo apt update
sudo apt -y dist-upgrade

More info at the following link.

https://www.knowledgepublisher.com/article/1452/solution-an-upgrade-from-disco-to-focal-is-not-supported-with-this-tool.html

Configure UFW Firewall on Ubuntu

UFW Firewall Status

Below are some simple commands around working with UFW. UFW is included in Ubuntu. However it may need to be enable.

Show status

sudo ufw status

Disable UFW Service

sudo systemctl stop ufw && sudo systemctl disable ufw

Stop UFW Service

sudo systemctl stop ufw

Start UFW service

sudo systemctl stop ufw

Enable UFW

sudo ufw enable

Allow SSH

sudo ufw allow 22/tcp

Show status

sudo ufw status numbered

Example output

sudo ufw status numbered
Status: active
To            Action   From 
--            ------   ----
[1] 3478/udp  ALLOW IN  Anywhere
[2] 5514/udp  ALLOW IN  Anywhere
[3] 8080/tcp  ALLOW IN  Anywhere
[4] 8443/tcp  ALLOW IN  Anywhere
[5] 8880/tcp  ALLOW IN  Anywhere
[6] 8843/tcp  ALLOW IN  Anywhere
[7] 6789/tcp  ALLOW IN  Anywhere
[8] 27117/tcp ALLOW IN  Anywhere
[9] 22/tcp    ALLOW IN  Anywhere

Delete rule

You need to know the number of the rule you want to delete. Replace number with the number of the rule from the status command

sudo ufw delete number

Reset rules

sudo ufw reset

Allow access to port from specific IP address

Example command allows access to SSH (port 22) from the 172.16.0.0/12 ip range.

sudo ufw allow proto tcp from 172.16.0.0/12 to any port 22

One note: It appears that you need to run the rule with every IP range you want to allow.

Allow access to port from all private IP ranges (RFC 1918)

If we wanted to allow SSH (port 22) from all local IP addresses, we would need to run the following three commands.

sudo ufw allow proto tcp from 10.0.0.0/8 to any port 22
sudo ufw allow proto tcp from 172.16.0.0/12 to any port 22
sudo ufw allow proto tcp from 192.168.0.0/16 to any port 22

The following link has more information regarding UFW firewall and subnets.
https://www.cyberciti.biz/faq/ufw-allow-incoming-ssh-connections-from-a-specific-ip-address-subnet-on-ubuntu-debian/