Error: Could not create the Java Virtual Machine

Apparently on some versions of Java checking the Java version will give you the following error.

root@local:~# java -v
Unrecognized option: -v
Error: Could not create the Java Virtual Machine.
Error: A fatal exception has occurred. Program will exit.
root@local:~#

The issue being the -v or –version options are not recognized. On newer versions of Java it is recognized.

The proper way to do it is -version with only one dash

root@local:~# java -version
openjdk version "1.8.0_252"
OpenJDK Runtime Environment (build 1.8.0_252-8u252-b09-1ubuntu1-b09)
OpenJDK 64-Bit Server VM (build 25.252-b09, mixed mode)
root@local:~#

https://askubuntu.com/questions/324858/installed-jdk-by-and-have-error-could-not-create-the-java-virtual-machine

fatal: [matrix2.host.com]: UNREACHABLE! => changed=false

Error while attempting to run playbook
ansible-playbook -i inventory/hosts setup.yml --tags=setup-system-user --ask-become-pass

Looks like the above issue is that Ansible is not able to authenticate with the server. By default it looks to try and use ssh keys, but I don’t have any passwordless ssh keys set up for Ansible to use so it fails while attempting to connect. The work around it to make sure you have sshpass installed and then specify –ask-pass to the end of the command.

ansible-playbook -i inventory/hosts setup.yml --tags=setup-system-user --ask-become-pass --ask-pass

When the command runs it’ll ask you for the ssh password and then use that.

Backup Matrix Synapse PostgreSQL Database

This is part of a series of posts on backing up and restoring a backup for Matrix Synapse server. Synapse was installed using the matrix-docker-ansible deployment which while a little complicated can greatly ease management later on down the road. All the main components are in docker containers so we need to use docker to access.

https://github.com/spantaleev/matrix-docker-ansible-deploy/blob/master/docs/maintenance-postgres.md#backing-up-postgresql

As the root user run

docker exec --env-file=/matrix/postgres/env-postgres-psql matrix-postgres pg_dumpall -h matrix-postgres | gzip -c > /matrix/postgres.sql.gz

This will dump the Postgres database in /matrix/postgres.sql.gz
We can use this later to restore to a new server or keep as a backup.

Configure rsnapshot on Ubuntu Server

rsnapshot is a utility that uses rsync to backup files locally or it can backup files from a remote server.

While trying to figure out a good solution for backing up an Ubuntu Server I decided to try rsnapshot, however since it can either create a local backup or pull a remote backup it needs to be configured to do that on the backup server side. It does not “push” a backup to a backup server.

Some helpful snippits from the man file.

rsnapshot will typically be invoked as root by a cron job, or series of cron jobs. It is possible, however, to run as any    arbitrary user with an alternate configuration file.
...
USAGE
        rsnapshot can be used by any user, but for system-wide backups you will probably want to run it as root.
...
NOTES
        Make sure your /etc/rsnapshot.conf file has all elements separated by tabs.  See
        /usr/share/doc/rsnapshot/examples/rsnapshot.conf.default.gz for a working example file.
    Make sure you put a trailing slash on the end of all directory references.  If you don't, you may have extra directories    created in your snapshots.  For more information on how the trailing slash is handled, see the rsync(1) manpage.

Overview

Scenario

Host A runs xyz application and host B is the backup server. We create a backup user on host A, host B then uses that user to ssh and rsync backups to itself.

  1. Create backup user
  2. Configure rysnc to be used without a password
  3. Setup SSH Key, aka Passwordless authentication (On backup server)
  4. Setup rsnapshot config (On backup server)
  5. Configure rsnapshot in crontab (On backup server)
  6. Final Testing

Create backup user

The following commands are fairly straight forward. Change backupuser to whatever you want to call your backup user.

sudo useradd -m backupuser
passwd backupuser
sudo usermod -a -G sudo backupuser

Configure rysnc to be used without a password

We need to setup the backup user to be able to use “sudo rsync” without having to input the user password. If we don’t use sudo we can’t access system files for backups. And if we have to manually input the password every time rsync runs, then the backups would not be automatic. The following link was helpful.

https://unix.stackexchange.com/questions/325100/proper-way-to-set-up-rsnapshot-over-ssh

All we need to do is create a file in /etc/sudoers.d/username and then tell it we don’t need to enter a password when “sudo rsync” is run.

sudo tee /etc/sudoers.d/backupuser <<<'backupuser ALL = (root) NOPASSWD: /usr/bin/rsync'

Setup SSH Key, aka Passwordless authentication (On backup server)

Log into the backup server

Create SSH keys. Note that since rsnapshot wants to run as root, we create the key and copy it as the root user.

sudo ssh-keygen

Accept all the defaults so we can login from the backup server without having to enter in a password.

Copy ssh key to the server we are wanting to back up

sudo ssh-copy-id backupuser@ip

enter in the password and the the key should get copied it over. Once complete, verify that you can login without having to enter in a password.

Setup rsnapshot config (On backup server)

Open up the rsnapshot config file and modify where appropriate. /etc/rsnapshot.conf

Change the path to where the snapshots are stored. By default it stores them under /.snapshots. I moved it under a local user as I am not needing to use rsnapshot to backup the local backup server files.


# SNAPSHOT ROOT DIRECTORY
snapshot_root /home/user/rsnapshot/snapshots/

Add a daily backup option under Backup levels

# BACKUP LEVELS / INTERVAL #
retain daily 6

Setup remote server to get a backup from. Replace ipaddress and directories as needed. hostname is the sever name. You can change to whatever you want.

### BACKUP POINTS / SCRIPTS ###
# LOCALHOST
# Comment or delete entries unless you want to backup those as well
# EXAMPLE.COM
backup  backupuser@ipaddress:/home/     hostname/       +rsync_long_args=--rsync-path="sudo rsync"

If you would like to back up multiple locations you can create multiple entries with different remote paths. Example locations to add

backup  backupuser@ipaddress:/etc/     hostname/       +rsync_long_args=--rsync-path="sudo rsync"
backup  backupuser@ipaddress:/usr/local/     hostname/       +rsync_long_args=--rsync-path="sudo rsync"

Verify that the config is good with

sudo rsnapshot configtest

It should return Syntax OK

Setup Crontab

sudo crontab -e

Add the following line to run rsnapshot at 3AM every day. More information about crontab can be found here.

0 3 * * * /usr/bin/rsnapshot daily

Final Testing

Manually run a backup to verify everything is set up correctly.

sudo rsnapshot daily

After it runs you can check the directory you specified in the config file to verify that the files did get copied.

Enable Automatic Update for Ubuntu Server 22.04

These steps should work for multiple versions of Ubuntu Server.

Thankfully enabling automatic updates in Ubuntu is super easy.

First make sure that the “unattended-upgrades” package is installed

sudo apt install unattended-upgrades

It was already installed on my Ubuntu 20.04 server instance.
Next run dpkg to reconfigure and enable updates

sudo dpkg-reconfigure unattended-upgrades

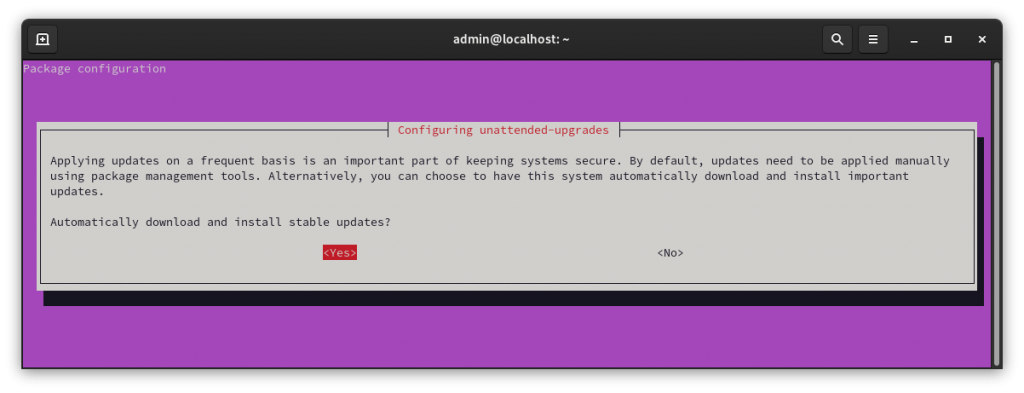
You should get the following prompt.

Configuring automatic updates

Hit “Yes” to enable.

Your system should now automatically install updates. however, if it needs to reboot it may not. You can configure the reboot options in

sudo vi /etc/apt/apt.conf.d/50unattended-upgrades

Scroll down to the Reboot lines and uncomment

// Automatically reboot *WITHOUT CONFIRMATION* if
//  the file /var/run/reboot-required is found after the upgrade
Unattended-Upgrade::Automatic-Reboot "true";  // <- Uncomment line

// If automatic reboot is enabled and needed, reboot at the specific
// time instead of immediately
// Default: "now"
Unattended-Upgrade::Automatic-Reboot-Time "02:00";  // <- Uncomment line

Save the file. Your system should now automatically install stable updates.

Disable automatic update

You can disable the automatic updates by running the dpkg command again.

sudo dpkg-reconfigure unattended-upgrades

and selecting “No”

Automatic updates should now be off.

More information can be found at the following link.

https://www.cyberciti.biz/faq/set-up-automatic-unattended-updates-for-ubuntu-20-04/

Limit Network Speed of wget

You can limit the download speed for wget with the –limit-rate option.

Example command

wget --limit-rate=128K incredigeek.com/file-to-download.html

Replace 128K with the rate you would like. Rate is in Bytes, K for kilobytes M for megabytes.

More info from the man pages

  --limit-rate=amount        Limit the download speed to amount bytes per second.  Amount may be expressed in bytes, kilobytes with the k suffix, or megabytes with the m suffix.  For example,        --limit-rate=20k will limit the retrieval rate to 20KB/s.  This is useful when, for whatever reason, you don't want Wget to consume the entire available bandwidth.        This option allows the use of decimal numbers, usually in conjunction with power suffixes; for example, --limit-rate=2.5k is a legal value.        Note that Wget implements the limiting by sleeping the appropriate amount of time after a network read that took less time than specified by the rate.  Eventually        this strategy causes the TCP transfer to slow down to approximately the specified rate.  However, it may take some time for this balance to be achieved, so don't        be surprised if limiting the rate doesn't work well with very small files.

wget –limit-rate options

Installing Discord on Fedora 33

For some reason a lot of applications out there do not have a built RPM package. Fortunately, there are a bunch of applications built into snap, so we can install snap and then install Discord.

You can also use the copr repo. Visit the following link for instructions.

Install Snap Store

sudo dnf install snapd

https://snapcraft.io/docs/installing-snap-on-fedora

Install Discord

snap install discord

You may need to try signing out and back in or restarting your computer for the applications to show up in your application menu.

You can also manually run the application with

snap run discord

OLED Screen Brightness on Fedora 33

By default Linux and OLED displays don’t really want to play well together. icc-brightness is a handy utility that resolves the problem, but all the instructions I found online were for Ubuntu/Debian based distributions.

https://github.com/udifuchs/icc-brightness

Fortunately, after a few failed attempts to compile the program I was able to figure out which dependency was required.

[admin@local icc-brightness]$ sudo make
cc -W -Wall  icc-brightness-gen.c -l lcms2  -o icc-brightness-gen 
icc-brightness-gen.c:9:10: fatal error: lcms2.h: No such file or directory
    9 | #include <lcms2.h>
      |          ^~~~~~~~~
compilation terminated.
make: *** [Makefile:10: icc-brightness-gen] Error 1
admin@local icc-brightness]$

We are missing the lcms2-devel package. Not sure if the utils package is required, but installed it anyway.

sudo dnf install lcms2-utils lcms2-devel

With that installed we can now make and install icc-brightness

sudo make install

Reboot the laptop and it should automatically start icc-brightness in the background and the brightness controls should work

You can find more information for installing on Debian based systems at the following link.

How To Setup Samba/CIFS Share on Fedora Server

We are going to setup a Samba/CIFS share on Fedora Server that we will then access from Windows 10.

  1. Install Samba/CIFS server packages
  2. Create user to access share
  3. Configure SELinux and firewall
  4. Connect to erver from Windows

1. Install Samba/CIFS Fedora Server Packages

First we need to install the samba package.

sudo dnf install samba
Installing SMB on Fedora
Samba Dependencies

Next, lets enable the Samba service so it automatically starts when the server boots up.

systemctl enable smb nmb
systemctl start smb

nmb is a “NetBIOS name server that provides NetBIOS over IP naming service to clients”
https://www.samba.org/samba/docs/current/man-html/nmbd.8.html

2. Setup Samba/CIFS User

We now need a user to connect to the Samba share with. You can use the commands below to to create a new user.

pdbedit only configures a current Linux system user for Samba. You can skip creating a new Linux user, but only if there is one already created that you can use.

sudo useradd -m sambaUser
sudo passwd sambaUser
sudo pdbedit -a sambaUser

3. Configure Server SELinux and Firewall Permissions

Configure SELinux permissions with the following command.

sudo setsebool -P samba_enable_home_dirs on

You can also just disable SELinux. Although it is not necessarily recommended.
How To Enable/Disable SELinux

sudo setsebool -P samba_enable_home_dirs on
sudo firewall-cmd --add-service=samba --permanent
sudo firewall-cmd --reload

4. Test Samba/CIFS Share from Windows

You can now test to see if the share works. Open up Windows Explorer. Type in the IP address of the server and connect.

\\ip-address\sambaUser

It should prompt you for a login. Enter the user and password you set up.

Connecting to Fedora Samba/CIFS server

If it loads, then congratulations! You have successfully setup a Samba/CIFS Share on Fedora Server. Create new directories or files or whatever else you need.

Successfully Connected to Fedora Samba/CIFS Server

Check out the following links for more information about setting up Samba.

https://fedoramagazine.org/fedora-32-simple-local-file-sharing-with-samba/
https://jewelhuq.wordpress.com/2017/12/08/how-to-install-samba-server-in-fedora/

https://fedoramagazine.org/fedora-32-simple-local-file-sharing-with-samba/