I had a command that was used to see if. It used some arithmetic operators to subtract 1 from the current day. That would give us yesterdays day which we could then use to check if a backup was created then.
day=$(date +%d) ; date=$(($day - 1)) ; echo "yesterday date is $date"
-bash: 08: value too great for base (error token is "08")
The better way
Fortunately there is an easier and more reliable way to do this. Using the date command, you can specify yesterday and it will print out yesterdays date.
Interesting bits are bolded. Our destination port it 22 “ssh” and our source address is 192.168.1.1. If I want this IP to access the server, I’ll need to add the 192.168.1.1 IP range in the allowed IP ranges.
Disable Logging (Optional)
After you have finished troubleshooting your problem, you may want to turn the logging feature off so you don’t fill up the logs with failed entries.
You can turn it off with
sudo firewall-cmd --set-log-denied=off
We can verify that logging is off by running
sudo firewall-cmd --get-log-denied
If the firewall logging option is off it will return “off”
The following site has some more information and alternative ways
Recently I started getting the following error while running ./validate.php.
$ sudo -u librenms ./validate.php
====================================
Component | Version
--------- | -------
LibreNMS  | 21.8.0-41-g0a76ca4
DB Schema | 2021_08_26_093522_config_value_to_medium_text (217)
PHP       | 7.4.20
Python    | 3.6.8
MySQL     | 10.5.10-MariaDB
RRDTool   | 1.4.8
SNMP      | NET-SNMP 5.7.2
====================================

[OK]    Composer Version: 2.1.6
[OK]    Dependencies up-to-date.
[OK]    Database connection successful
[FAIL]  Database: incorrect column (notifications/datetime)
[FAIL]  Database: incorrect column (users/created_at)
[FAIL]  We have detected that your database schema may be wrong, please report the following to us on Discord (https://t.libren.ms/discord) or the community site (https://t.libren.ms/5gscd):
        [FIX]:
        Run the following SQL statements to fix.
        SQL Statements:
         SET TIME_ZONE='+00:00';
         ALTER TABLE `notifications` CHANGE `datetime` `datetime` timestamp NOT NULL DEFAULT '1970-01-02 00:00:00' ;
         ALTER TABLE `users` CHANGE `created_at` `created_at` timestamp NOT NULL DEFAULT '1970-01-02 00:00:01' ;
Reading online it sounds like some of the recent changes are causing the issue. Looks fairly easy to resolve though.
First we’ll need to get a MySQL prompt. We’ll do that by running
mysql -u librenms -p librenms
It’ll ask use for the librenms user’s mysql password.
Once we have the MySQL prompt we can just copy and paste the commands in.
SET TIME_ZONE='+00:00';
ALTER TABLE `notifications` CHANGE `datetime` `datetime` timestamp NOT NULL DEFAULT '1970-01-02 00:00:00' ;
ALTER TABLE `users` CHANGE `created_at` `created_at` timestamp NOT NULL DEFAULT '1970-01-02 00:00:01' ;
Type ‘quit’ to exit MySQL and lets run the validate script again.
Installing Linux GUI applications seems fairly easy on WSL 2. Main requirement is to have the graphics driver installed and the WSL being on version 2.
Formatting an unformated “phone” number using sed.
There may be a different and easier way to do this, but the main thing to learn here is the ^, $, and [[:digit:]] options.
^ refers to the first part of a line & which is our searched for pattern $ refers to an end part of the line [[:digit:]] searches for, you guessed it. Digits!
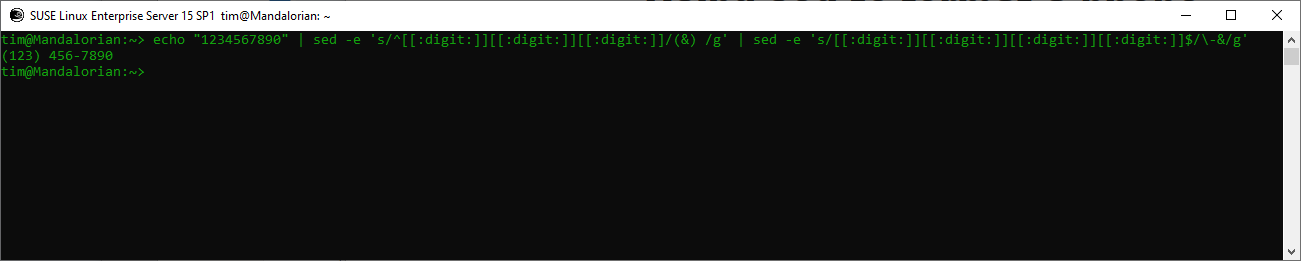
The following command reads the incoming 10 digit number form echo and does the following.
the ^ tells it that the pattern needs to match at the beginning of the line [[:digit:]] repeated tells it to search for three consecutive digits (&) tells it to put brackets around the & which is our searched for pattern in the first part. We then pipe that to another sed command which searches for 4 consecutive digits the $ tells it that it needs to be at the end of the line.
echo "1234567890" | sed -e 's/^[[:digit:]][[:digit:]][[:digit:]]/(&) /g' | sed -e 's/[[:digit:]][[:digit:]][[:digit:]][[:digit:]]$/-&/g'
Resulting output is
(123) 456-7890
The following link was helpful while searching what the ^ and $ options do.
An easy way to do this is by using fping. fping is a little bit easier ping utility to use then normal ping when trying to verify that a host is actually down.
By default fping returns if a host is “alive” or “unreachable”
Example:
$ fping 192.168.1.4
192.168.1.4 is alive
Or for a host that is down it returns something like the following
$ fping 192.168.1.5
ICMP Host Unreachable from 192.168.1.2 for ICMP Echo sent to 192.168.1.5
ICMP Host Unreachable from 192.168.1.2 for ICMP Echo sent to 192.168.1.5
ICMP Host Unreachable from 192.168.1.2 for ICMP Echo sent to 192.168.1.5
ICMP Host Unreachable from 192.168.1.2 for ICMP Echo sent to 192.168.1.5
192.168.1.5 is unreachable
You can adjust the retry rate with the -r option, default is 3 which it has multiple of the Host Unreachable lines. Changing it to 1 or 2 gets rid of those lines so it just shows that the host is unreachable.
$ fping -r 1 192.168.1.5
192.168.1.5 is unreachable
Ping multiple addresses
Fortunately pinging multiple addresses with fping is as easy as adding them to the end of the command. For example
fping -r1 192.168.1.1 192.168.1.2
will ping both the specified addresses one after the other and print the results to the terminal.
Example:
$ fping -r 192.168.1.1 192.168.1.10 192.168.1.45
192.168.1.1 is alive
192.168.1.10 is alive
192.168.1.45 is unreachable