Install NextCloud on Ubuntu 19.04

Install with snap

sudo snap install nextcloud 

Set user and password for NextCloud

sudo nextcloud.manual-install nextcloudadmin password

Allow https access for firewall

sudo ufw allow 80,443/tcp

For the following steps to work, you’ll need an A record setup on your domain name server to point a domain to your Next Cloud servers public ip address. Change www.example.com in the following steps to the domain name you’ve setup.

View trusted domains

sudo nextcloud.occ config:system:get trusted_domains

Setup new trusted domain. Change www.example.com with your domain.

sudo nextcloud.occ config:system:set trusted_domains 1 --value=www.example.com

Run through Lets Encrypt to setup a SSL certificate.

sudo nextcloud.enable-https lets-encrypt

Should be able to access NextCloud from a web browser www.example.com

Extra info
https://www.digitalocean.com/community/tutorials/how-to-install-and-configure-nextcloud-on-ubuntu-18-04

How To Reset root Password on CentOS VM – XenServer

Basic steps are as follows.

  1. Shutdown VM
  2. From XenCenter, insert the CentOS iso into the VM’s Virtual DVD drive.
  3. Boot the CentOS VM in recovery mode.  If you need help with that check this post out.
  4. On the grub menu, select recover OS Installation.
  5. Run through the recovery and mount the VM’s disk where CentOS is installed
  6. You should now be able to drop to a prompt and chroot /sysimage
  7. Change the root password with passwd
  8. Shutdown the VM
  9. Eject the CentOS iso
  10. Boot up the VM and login with the new password

Set static ip address in Ubuntu 19.04

The network configuration settings for the server edition of Ubuntu are now stored in the following location. Create the file if it does not exist.

sudo vi /etc/netplan/01-network-manager-all.yaml

Add or edit the config file to the following. Change eno1 to your interface name and the address and gateway to the appropriate IP’s

For more information, see netplan(5).
 network:
   version: 2
   renderer: networkd
   ethernets:
     eno1:
      dhcp4: no
      addresses: [192.168.200.24/24]
      gateway: 192.168.200.1
      nameservers:
        addresses: [8.8.8.8,8.8.4.4]

Now apply the changes with the following command.

sudo netplan apply

Verify Ubuntu iso on Windows

On Windows you can use the CertUtil utility to verify an iso image.

First, you’ll need the checksum of the iso. Should be on the page where you downloaded the iso. More info about that here.

Next generate the hash by running the following in a command prompt. Replace the path and ISO name with the one you downloaded

certutil -hashfile Downloads\ubuntu-19.04-live-server-amd64.iso sha256

Example output

SHA256 hash of Downloads\ubuntu-19.04-live-server-amd64.iso:
25d483341ccd0d522a6660b00db933787c86c47b42f1845bcf997127f4b61e9d
CertUtil: -hashfile command completed successfully.

Compare the output with the checksum. If they are the same, you should be good to go.

Raspberry Pi – Ping IP Address and Toggle LED

The following script is for monitoring if an IP address is reachable or not. If it becomes unavailable the script will turn on a LED that is plugged into one of the GPIO pins of the Raspberry Pi. View pinout here

Script

#!/bin/bash
# Script to ping ip address and turn on LED on if device is unreachable.
                                                                                                                                                                                                 nPin="18"  # Change if GPIO pin is different                                                                                                     
ledPin="gpio${nPin}"                                                                                                                                                                                                                            toPing="8.8.8.8"  # Change to address you want to ping

echo "${nPin}" > /sys/class/gpio/export
echo "out" > /sys/class/gpio/${ledPin}/direction

if ( fping -r1 $toPing | grep -v alive ); then
         echo "Internet unreachable"
         # Turn on LED
         echo "1" > /sys/class/gpio/${ledPin}/value
 else
         # Turn off LED 
         echo "0" > /sys/class/gpio/${ledPin}/value
 fi

Save script as ping_led.sh and make it executable.

chmod +x ping_led.sh

and run the script.

sh ping_led.sh

Run script in crontab

You can setup the script to run every minute using a crontab

crontab -e

Add the following line

*/1 * * * * /home/pi/ping_led.sh

Should now execute the script every minute and not need any human interaction.

Delete files older than x days – Linux


You can use find command to find and delete files older than the specified days. In this case 30.

find /backup/* -mtime +30 -exec rm {} \;

Non recursive example. The -prune option should limit find to only look for files in the /backup directory. So it won’t check any subdirectories.

find /backup/* -prune -mtime +30 -exec rm {} \; 

CHIPSEC notes

The following is some quick notes on using CHIPSEC to compare the EFI whitelist on your current machine with the BIOS Dell provides

Quick notes.

  1. Install prerequisites (Uses python 2)
  2. Git clone Chipsec
  3. Install (Had to use a -i option, is in the manual)
  4. Run (Use spaces like below)

Extract Bios ROM from Dell EXE
Use the BIOS exe to output a .rom file that you can use in Linux. Run the following command from Windows command prompt, accept the security request. Change the EXE to the BIOS you downloaded.

Alienware_17_R2_1.5.0.EXE /writeromfile

The BIOS rom is named dell.rom in the following commands

Get list of Computer ROM

Should create fw.bin file and efilist.json file from local machine

sudo python chipsec_main.py -m tools.uefi.whitelist

Get list from Dell rom

sudo python chipsec_main.py -m tools.uefi.whitelist -a generate efilist.json dell.rom

Compare the current ROM against the one downloaded from Dell

sudo python chipsec_main.py -m tools.uefi.whitelist -a check efilist.json fw.bin

For some reason Ubuntu was not recognizing the last three options after the -a as individual options unless there was a space in between them.  All the examples online show that they had commas between them.  Which should work, so wonder if it was an environment variable problem or something.

The tell tell sign was the [*] Module arguments Line only shows 1 argument, needs 3.

Other links

Install instructions here.
https://github.com/chipsec/chipsec/wiki/Installing-CHIPSEC-in-Linux

LUV Linux download
https://01.org/linux-uefi-validation

Manual
https://github.com/chipsec/chipsec/blob/master/chipsec-manual.pdf

Setting up Proxy over SSH on Linux

Initiate a ssh connection to the server or device you want to use as a proxy. You can change the port to something else if so desired.

ssh username@ipaddress -D 1880

Log in and leave the session running

You can now setup your computer or browser to use the Proxy.
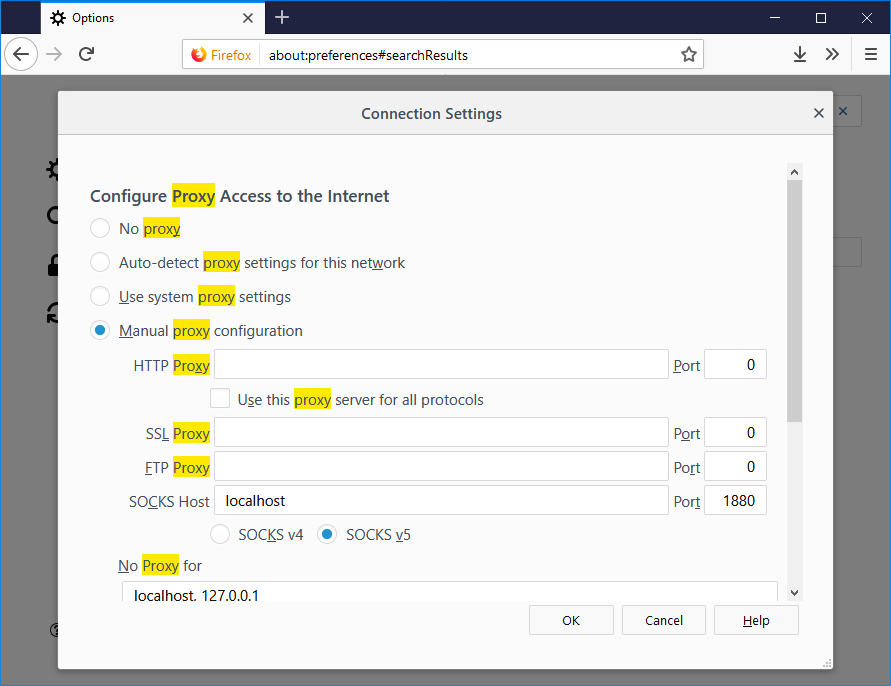
Specify SOCKS Host, hostname is either localhost or 127.0.0.1, the port is 1880.

Firefox example below.