Set up Minecraft Server on CentOS 6

Update system

yum update -y

Install Java and wget

yum install -y java wget

Allow Minecraft port through the firewall

Insert the following line in your iptables config file, found in “/etc/sysconfig/iptables”

-A INPUT -m state --state NEW -m tcp -p tcp --dport 25565 -j ACCEPT

Example:

vi /etc/sysconfig/iptables
# Firewall configuration written by system-config-firewall
 # Manual customization of this file is not recommended.
 *filter
 :INPUT ACCEPT [0:0]
 :FORWARD ACCEPT [0:0]
 :OUTPUT ACCEPT [0:0]
 -A INPUT -m state --state ESTABLISHED,RELATED -j ACCEPT
 -A INPUT -p icmp -j ACCEPT
 -A INPUT -i lo -j ACCEPT
 -A INPUT -m state --state NEW -m tcp -p tcp --dport 22 -j ACCEPT
 -A INPUT -m state --state NEW -m tcp -p tcp --dport 25565 -j ACCEPT <--- Added Rule
 -A INPUT -j REJECT --reject-with icmp-host-prohibited
 -A FORWARD -j REJECT --reject-with icmp-host-prohibited
 COMMIT
 ~
 ~
 :wq
"/etc/sysconfig/iptables" 14L, 544C written
 [root@localhost ~]# service iptables restart
 iptables: Setting chains to policy ACCEPT: filter [ OK ]
 iptables: Flushing firewall rules: [ OK ]
 iptables: Unloading modules: [ OK ]
 iptables: Applying firewall rules: [ OK ]
 [root@localhost ~]#


Setup your network.

you will need to edit the network config file in “/etc/sysconfig/network-scripts/ifcfg-eth0”

DHCP

If your using DHCP then just change “ONBOOT=no” to “ONBOOT=yes”

Static

If you need a static address, then change “ONBOOT=no” to “ONBOOT=yes” and change “BOOTPROTO=dhcp” to “BOOTPROTO=static”

add the following to “/etc/sysconfig/network-scripts/ifcfg-eth0”

IPADDR=192.168.1.100
NETMASK=255.255.255.0
GATEWAY=192.168.1.1
BROADCAST=192.168.1.255
DNS1=1.1.1.1


Start Minecraft server on system boot

Create user

useradd -m steve

Create password for steve

passwd steve

Login as your new user.

su steve

Go to user root directory

cd ~/

Download the minecraft server jar

wget https://s3.amazonaws.com/Minecraft.Download/versions/1.8.7/minecraft_server.1.8.7.jar

Create a directory for the start up script and create start up script.

mkdir /home/steve/mc
touch /home/steve/mc/mcstart.sh

Copy and paste the following text into mcstart.sh

#! /bin/sh
# /etc/init.d/mcserver

### BEGIN INIT INFO
# Minecraft CraftBukkit Start script
### END INIT INFO

case "$1" in
  start)
    echo "Starting mcserver"
    MCDIR="/home/steve/"
    cd "$MCDIR"
    java -Xmx512M -jar minecraft_server.1.8.7.jar -o true &
;;
  stop)
    echo "Stopping mcserver"
    kill `pgrep mcserver`
    ;;
  *)
    echo "Usage: /etc/init.d/mcserver {start|stop}"
    exit 1
    ;;
esac
exit 0

Make the script executable

chmod +x /home/steve/mc/mcstart.sh

Add mcstart.sh to the crontab

Access the crontab by running the following command

crontab -e

Add the following to the crontab.

@reboot /home/steve/mc/mcstart.sh start

Start the server.

/home/steve/mc/mcstart.sh start

Note: Starting the server will fail because you need to agree to the end user license agreement.

Agree to the eula

sed -i s/false/true/g eula.txt

Reboot the server and connect to your new Minecraft server.

How To change the Hostname in CentOS 7

Check current hostname with the hostname command.

hostname

Change hostname with hostnamectl

hostnamectl set-hostname newhostname


Example:

Changing hostname from “localhost” to “newhost”.

[root@localhost ~]# hostname
localhost
[root@localhost ~]# hostnamectl set-hostname newhost
[root@localhost ~]# hostname
newhost
[root@localhost ~]# 


How to Install Zenoss 5 on CentOS 7

Note:

  1. This is not a comprehensive guide, if you need more info, refer to the installation manual here.
  2. This assumes that all your partitions are going to be on one drive

Installing CentOS 7

Note: If you have issues installing CentOS via the default install interface, try using the Fallback graphics mode, found in the Grub boot menu under “trubbleshooting”.

Install CentOS like you normally would, just be sure to leave at least 60GB of free space for Docker/Zenoss

2

You can Select Automatic Partitioning, but you will need to make additional space available.  I just configured it manually.3

 Note that I have about 75GB of free space, this will be used for “/var/lib/docker” and “/opt/serviced/var/volumes”.  We’ll set these up later on.1

You don’t necessarily need to setup a user, but you can if you want to.  4

Once your finished reboot and login.5


Configuring CentOS for Zenoss

Setup network

You will need to setup your network settings.  Refer to this post to set a static IP address if needed.


Note: In CentOS 7 ifconfig is not installed by default.  If you need to check the IP address use the following command.

ip addr sh

After your connected to the internet you can install ifconfig with

yum install -y net-tools

Setup Hostname

Zenoss seems to have issues if you change the hostname after it is installed so be sure to set up the hostname before you start installing zenoss.

Check current hostname

hostname

Change the hostname.  Replace “newhostname” with your new hostname.

hostnamectl set-hostname newhostname

After you finish configuring the hostname, add it to “/etc/hosts” with the following command.  Change the IP address and the hostname “zenoss” to your systems IP address and hostname.

echo "192.168.56.101   zenoss" >> /etc/hosts

Update your system

yum update -y

Disable Firewall

systemctl stop firewalld && systemctl disable firewalld

Enable persistent log storage

mkdir -p /var/log/journal && systemctl restart systemd-journald

Create two Btrfs file systems

First create two normal linux partitions using your favorite disk utility.  I am using cfdisk.  Each partition should be over 30GB.

cfdisk /dev/sda

6

Create two Primary partitions and put them at the end and then write and exit.

7

Take note of the two new partitions names.  Mine are “sda4” and “sda3”.

After the above changes are made, it would be a good idea to reboot the machine so the partition table can be updated.

reboot

Now we will reformat the two partitions as Btrfs

Create mount point.

mkdir -p /var/lib/docker /opt/serviced/var/volumes

Change “/dev/sda3” and “/dev/sda4” to your partitions names if they are different.

DOCKER_PART=/dev/sda3
APP_PART=/dev/sda4
mkfs -t btrfs --nodiscard $DOCKER_PART
mkfs -t btrfs --nodiscard $APP_PART

Add the new file systems to fstab, so they automatically mount on boot.

APP_PATH="/opt/serviced/var/volumes"
echo "$DOCKER_PART /var/lib/docker btrfs rw,noatime,nodatacow 0 0" >> /etc/fstab
echo "$APP_PART $APP_PATH btrfs rw,noatime,nodatacow 0 0" >> /etc/fstab

Mount the new filesystems, and make sure that they mounted

mount -a
if [[ `mount | egrep 'docker|serviced'` ]]; then echo "Mounted" ; else echo "Not Mounted" ; fi

You can manually check by running the following command.

mount | egrep 'docker|serviced'

you should receive something like the following

/dev/sda3 on /var/lib/docker type btrfs (rw,noatime,seclabel,nodatasum,nodatacow,space_cache)
/dev/sda4 on /opt/serviced/var/volumes type btrfs (rw,noatime,seclabel,nodatasum,nodatacow,space_cache)

Disable SELinux

By default SELinux is installed and enabled.  To disable SELinux either edit the config file “/etc/selinux/config” and change “SELINUX=enforcing” to “SELINUX=disabled”, or you can run the following command.

EXT=$(date +"%j-%H%M%S")
sudo sed -i.${EXT} -e 's/^SELINUX=.*/SELINUX=disabled/g' \
/etc/selinux/config && \
grep '^SELINUX=' /etc/selinux/config

Enable Dnsmasq

systemctl enable dnsmasq && systemctl start dnsmasq

Install and Configure NTP

yum install -y ntp && systemctl enable ntpd

Have NTP start on system boot and then start NTP

echo "systemctl start ntpd" >> /etc/rc.d/rc.local
chmod +x /etc/rc.d/rc.local
systemctl start ntpd

Download and install the Zenoss repository

rpm -ivh http://get.zenoss.io/yum/zenoss-repo-1-1.x86_64.rpm
yum clean all

Final Reboot

reboot


Installing Zenoss


Once your logged back into the system start installing zenoss

Install the Zenoss-core service and start docker

yum --enablerepo=zenoss-stable install -y zenoss-core-service
systemctl start docker

Add the Btrfs and DNS flags to the Docker startup options

Identify ip for docker

ip addr | grep -A 2 'docker0:' | grep inet

Add the docker startup options.  Change the ip address if needed.  It should match the one from the previous command.

echo 'DOCKER_OPTS="-s btrfs --dns=172.17.42.1"' >> /etc/sysconfig/docker

Change the volume type for application data

You can manually edit the serviced file “/etc/default/serviced” and change the variable “SERVICED_FS_TYPE” from “rsync” to “btrfs” or run the following command.

EXT=$(date +"%j-%H%M%S")
 sudo sed -i.${EXT} \
 -e 's|^#[^S]*\(SERVICED_FS_TYPE=\).*$|\1btrfs|' \
 /etc/default/serviced

Restart docker

systemctl stop docker && systemctl start docker

Start the control center

systemctl start serviced

you can monitor the process with

journalctl -u serviced -f

Serviced has about 5-10 minutes worth of work to do before you’ll be able to login to the Control Center interface.  If the service fails to start, reboot the server.

Setting up name resolution

To setup name resolution on you local computer just add the following line to your “hosts” file.  On Linux and OS X this is located in “/etc/hosts” On Windows machines it is under “\Windows\Sytem32\Drivers\etc\hosts”

192.168.56.101 hostname zenoss5.hostname hbase.hostname opentsdb.hostname rabbitmq.hostname

Be sure to change the IP address and “hostname”  to the IP address and hostname of your server.  You also might need administrative privileges to edit the hosts file.

10

Logging into the Control Center.

Now open up a web browser and go the following URL.  Change the IP address to your servers IP.

https://192.168.56.101

Login with the Zenoss server root username and password.  If you want to setup a user other then root, please refer to the Zenoss Installation guide here.

11

Change the hostname to your Zenoss server hostname12

Select the check boxes in the next two steps.13 14
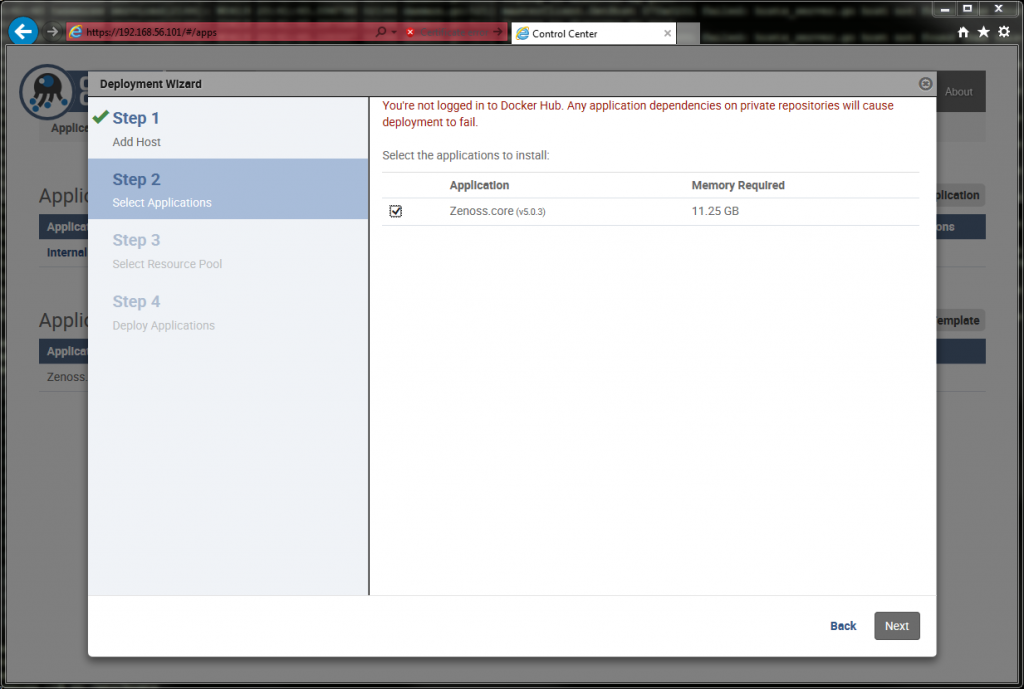
Give it a deployment id and deploy it.15 16
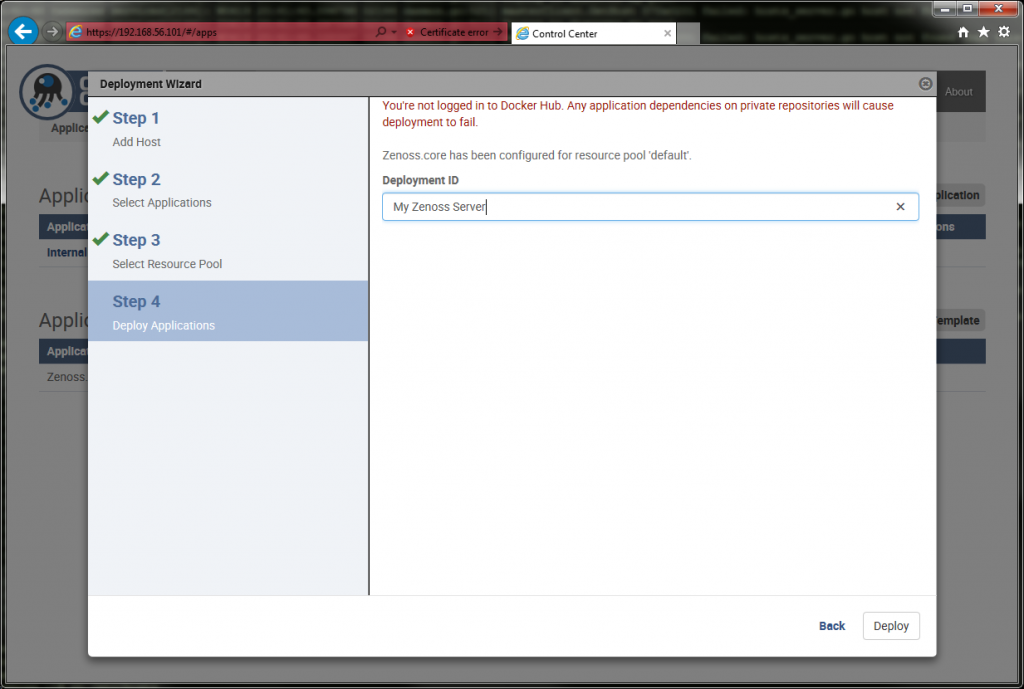
Once it is deployed Make sure that it is started.  Once it finishes go log into Zenoss.  It can take awhile for Zenoss to start up, depending on your hardware, so be patient.

The Direct URL for Zenoss is

https://zenoss5.hostname


How to Install Nagios 4.0.8 on CentOS 6.5

Install the prerequisite packages

yum install gd gd-devel httpd php gcc glibc glibc-common make perl wget

If you want to monitor SNMP you should install net-snmp now

yum install net-snmp net-snmp-utils
service snmpd start
chkconfig snmpd on

Create the Nagios user.

useradd -m nagios
passwd nagios
groupadd nagcmd
usermod -a -G nagcmd nagios
usermod -a -G nagcmd apache

Create a directory to download and build Nagios from

mkdir /root/nagios
cd /root/nagios

Download Nagios and the Nagios plugins

wget http://sourceforge.net/projects/nagios/files/nagios-4.x/nagios-4.0.8/nagios-4.0.8.tar.gz
wget nagios-plugins.org/download/nagios-plugins-2.0.3.tar.gz 

Extract the Nagios zip

tar xvzf nagios-4.0.8.tar.gz
cd nagios-4.0.8

Compile and make it

./configure
make all
make install
make install-init
make install-commandmode
make install-config
make install-webconf

Create a password so you can login to the web interface

htpasswd -c /usr/local/nagios/etc/htpasswd.users nagiosadmin

Enable Nagios on startup

 chkconfig nagios on

Start the service

service nagios start

Install the plugins.

cd ..
tar xvzf nagios-plugins-2.0.2.tar.gz
cd nagios-plugins-2.0.2
./configure
make
make install

Start apache and make sure it starts on boot.

service httpd start
chkconfig httpd on

You should now be able to access Nagios by going to https://nagiosserverip/nagios

If you run into issues check your firewall and make sure SELinux is disabled.

How To Enable/Disable SELinux

Disable SELinux

You can manually edit the SELinux config file in /etc/selinux/config and change the variable SELINUX=enforcing to disabled

vi /etc/selinux/config
...
SELINUX=disabled
...

or you can use this little command

sed -i.bak -e 's/^SELINUX=.*/SELINUX=disabled/g' /etc/selinux/config

Enable SELinux

You can enable SELinux manually the same as above but set SELINUX=disabled to SELINUX=enforcing

vi /etc/selinux/config
...
SELINUX=enforcing
...

or

sed -i.bak -e 's/^SELINUX=.*/SELINUX=enforcing/g' /etc/selinux/config

How To Install Zenoss 4.2.5 on CentOS 6.5

First you need to remove mysql-libs

yum remove mysql-libs

Install wget

yum install -y wget

Download the Zenoss install script archive

wget https://github.com/zenoss/core-autodeploy/tarball/4.2.5 -O auto.tar.gz

Extract the archive

tar zxvf auto.tar.gz

and execute the install script

cd zenoss-core-autodeploy-*
./core-autodeploy.sh

Follow the prompts and when it’s finished navigate to http://yourserverip:8080 to complete the install.

How to View Installed Programs in linux

Debian Based Distros

The below command should work for Debain, Ubuntu, and the Raspberry Pi Raspbian.

dpkg --get-selections


RPM Based Distros

The following works on Fedora, CentOS, ReHat.

rpm -qa


The above commands return all of the packages installed on a system.  If you want to look for a specific program or package you can use grep to filter the results.

rpm -qa | grep program

or

dpkg --get-selections | grep program

Setup SNMP for Ubiquiti Radios

First lets install SNMP.

On Red Hat type systems such as Fedora and CentOS do the following

yum install -y net-snmp net-snmp-utils

If you are using a Debian based distro the you can use apt.

apt-get install snmp

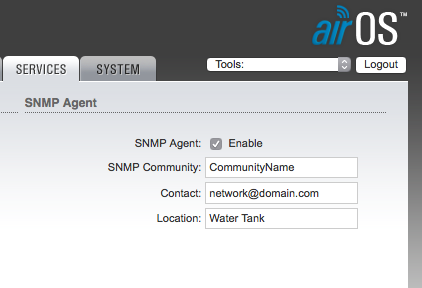
You will need to make sure that SNMP is turned on in the radio under the Services tab.

Be sure to remember the SNMP Community string as that is needed in the next step.

Now try to connect to the device with the following command.

snmpwalk -v1 -c comunityname 192.168.1.20

You should receive something like the following.

...
IF-MIB::ifSpecific.5 = OID: SNMPv2-SMI::zeroDotZero
SNMPv2-MIB::snmpInPkts.0 = Counter32: 484
SNMPv2-MIB::snmpOutPkts.0 = Counter32: 471
SNMPv2-MIB::snmpInBadVersions.0 = Counter32: 0
SNMPv2-MIB::snmpInBadCommunityNames.0 = Counter32: 12
SNMPv2-MIB::snmpInBadCommunityUses.0 = Counter32: 0
...

If you received

Timeout: No Response from 192.168.1.20

Then either the SNMP Community name is wrong or the ip address is unreachable.

The following command will list all the interfaces on the device.

snmpwalk -v1 -c comunityname 192.168.1.20 ifDescr
IF-MIB::ifDescr.1 = STRING: lo
IF-MIB::ifDescr.2 = STRING: eth0
IF-MIB::ifDescr.3 = STRING: eth1
IF-MIB::ifDescr.4 = STRING: wifi0
IF-MIB::ifDescr.5 = STRING: ath0
IF-MIB::ifDescr.6 = STRING: br0

Notice the number at the end of the ifDescr, That number identifies the interface.  You will need that for the next command.

Now lets check the signal. Note that the last number of the OID(the OID is the last string of numbers) is the interface number of ath0.  Yours could be different depending on how you have the radio setup.

snmpwalk -v1 -c communityname 192.168.1.20 1.3.6.1.4.1.14988.1.1.1.1.1.4.5

Here is a short list of OID’s.  To use them just run the above command but replace the OID with the one you want.

RxRate of 5'th interface (ath0) of the device (bps): 1.3.6.1.4.1.14988.1.1.1.1.1.3.5
TxRate of 5'th interface (ath0) of the device (bps): 1.3.6.1.4.1.14988.1.1.1.1.1.2.5
Channel: 1.3.6.1.4.1.14988.1.1.1.1.1.7.5
Firmware Version: 1.2.840.10036.3.1.2.1.4
Hostname: 1.3.6.1.4.1.14988.1.1.1.1.1.5
AP MAC: 1.3.6.1.4.1.14988.1.1.1.1.1.6
Station MAC: 1.2.840.10036.1.1.1.1
Signal 1.3.6.1.4.1.41112.1.4.5.1.5.1 (OID seems to vary a little bit, from nanoBeam to nanoStation)


How to set a static ip address on CentOS, Fedora, or Red Hat Linux

Open up the following file with your favorite text editor. Change eth0 to the interface you need, like “wlan0” or “eth1”.

 vi /etc/sysconfig/network-scripts/ifcfg-eth0

The file should look something like the following.

DEVICE=eth0
HWADDR=0A:2G:F3:56:66:4B
TYPE=Ethernet
UUID=aeh9421c-6a62-712c-886d-347813g8d1dh
ONBOOT=no
NM_CONTROLLED=yes
BOOTPROTO=dhcp

To set the static IP address change “BOOTPROTO=dhcp” to “BOOTPROTO=static” and add the following to the end of the file. If you want/need the interface to come up when the computer boots up then be sure to change “ONBOOT=no” to “ONBOOT=yes”.

BROADCAST=192.168.1.255
DNS1=8.8.8.8
GATEWAY=192.168.1.1
IPADDR=192.168.1.110
NETMASK=255.255.255.0

Also, on some newer versions of CentOS you may need to add NM_DISABLED=no

So your file should now look like this.

DEVICE=eth0
HWADDR=0A:2G:F3:56:66:4B
TYPE=Ethernet
UUID=aeh9421c-6a62-712c-886d-347813g8d1dh
ONBOOT=yes
NM_CONTROLLED=no
BOOTPROTO=static
BROADCAST=192.168.1.255
DNS1=8.8.8.8
GATEWAY=192.168.1.1
IPADDR=192.168.1.110
NETMASK=255.255.255.0

Save the file and restart networking.

service network restart

Finally, check you IP address with ifconfig.

root@localhost ~]# ifconfig eth0
eth0      Link encap:Ethernet  HWaddr 0A:2G:F3:56:66:4B  
          inet addr:192.168.1.110  Bcast:192.168.1.255  Mask:255.255.255.0

How to Install Nagios 4.0.6 on CentOS 6.3

Install the prerequisite packages

yum install gd gd-devel httpd php gcc glibc glibc-common make perl

Create the Nagios user.

useradd -m nagios
passwd nagios
groupadd nagcmd
usermod -a -G nagcmd nagios
usermod -a -G nagcmd apache

Create a directory to download and build Nagios from

mkdir /root/nagios
cd /root/nagios

Download Nagios and the Nagios plugins

wget downloads.sourceforge.net/project/nagios/nagios-4.x/nagios-4.0.6/nagios-4.0.6.tar.gz
wget nagios-plugins.org/download/nagios-plugins-2.0.2.tar.gz 

Extract the Nagios zip

 tar xvzf nagios-4.0.6.tar.gz
cd nagios-4.0.6

Compile and make it

./configure
make all
make install-init
make install-commandmode
make install-config
make install-webconf

Create a password so you can login to the web interface

htpasswd -c /usr/local/nagios/etc/htpasswd.users nagiosadmin

Enable Nagios on startup

 chkconfig nagios on

Start the service

service nagios start

Install the plugins.

cd ..
tar xvzf nagios-plugins-2.0.2.tar.gz
cd nagios-plugins-2.0.2
./configure
make
make install

Start apache and make sure it starts on boot.

service httpd start
chkconfig httpd on