Troubleshooting Backup Errors on WHM / cPanel

Below are some helpful locations of files, logs etc for troubleshooting backup errors on WHM

WHM backup logs
Change date to the correct date. Should be one log per day or I guess every time a backup runs.

/usr/local/cpanel/logs/cpbackup/{date}.log

View WHM backup config

cat /var/cpanel/backups/config

View WHM remote destination config(s)
Replace *** with the appropriate name.

cat /var/cpanel/backups/***.backup_destination

Rysnc.pm file

May need to modify this file to increase time out limits if you are having issues with time out errors for backups.

/usr/local/cpanel/Cpanel/Transport/Files/Rsync.pm

This link has some more info https://forums.cpanel.net/threads/what-commands-does-cpanel-run-over-ssh-to-do-rsync-backups.671777/

Unable to prune transport Rsync Incremental Backup – WHM/cPanel

For some reason I keep getting an alert about the transport failing to prune the incremental backups. Shows “ssh slave failed: timed out”

Going to the backup server shows that the directories have been pruned. This makes the alert a bit confusing.

It appears that others are experiencing the same problem.

https://forums.cpanel.net/threads/remote-incremental-backups-timeouts.606911/page-3

https://forums.cpanel.net/threads/error-pruning-ssh-slave-failed-timed-out.627691/

You can check the backup log to see if it gives you any errors or ideas on what the problem is. Replace {currentdate} with the date of the log file you want.

/usr/local/cpanel/logs/cpbackup/{currentdate}.log

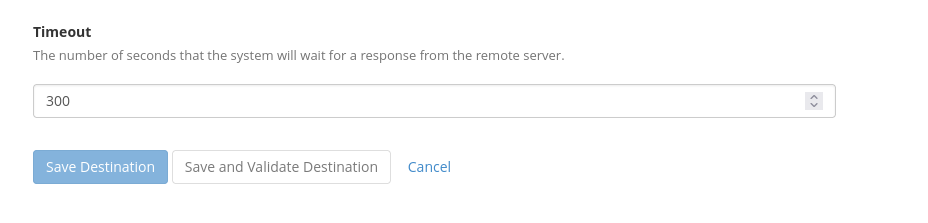
One thing to try is to increase the time out on the

In WHM, go to Backup -> Backup Configuration -> Additional Destinations -> Your Destination
Scroll down to the bottom and enter a higher timeout value

Setting cPanel remote transport timeout

One user said they patched the rsync.pm file. Looks like there may be a 30 second timeout for rsync, so maybe increasing that would help.

/usr/local/cpanel/Cpanel/Transport/Files/Rsync.pm

Set coolbits value on Fedora Linux

You sometimes need to set the coolbits value to overclock your GPU on Linux

You’ll need to install nvidia-xconfig

sudo dnf install nvidia-xconfig

Then you can set the cool bits value with the following command. Change 24 to the appropriate cool bits value. Refer to the link below.

sudo nvidia-xconfig --cool-bits=28

It’ll create a new xorg config file. Reboot to take advantage of cool bits being enabled.

Multiple GPUs

If you have multiple GPUs, you will need to do the following to enable cool bits on each GPU.

sudo nvidia-xconfig -a --cool-bits=28 --allow-empty-initial-configuration

https://wiki.archlinux.org/title/NVIDIA/Tips_and_tricks#Enabling_overclocking

How to setup a Chia Harvester on Windows

The following instructions are for setting up a Windows computer as a Chia Harvester.

Prerequisites

Before we get started you will need the following

  1. Have a current Chia farmer
  2. You will need the \ca folder from your main farmer.
  3. IP address of your Chia farmer

The ca folder should be located in

%homepath%\.chia\mainnet\config\ssl\

You should be able to copy and paste the above in File Explorer. Copy the ca folder to a USB drive or share it via a network share.

Setting up harvester

  1. Copy the ca folder to an easily accessible place on your harvester
  2. Install Chia from https://www.chia.net/download/
  3. Close chia
  4. Open PowerShell and paste the cfollowing commands in. Change the sections in bold to reflect your settings/options
cd $env:APPDATA..\local\chia-blockchain\app-1.2.5\resources\app.asar.unpacked\daemon
.\chia.exe init -c D:\ca\
.\chia.exe stop all
.\chia.exe configure --set-farmer-peer 192.168.188.2:8447
.\chia.exe configure --enable-upnp false
.\chia.exe plots add -d D:\   
.\chia.exe start harvester -r

Check the main Farmer to verify the Harvester connected.

LibreNMS Error Running ./validate.php – Database: incorrect column…

LibreNMS error while running ./validate.php

Recently I started getting the following error while running ./validate.php.

$ sudo -u librenms ./validate.php
====================================
Component | Version
--------- | -------
LibreNMS  | 21.8.0-41-g0a76ca4
DB Schema | 2021_08_26_093522_config_value_to_medium_text (217)
PHP       | 7.4.20
Python    | 3.6.8
MySQL     | 10.5.10-MariaDB
RRDTool   | 1.4.8
SNMP      | NET-SNMP 5.7.2
====================================

[OK]    Composer Version: 2.1.6
[OK]    Dependencies up-to-date.
[OK]    Database connection successful
[FAIL]  Database: incorrect column (notifications/datetime)
[FAIL]  Database: incorrect column (users/created_at)
[FAIL]  We have detected that your database schema may be wrong, please report the following to us on Discord (https://t.libren.ms/discord) or the community site (https://t.libren.ms/5gscd):
        [FIX]:
        Run the following SQL statements to fix.
        SQL Statements:
         SET TIME_ZONE='+00:00';
         ALTER TABLE `notifications` CHANGE `datetime` `datetime` timestamp NOT NULL DEFAULT '1970-01-02 00:00:00' ;
         ALTER TABLE `users` CHANGE `created_at` `created_at` timestamp NOT NULL DEFAULT '1970-01-02 00:00:01' ;

Reading online it sounds like some of the recent changes are causing the issue. Looks fairly easy to resolve though.

First we’ll need to get a MySQL prompt. We’ll do that by running

mysql -u librenms -p librenms

It’ll ask use for the librenms user’s mysql password.

Once we have the MySQL prompt we can just copy and paste the commands in.

SET TIME_ZONE='+00:00';
ALTER TABLE `notifications` CHANGE `datetime` `datetime` timestamp NOT NULL DEFAULT '1970-01-02 00:00:00' ;
ALTER TABLE `users` CHANGE `created_at` `created_at` timestamp NOT NULL DEFAULT '1970-01-02 00:00:01' ;

Type ‘quit’ to exit MySQL and lets run the validate script again.

sudo -u librenms ./validate.php

Everything should check out OK.

Unity – Rotate Player by Dragging Finger on Screen

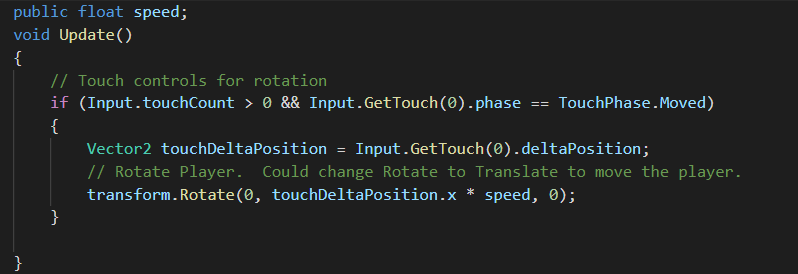
C# Code for rotating a player in Unity by swiping on the screen.

This is actually really simple to do. Create a script called PlayerRotation or something, then put in the following code.

 
 public float speed;
 void Update()
    {
        // Touch controls for rotation
        if (Input.touchCount > 0 && Input.GetTouch(0).phase == TouchPhase.Moved)
        {
            Vector2 touchDeltaPosition = Input.GetTouch(0).deltaPosition;
            // Rotate Player.  Could change Rotate to Translate to move the player.
            transform.Rotate(0, touchDeltaPosition.x * speed, 0);
   

    }

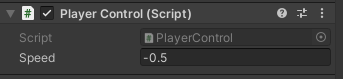
Assign the Script to the player and specify the speed in the Unity Inspector. The public float speed variable will increase or decrease how fast you rotate around. You can also set it to a negative number to rotate the opposite direction you drag with your finger.

Unity speed of rotation for player.

How To Install MadMAx Plotter on Ubuntu 20.04

Flexpool has some excellent steps on how to get started and also on installing MadMAx

https://www.flexpool.io/get-started/xch/XCH-CLI?primaryServer=xch-us-west.flexpool.io

The one caveat is that on Ubuntu 20.04 you’ll need to install cmake

sudo apt install cmake

Then you can install and run MadMAx with

git clone https://github.com/madMAx43v3r/chia-plotter 
cd chia-plotter 
git submodule update --init 
bash make_release.sh 
sudo mv build/chia_plot /usr/bin

Now you can create a plot by running the chia_plot command.

chia_plot -n 1 -t /path/to/tmp/ -d /chia/destination -c p2singletonaddressorpoolcontractaddress -f biglongfarmerpublickey

Note that if you are plotting on a harvester that the p2 singleton or the pool contract address does not have to be on the harvester system. You can grab it off the main node and then use the address on the machine plotting.

Upgrade to the latest version of Chia on Ubuntu

https://github.com/Chia-Network/chia-blockchain/wiki/INSTALL#ubuntudebian

While upgrading Chia on Linux is not as simple as on Windows, it is still relatively easy.

First we need to stop the Chia service

Open up a terminal, navigate to the chia-blockchain folder, and stop the services

cd chia-blockchain
. ./activate
chia stop -d all
deactivate

Now we will need to download the latest files using git.

git fetch
git checkout latest
git reset --hard FETCH_HEAD

Now that we have the latest files, we can install the new version.

sh install.sh
. ./activate
chia init

Upgrade GUI

Upgrading the GUI is similar to the above process. Should be able to copy and paste the following commands.

cd chia-blockchain-gui
git fetch
cd ..
chmod +x ./install-gui.sh
./install-gui.sh
cd chia-blockchain-gui
npm run electron &

The last command will launch Chia GUI.

Simple SH Ping script to scan a /24

This is a very simple ping script I created to run on a remote UniFi device to scan for other IP addresses on it’s network. It works on SH environments as well as Bash.

Paste the script in a ping.sh file and then

chmod +x ping.sh

run like so, replacing 192.168.1. with the IP range you want to scan.

sh ping.sh 192.168.1.

#!/bin/sh
# simple ping scan utility

# i.e. 192.168.0.
ipFirstPart=$1

ip=0
while [ $ip -ne 255 ] 
do 
  ip=$(($ip+1))
  ping -w1 $ipFirstPart${ip} | grep "64 bytes from"
done