This could potentially be a number of issues. But Windows can show this error if you have any VPNs running that have the “Kill Switch” enabled. You can either add the local range as an exception, or not enable the Kill Switch.

This could potentially be a number of issues. But Windows can show this error if you have any VPNs running that have the “Kill Switch” enabled. You can either add the local range as an exception, or not enable the Kill Switch.
vty stands for Virtual Teletype. What is Teletype?
The teletype, or teleprinter, is a device used for communicating text over telegraph lines, public switched telephone network, Telex, radio, or satellite links.
Wikipedia explanation of teletype
https://en.wikipedia.org/wiki/Teleprinter
This means vty is essentially like a virtual computer screen plugged into the router that we can remotely access.
Both SSH and Telnet use this virtual monitor to let you see the router/switch.
The command
line vty 0 4
Configures 5 of these virtual teletypes (vty’s) for us to use. Can think of it having 5 monitors connected to the router. When you SSH to it, you are claiming one of these monitors. Cisco devices support up to a maximum of 16. 0-15
Here is a list of default administrative distances.
| Route Source | Default Administrative Distance |
| Connected Route | 0 |
| Static Route | 1 |
| eBGP | 20 |
| EIGRP | 90 |
| OSPF | 110 |
| RIP | 120 |
| iBGP | 200 |
The following is some basic info on STP and RSTP. This list is not comprehensive. Refer to the link at the bottom of the page for more in depth details.
Default Priority is 32768 + VLAN ID
For example, if we are using vlan 10, then our default priority is 32768 + 10 = 32778
RSTP Priority can be set from 0 – 61440 in increments of 4096.
Ports can fill 1 of 4 roles.
| Port Role | Description |
| Root Port | Port closest to the Root Bridge (Switches going to the Root switch) |
| Designated Port | Ports going away from the Root Bridge (To clients) |
| Alternate Port | A “backup” port for the Root port. If the Root Port fails, this port takes over |
| Backup Port | Essentially a backup port for the designated port |
A port can be in one of 3 states. Well technically 4 states if you include down/unplugged.
| Port State | Description |
| Discarding | Port discards packets (Alternate and Backup Ports) |
| Learning | Port learns MACs and doesn’t forward data |
| Forwarding | Port forwards data and learns MACs |
There are 3 port Types. Not to be confused with port States or Roles.
| Port Type | Description |
| Point to Point | Switch to Switch |
| Point to Point Edge | Edge of Network. Connected to a PC, Printer etc. |
| Shared | Half Duplex, Port connected to a Hub |
There are three RSTP timers. STP has the same timers, but the MaxAge is 10 seconds, and the Forward Delay is used for both Learning and Listening states which takes a total of 30 seconds to complete.
| Timer Name | Default Value | Description |
| Hello Timer | 2 Seconds | Time between Hellos created by Root |
| MaxAge | 6 Seconds (Hello Timer * 3) | How long a Switch should wait before trying to readjust the network |
| Forward Delay | 15 Seconds | Delay used for Learning/Listening in STP. Shouldn’t be necessary if legacy bridges are not used. |
There are technically two types of cost. The newer cost values were introduced so we could use faster ethernet speeds.
By default Cisco switches use the old cost values, but they can be changed to use the new ones.
spanning-tree pathcost method long
| Ethernet Speed | Old Cost | New Cost |
| 10 Mbps | 100 | 2,000,000 |
| 100 Mbps | 19 | 200,000 |
| 1 Gbps | 4 | 20,000 |
| 10 Gbps | 2 | 2000 |
| 100 Gbps | N/A | 200 |
| 1 Tbps | N/A | 20 |
More information can be found at the following link.
https://www.cisco.com/c/en/us/support/docs/lan-switching/spanning-tree-protocol/24062-146.html
After a recent update, the named service stopped working. When manually trying to restart the service it would just fail.
Running the named-checkconf command
sudo /usr/bin/named-checkconf -z /etc/named.conf
Returned the following error.
/etc/named.conf:37: option 'dnssec-enable' no longer exists
Looks like what happened is they removed the dnssec-option, but enabled it by default
The dnssec-enable option has been obsoleted and no longer has any effect. DNSSEC responses are always enabled if signatures and other DNSSEC data are present. [GL #866]
https://bind9.readthedocs.io/en/v9_16/notes.html#id118
So the option is invalid now and not needed.
To fix the issue, simply open up the /etc/named.conf file and delete the line that has ‘dnssec-enable’
Authentication, Authorization, and Accounting or AAA is an framework that allows access to a computer network/resource,
Authentication identifies the user. It’s from the Greek authentikos “real, genuine”. We can think of it as proving the identity of the user. Bob sits down at the computer and types in his password (Something he knows) and confirms that he is in fact Bob.
Authorization is the privileges that the user has to the system. For instance, Bob is now authenticated to the computer, but he may only be authorized to access email and a web browser.
Authorization and Authentication can get confusing. In simple terms
Accounting is the auditing or logging arm of AAA. It is for answering the 5 Ws Who did what, when, where, and how. For instance, accounting could log that Bob checked his email at 9:30AM, Improved his mind by reading posts on incredigeek.com for a couple hours, then checked email again before shutting the computer down.
Hopefully that is a short helpful explanation of AAA. For more information, check out the following links.
https://afteracademy.com/blog/authentication-vs-authorization/
This error can show up on Windows if you have already copied a file with the same name. To fix the issue, just copy it to a file with a different name. Change cap.pcap to cap1.pcap and so forth as needed.
scp user@192.168.1.20:/tmp/tcp.pcap .\cap1.pcap
First we’ll need to ssh into the device
ssh ubnt@192.168.1.20
Next lets open up the config file
vi /tmp/system.cfg
Now search for vlan and replace the vlan id with the appropriate number
In VI you can search by hitting / and then type in vlan
After you have changed all the vlan ids, save the file with esc, wq, enter.
Now we can save the config with
cfgmtd -f /tmp/system.cfg -w && reboot
In the post, we’ll be adding a custom OID for a Ubiquiti Solar Charge Controller.
Check out the following post if you are trying to add a Ubiquiti Solar Charge controller graph to LibreNMS. Otherwise you may need to do some googling around looking for the OID.
Go to your device -> Settings(Little Gear) -> Custom OID -> +Add New OID
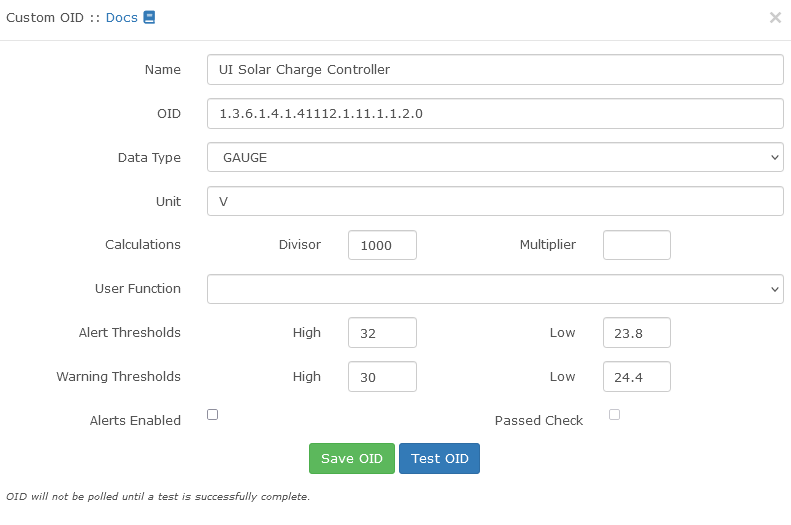
Couple notes about the information.
– There needs to be a 0 after the end of the OID.
– Data Type needs to be Gauge, Not Counter. A gauge can go up and down. A counter just counts up.
Hit “Test OID” and you should get a little notification saying it got a value for the OID. In this case 25572.

Now Hit “Save OID”
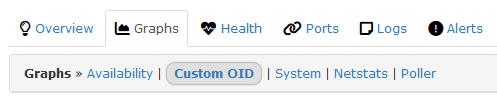
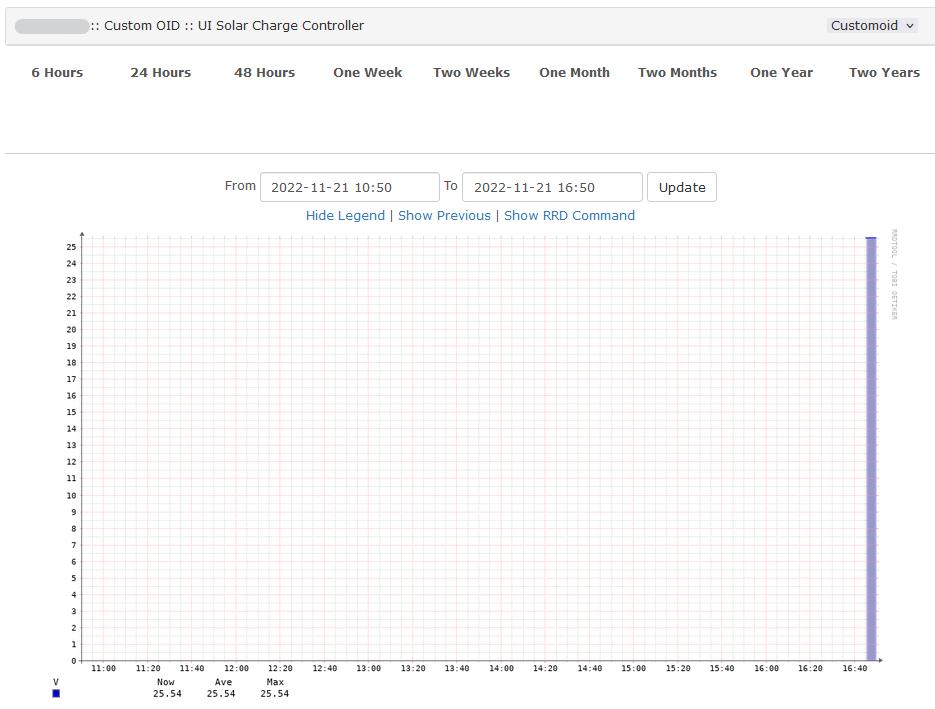
Now LibreNMS should start graphing our Custom OID. You may need to give it a minute to start showing data.
The graphs show up under Graphs -> Custom OID
Here is a list of OIDs for Ubiquiti’s solar charge controller. You can download the
Top interesting ones are
snmptranslate -Pu -Tz -m ./UBNT-MIB:./UBNT-SUNMAX-MIB
"org"                   "1.3"
"dod"                   "1.3.6"
"internet"                      "1.3.6.1"
"directory"                     "1.3.6.1.1"
"mgmt"                  "1.3.6.1.2"
"mib-2"                 "1.3.6.1.2.1"
"transmission"                  "1.3.6.1.2.1.10"
"experimental"                  "1.3.6.1.3"
"private"                       "1.3.6.1.4"
"enterprises"                   "1.3.6.1.4.1"
"ubnt"                  "1.3.6.1.4.1.41112"
"ubntMIB"                       "1.3.6.1.4.1.41112.1"
"ubntORTable"                   "1.3.6.1.4.1.41112.1.1"
"ubntOREntry"                   "1.3.6.1.4.1.41112.1.1.1"
"ubntORIndex"                   "1.3.6.1.4.1.41112.1.1.1.1"
"ubntORID"                      "1.3.6.1.4.1.41112.1.1.1.2"
"ubntORDescr"                   "1.3.6.1.4.1.41112.1.1.1.3"
"ubntSnmpInfo"                  "1.3.6.1.4.1.41112.1.2"
"ubntSnmpGroups"                        "1.3.6.1.4.1.41112.1.2.1"
"ubntORInfoGroup"                       "1.3.6.1.4.1.41112.1.2.1.1"
"ubntORCompliance"                      "1.3.6.1.4.1.41112.1.2.1.2"
"ubntAirosGroups"                       "1.3.6.1.4.1.41112.1.2.2"
"ubntAirFiberGroups"                    "1.3.6.1.4.1.41112.1.2.3"
"ubntEdgeMaxGroups"                     "1.3.6.1.4.1.41112.1.2.4"
"ubntUniFiGroups"                       "1.3.6.1.4.1.41112.1.2.5"
"ubntAirVisionGroups"                   "1.3.6.1.4.1.41112.1.2.6"
"ubntMFiGroups"                 "1.3.6.1.4.1.41112.1.2.7"
"ubntUniTelGroups"                      "1.3.6.1.4.1.41112.1.2.8"
"ubntAFLTUGroups"                       "1.3.6.1.4.1.41112.1.2.9"
"ubntSunMaxGroups"                      "1.3.6.1.4.1.41112.1.2.10"
"sunMaxCompliances"                     "1.3.6.1.4.1.41112.1.2.10.1"
"sunMaxGroups"                  "1.3.6.1.4.1.41112.1.2.10.2"
"ubntAirFIBER"                  "1.3.6.1.4.1.41112.1.3"
"ubntEdgeMax"                   "1.3.6.1.4.1.41112.1.5"
"ubntUniFi"                     "1.3.6.1.4.1.41112.1.6"
"ubntAirVision"                 "1.3.6.1.4.1.41112.1.7"
"ubntMFi"                       "1.3.6.1.4.1.41112.1.8"
"ubntUniTel"                    "1.3.6.1.4.1.41112.1.9"
"ubntAFLTU"                     "1.3.6.1.4.1.41112.1.10"
"ubntSunMax"                    "1.3.6.1.4.1.41112.1.11"
"sunMaxMIB"                     "1.3.6.1.4.1.41112.1.11.1"
"sunMaxBatteryStats"                    "1.3.6.1.4.1.41112.1.11.1.1"
"sunMaxBatCurrent"                      "1.3.6.1.4.1.41112.1.11.1.1.1"
"sunMaxBatVoltage"                      "1.3.6.1.4.1.41112.1.11.1.1.2"
"sunMaxBatPower"                        "1.3.6.1.4.1.41112.1.11.1.1.3"
"sunMaxBatTemp"                 "1.3.6.1.4.1.41112.1.11.1.1.4"
"sunMaxPvPanelStats"                    "1.3.6.1.4.1.41112.1.11.1.2"
"sunMaxPVCurrent"                       "1.3.6.1.4.1.41112.1.11.1.2.1"
"sunMaxPVVoltage"                       "1.3.6.1.4.1.41112.1.11.1.2.2"
"sunMaxPVPower"                 "1.3.6.1.4.1.41112.1.11.1.2.3"
"sunMaxOutPutStats"                     "1.3.6.1.4.1.41112.1.11.1.3"
"sunMaxOutCurrent"                      "1.3.6.1.4.1.41112.1.11.1.3.1"
"sunMaxOutVoltage"                      "1.3.6.1.4.1.41112.1.11.1.3.2"
"sunMaxOutPower"                        "1.3.6.1.4.1.41112.1.11.1.3.3"
"security"                      "1.3.6.1.5"
"snmpV2"                        "1.3.6.1.6"
"snmpDomains"                   "1.3.6.1.6.1"
"snmpProxys"                    "1.3.6.1.6.2"
"snmpModules"                   "1.3.6.1.6.3"
"zeroDotZero"                   "0.0"
We can get the battery voltage from the controller with the following SNMP walk command. Change the community “ubnt” to your SNMP community.
snmpwalk -c ubnt -v2c 10.96.1.9 1.3.6.1.4.1.41112.1.11.1.1.2
Return value is
SNMPv2-SMI::enterprises.41112.1.11.1.1.2.0 = INTEGER: 24990
You may need to add a zero if you are trying to add the OID in LibreNMS for a custom OID.