Ansible “PlayContext” error for RouterOS Community Collection

The following error is due to PlayContext being removed from ansible-core.

https://github.com/ansible-collections/ansible.netcommon/issues/541

"msg": "'PlayContext' object has no attribute 'verbosity'"

This can be fixed by updating the Ansible Collection.

You can list your current collections with

ansible-galaxy collection list

You may have multiple duplicates for different versions of Python and for local and system paths. I.e., /usr/lib/python3 and ~/.local/lib/python3

We can upgrade the collection with the following command.

ansible-galaxy collection install community.routeros --upgrade

How to “Lock” docker version on RHEL / RockyLinux / AlmaLinux

Sometimes it can be helpful to have a specific docker version that doesn’t change with a dnf update. To manually set the docker version, do the following.

Install dnf versionlock

dnf install 'dnf-command(versionlock)'

Next, lock the version for Docker and the Docker CLI.

dnf versionlock add docker-ce-3:27.5.0 docker-ce-cli-1:27.5.0

If you need to downgrade docker, you can do that with the following.

dnf downgrade docker-ce-3:27.5.0 docker-ce-cli-1:27.5.0

That should be it. If you want to check and see what packages are locked, run

dnf versionlock list

Example output:

Last metadata expiration check: 0:01:39 ago on Tue 08 Apr 2025 01:01:10 AM UTC.
docker-ce-3:27.5.0-1.el9.*
docker-ce-cli-1:27.5.0-1.el9.*

Changing Ubiquiti Radio password from Command Line

Most configuration changes to Ubiquiti radios can be done on the command line by modifing them in /tmp/system.cfg and then applying the configuration. The device password is a little more complicated. The password is in the system.cfg config file, but it is hashed. To change the password, we must change the password via ssh, then update the config password hash to match the hash in /etc/passwd.

We’ll cover two ways to update the password for a Ubiquiti radio. The first method uses the UBNTMOD script. The second shows a more hands on approach.

Method 1: Using the UBNTMOD script.

Download the UBNTMOD script and make it executable.

wget http://incredigeek.com/home/downloads/ubntmod/ubntmod.sh
chmod u+x ubntmod.sh
./ubntmod.sh -y 'ubnt,ubnt' -p 'newpassword' -i 192.168.1.20 -z

-y is the current username and password pair
-p is the new password
-i is the radio IP
-z saves the changes without rebooting.

Method 2: Changing password over SSH

To change the password we need to:

  • SSH to the radio
  • Change the current password with passwd
  • Copy the hash from /etc/passwd to /tmp/system.cfg
  • Save changes with /usr/etc/rc.d/rc.softrestart save

SSH into radio

ssh ubnt@192.168.1.20

Change the Password with passwd

passwd is the default utility to change the password for a user. Simply run passwd and follow the prompts

Example:

XW.v6.1.12# passwd
Changing password for ubnt
New password: <-- Enter password here
Retype password: <-- Reenter password here
Password for ubnt changed by ubnt
XW.v6.1.12# 

ℹ️Once you change the password with passwd, the password will change, but it wont be permanently saved until we copy the hash and then apply the change.

Copy Password hash to system.cfg

We can get the new password hash with

cat /etc/passwd

Example output:

admin:$1$QESek5FH$FUPpzbPbAvf0NUbYyJMj21:0:0:Administrator:/etc/persistent:/bin/sh

The section between the first and second colon, i.e., the two dots, “:”, is our hashed password. This is what we need to copy into the system.cfg config.

Edit the config file

vi /tmp/system.cfg

Find the line that starts with users.1.password= and replace everything after the equals sign with our new hash. For example:

users.1.password=$1$QESek5FH$FUPpzbPbAvf0NUbYyJMj21

ℹ️VI can be a little tricky to deal with, you can hit i, to enter insert mode, delete everything after the =, and then right click with your mouse to paste in the password hash.

Apply the new Password Permanently

Save the changes with /usr/etc/rc.d/rc.softrestart save command.

XW.v6.1.12# /usr/etc/rc.d/rc.softrestart save 
--- /tmp/.running.cfg.919
+++ /tmp/.system.cfg.919
@@ -81,7 +81,7 @@
system.cfg.version=65546
system.eirp.status=disabled
users.1.name=ubnt
-users.1.password=$1$5FJMj2H$FbkP6UAb8yvfES0NUbPpzbQ <- Old Password Hash
+users.1.password=$1$QESek5FH$FUPpzbPbAvf0NUbYyJMj21 <- New Password Hash
users.1.status=enabled
users.status=enabled
wireless.1.addmtikie=enabled
Fast users script build Success.
Fixup Startup_list …Done.
XW.v6.1.12#

ℹ️Your existing ssh connection should stay connected which can be handy if something did not work correctly. Launch another terminal, or log in the web interface, to verify that the new password works.

How to Fix UISP “Application is loading. 1 min remaining…” Again… fluentd Error

There is an issue upgrading to UISP version 2.4.188 on Ubuntu 22.04. If you manually run an update from the command line, you’ll receive an error stating:

Error response from daemon: unknown log opt 'fluentd-async-connect' for fluentd log driver
ERROR: Failed to start Postgres DB.
UISP install script failed. Attempting rollback…
Restoring previous configuration

The Resolution

To fix the problem, we can do one of two things:

  1. Downgrade Docker.
  2. Change fluentd-async-connect to fluentd-async in docker-compose files.

The commands are taken from the comments in the following link.

https://community.ui.com/releases/UISP-Application-2-4-188/dee1603c-9f36-413c-aad6-cd6a9fc68258?page=2

Downgrade Docker

Use apt to downgrade Docker.

sudo apt install docker-ce=5:27.5.1-1~ubuntu.22.04~jammy docker-ce-cli=5:27.5.1-1~ubuntu.22.04~jammy docker-ce-rootless-extras=5:27.5.1-1~ubuntu.22.04~jammy

After Docker is downgraded, you can manually run the update again.

sudo ~unms/app/unms-cli update

Modify Docker Compose File

All we need to do is replace fluentd-async-connect with fluentd-async in the docker-compose file in the unms user directory. We can do this with sed.

sudo sed -i.orig 's/fluentd-async-connect/fluentd-async/g' ~unms/app/docker-compose.yml
sudo sed -i.orig 's/fluentd-async-connect/fluentd-async/g' ~unms/app/docker-compose.yml.template

After we run both sed commands, start or update UISP.

sudo ~unms/app/unms-cli update

Email Account Sending out spam while Suspended – cPanel

When you suspend an account in cPanel, the users password, in “/home/ACCOUNT/etc/DOMAIN.com/shadow”, gets two exclamation marks prepended to the password hash. This means that the hash of a password from a user trying to login will not match what is in the shadow file effectively blocking the login.

Screenshot showing cPanel email account suspended.

However, there is an option that allows an admin to sign into all email accounts for a domain. The option is in WHM and called “Mail authentication via domain owner password”. It is under “Tweak Settings -> Mail”.

Screenshot showing Mail authentication via domain owner password setting.

If this option is enabled, then the admin, or an attacker that has compromised the admin password, can continue to login and send mail as a user.

A lot of email spam attacks appear to be automated. So if the admin password was weak and some hacker is using it to send spam, there is a good chance they don’t know it is the admin password. They just want to send out emails. Update the admin password, check and make sure the system is secure and monitor.

How to Check the Uptime and RouterOS version on the Mikrotik Command Line

Check uptime and RouterOS version

The system uptime is displayed in the system resources output.

/system/resource/print

Example Output:

                   uptime: 1w2d10h2m52s        <-- Uptime
                  version: 7.17 (stable)       <-- RouterOS version
               build-time: 2025-01-10 11:30:08
              free-memory: 21.1MiB
             total-memory: 64.0MiB
                      cpu: MIPS 24Kc V7.4
                cpu-count: 1
            cpu-frequency: 400MHz
                 cpu-load: 16%
           free-hdd-space: 45.2MiB
          total-hdd-space: 64.0MiB
  write-sect-since-reboot: 631
         write-sect-total: 486250
               bad-blocks: 0%
        architecture-name: mipsbe
               board-name: RB750GL
                 platform: MikroTik

Check RouterOS Firmware version

We can check the firmware version by running the following command.

/system/routerboard/print

Example output:

       routerboard: yes
             model: RB750GL
     serial-number: XXXXXXXXXXXX
     firmware-type: ar7240
  factory-firmware: 3.29
  current-firmware: 7.17
  upgrade-firmware: 7.17

If there is a line that says ;;; Firmware upgraded successfully, please reboot for changes to take effect!, then the firmware has been updated at some point and the router needs a reboot to apply it. Remember you need to update both the RouterOS version and the firmware version when upgrading.

How to Fix UISP “Application is loading. 1 min remaining…”

After a recent update, UISP may have stopped working.

If we run sudo ~unms/app/unms-cli status, we receive the following error:

WARN[0000] /home/unms/app/docker-compose.yml: the attribute version is obsolete, it will be ignored, please remove it to avoid potential confusion
Error response from daemon: Container 174b07e5e39d311a326c69497f1b2e1ae0eedcb067c9dada6e546ab556aad371 is restarting, wait until the container is running

It appears that there is a bug upgrading to 2.4.155.
https://community.ui.com/questions/UISP-v2-4-143-and-v2-4-155-UISP-Fails-to-start-Geomagnetism-date-comparison-BUG/0cb32012-9afb-41d4-9f37-6a9ba94c4c36

The Fix

To fix the issue, manually update from the command line again.

sudo ~unms/app/unms-cli update

Collecting Logs

There are a couple ways to check logs. We can view docker logs for specific containers using

docker logs unms

We can collect all of the logs with

sudo tar -cvjSf /tmp/uisp-logs.tar.bz2 /home/unms/data/logs

If you receive an error about bzip2 not being found, either install it sudo apt install bzip2 or change tar to tar -cvz

This will put all the logs in /tmp. You can download them with scp, sftp, winscp or something.

https://help.ui.com/hc/en-us/articles/115015690107-UISP-How-to-Find-Logs-Report-Bugs

Enable SNMP v3 on Dell iDRAC9

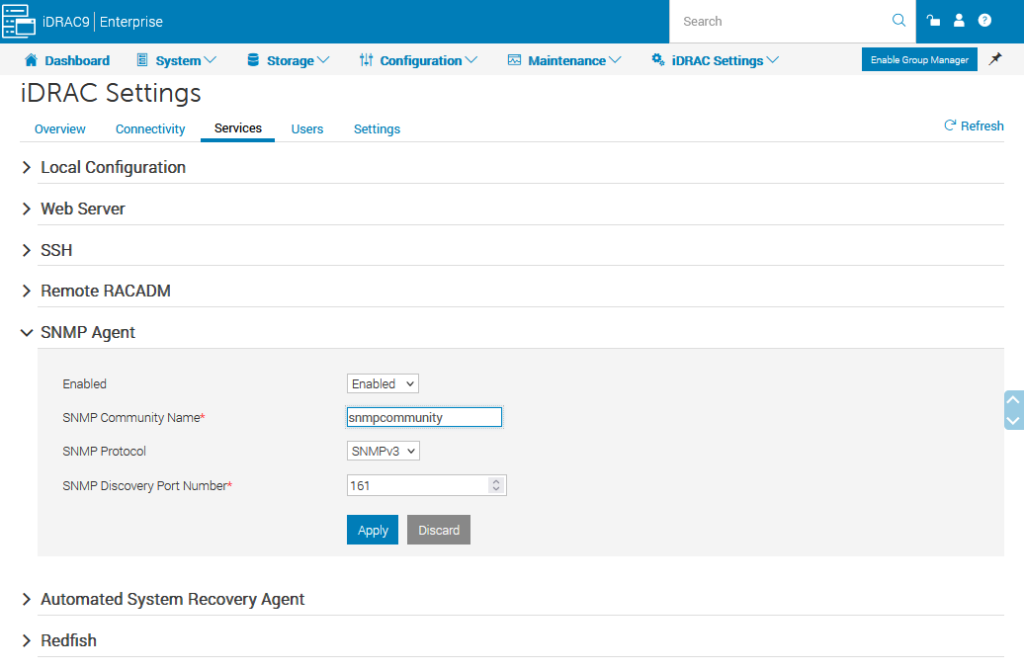
First go to iDRAC Settings > Services > SNMP Agent.

  • Change you SNMP Community Name. (This is not used for SNMPv3)
  • Enable SNMPv3.

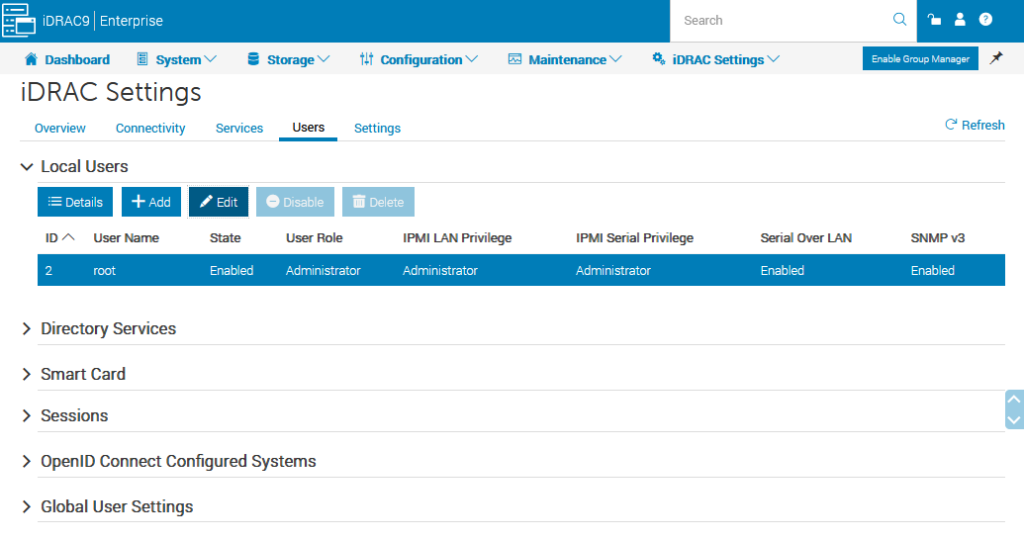
Next go to iDRAC Settings > Users.

Edit the current user, or create a new user. Scroll down to SNMP V3 Settings.

  • Change SNMP v3 to Enabled.
  • Enable Passphrase.
  • Set Authentication and Privacy Passphrases.
  • Save.

Add your iDRAC to your monitoring software. You can verify everything works from a Linux machine that has the SNMP utils installed.

snmpwalk -v3 -a SHA1 -A "snmpv3userpass" -x AES -X "snmpv3userpass" -l authPriv -u root 192.168.1.100

How to Update Dell PowerEdge iDrac9

Log in to the iDrac. Go to Maintenance > System Update > Manual Update

Change the Location Type to HTTPS

Check “Use Default Address” This will populate the HTTPS Address with downloads.dell.com.

Click on Test network connection on the right hand side. If it succeeds, scroll down and click “Check for Update”

It will check for updates and give you an option to select and apply them.